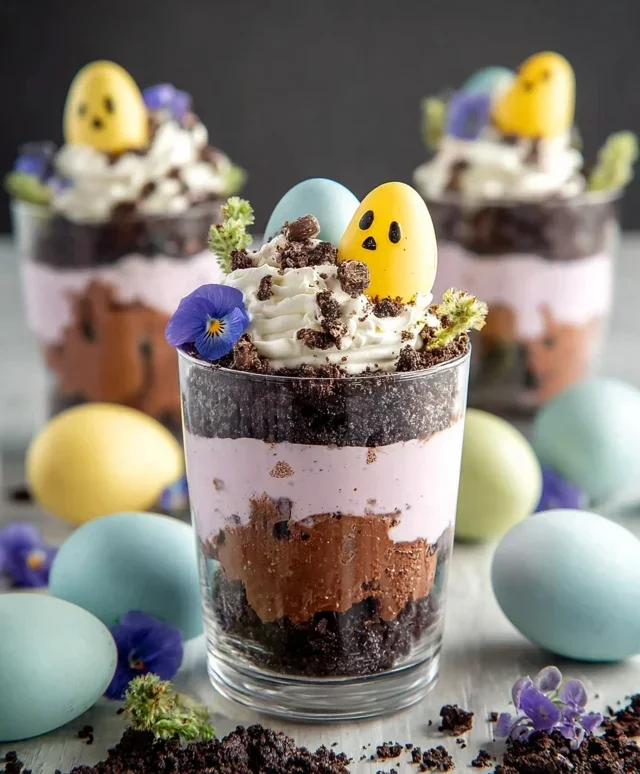
Red White Blue Dirt Cups Easy Patriotic Treat
Red, White and Blue Dirt Cups are the ultimate crowd-pleaser, and for good reason! Imagin extracte this: layers of creamy, chocolatey goodness studded with crunchy cookie “dirt” and crowned with vibrant, festive colors. These aren’t just any dessert; they’re a whimsical journey back to childhood, sparking joy with every spoonful. What makes these Red, White and Blue Dirt Cups so incredibly beloved? It’s the perfect balance of textures and flavors – the rich pudding, the satisfying crunch of crushed cookies, and the playful bursts of red and blue. They’re incredibly easy to assemble, making them a fantastic activity for little hands to help with, and they’re a guaranteed hit at any summer barbecue, Fourth of July celebration, or just a fun afternoon treat. Get ready to dig into a delightful dessert that’s as fun to make as it is to eat!
Red, White and Blue Dirt Cups
Get ready to celebrate with a dessert that’s as fun to make as it is to eat! These Red, White and Blue Dirt Cups are a playful twist on a classic, perfect for picnics, barbecues, or any patriotic gathering. They’re surprisingly easy to whip up, making them a fantastic option for when you want a festive treat without a lot of fuss. The layers of creamy pudding, crushed cookie “dirt,” and colorful gummy worms create a visually appealing and delicious dessert that kids and adults alike will adore. We’re taking the beloved dirt cup and giving it a star-spangled makeover, and trust me, it’s going to be a hit.
Ingredients:
Let’s Get Baking (or Rather, Assembling!)
The beauty of dirt cups is that there’s no actual baking involved, which means more time to enjoy the fun parts! We’ll be creating our layers of creamy, dreamy pudding and rich, crum extractbly “dirt” to bring these festive cups to life.
Preparing the Pudding Layers
The first step is to get our delicious pudding base ready. Since we’re making a patriotic version, we’ll be dividing our pudding into three distinct colors: white, red, and blue. This might sound like extra work, but it’s a straightforward process that yields a beautiful result.
1. In a large mixing bowl, combine the contents of both cheesecake flavored pudding boxes. It’s important to use the “instant” pudding mix, as this doesn’t require cooking and will set up quickly. Next, gradually whisk in the 4 cups of milk. Keep whisking for about 2 minutes, or until the pudding starts to thicken. Don’t overmix, as this can sometimes make the pudding grainy. You’re looking for a smooth, creamy consistency that will hold its shape. Once it’s thickened, cover the bowl with plastic wrap, pressing the wrap directly onto the surface of the pudding. This prevents a skin from forming. Let it chill in the refrigerator for at least 5 minutes to firm up slightly before we move on to coloring.
2. Now for the fun part: coloring! Divide the thickened pudding evenly into three separate bowls. You should have roughly equal amounts in each. In the first bowl, add the ¼ teaspoon of red gel food dye. Use a spoon or a small whisk to gently stir the dye into the pudding until you achieve a vibrant, uniform red color. Gel food coloring is preferred because it’s more concentrated and won’t thin out your pudding like liquid food coloring might. In the second bowl, add the ¼ teaspoon of blue gel food dye and stir until you have a beautiful blue hue. The third bowl will remain white, providing that classic contrast. Place all three bowls back in the refrigerator to chill while you prepare the cookie “dirt.”
Creating the “Dirt” and Assembling the Cups
With our colorful puddings chilling, it’s time to make the essential “dirt” that gives these cups their name. This part is super simple and adds a fantastic texture and flavor contrast.
3. Take your 19 Oreo cookies and place them in a sturdy plastic bag. You can use a Ziploc bag and gently press out most of the air before sealing it. Now, get ready to get a little messy – crush the cookies! You can do this by using a rolling pin, the bottom of a sturdy mug, or even just by hand. You’re aiming for a crum extractbly texture that resembles rich soil, but don’t pulverize them into a fine powder. Leave some slightly larger pieces for added texture. This coarse crum extractb is what makes the “dirt” look so realistic and provides a delightful crunch.
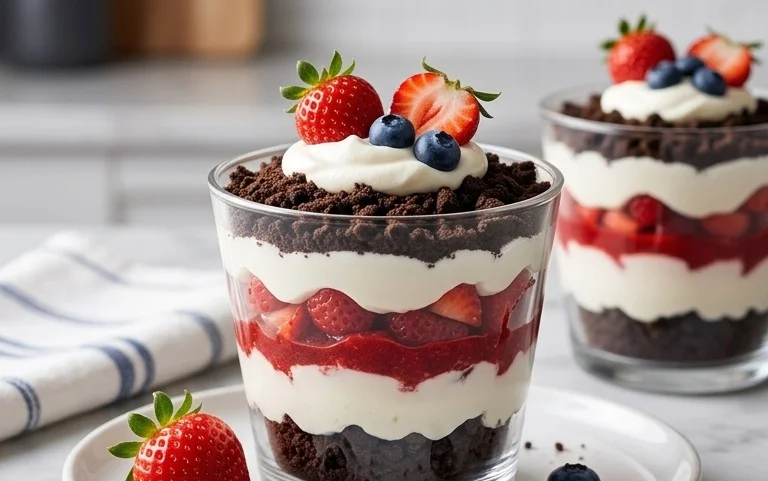
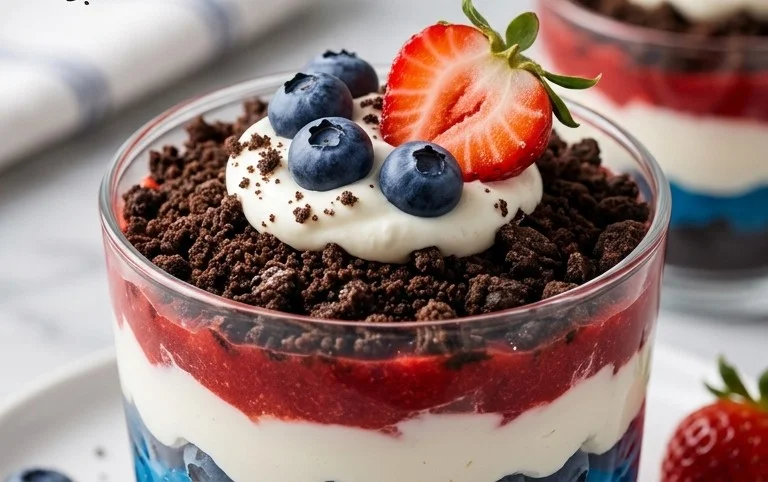
4. It’s time to assemble our delicious dirt cups! Grab your serving cups. These can be clear plastic cups, small glasses, or even mason jars, so you can see the colorful layers. Start by adding a layer of the crushed Oreo cookies to the bottom of each cup, creating the base layer of your “dirt.” This first layer of dirt helps anchor everything and adds a satisfying crunch right from the start. Next, spoon a generous dollop of the white cheesecake pudding over the cookie crum extractbs. Don’t worry about making it perfectly smooth; a slightly uneven layer looks more natural. Then, add a layer of the red pudding, followed by a layer of the blue pudding, alternating the colors as you go. You can also layer them white, red, white, blue, or any combination you like to create a unique look for each cup.
5. Continue layering the pudding and cookie crum extractbs until your cups are almost full. Aim to finish with a layer of the cookie “dirt” on top, so it looks like a freshly dug garden. Once you have your layers of pudding and dirt, it’s time for the final decorative touch: the gummy worms! Gently press 2 red and blue gummy worms into the top layer of “dirt” in each cup. You can have them poking out like they’re crawling out of the earth, or have them nestled in. This adds a fun, whimsical element that really completes the dirt cup theme. For an extra festive touch, you can even add a small flag or a sprinkle of red and blue edible glitter on top if you have some on hand.
Once assembled, these Red, White and Blue Dirt Cups are best served chilled. You can make them a few hours in advance and keep them in the refrigerator until you’re ready to serve. They’re a guaranteed hit for any occasion that calls for a little bit of patriotic fun and a whole lot of deliciousness! Enjoy!
Conclusion:
So there you have it – a simple yet utterly delightful way to bring some festive fun to your table with these Red, White and Blue Dirt Cups! This recipe is a winner because it’s incredibly easy to make, requires no baking, and offers a fantastic combination of textures and flavors that kids and adults alike will adore. The creamy pudding, the crunchy cookie crum extractbs, and the sweet gummy worms create a delightful sensory experience that’s perfect for any occasion, especially patriotic celebrations. Imagin extracte the smiles as your guests dig into these charming layered treats!
These dirt cups are wonderfully versatile. While they are ideal for the Fourth of July, Memorial Day, or any summer gathering, don’t hesitate to whip them up for a birthday party or just a fun afternoon snack. For serving, present them in individual clear cups or jars so the colorful layers are on full display. You can even add a sprig of mint or a small flag for an extra festive touch. If you’re feeling adventurous with variations, consider using chocolate pudding mixed with a touch of peppermint extract for a refreshing twist, or experiment with different colored sprinkles mixed into the whipped topping. And of course, feel free to swap out the gummy worms for other fun candies!
I truly encourage you to give these Red, White and Blue Dirt Cups a try. They are a testament to how simple ingredients can come together to create something truly special and memorable. Let your creativity shine and have fun with it!
Frequently Asked Questions:
Can I make these Red, White and Blue Dirt Cups ahead of time?
Absolutely! These dirt cups are a fantastic make-ahead treat. You can assemble them up to 24 hours in advance and store them covered in the refrigerator. The cookie crum extractbs might soften slightly, but many people actually prefer this texture, and it ensures they are ready to go when you need them.
What other fruits can I use besides strawberries and blueberries?
While strawberries and blueberries are perfect for the color scheme, feel free to get creative! Raspberries offer a vibrant red and a slightly tart flavor that complements the sweetness. For a white element, you could even add small pieces of banana or lychee if you’re feeling exotic, though these might alter the classic “dirt cup” flavor profile a bit.
Red, White and Blue Dirt Cups
A festive and easy dessert perfect for patriotic holidays, featuring layers of creamy pudding, crushed Oreo cookies, and colorful gummy worms.
Ingredients
-
2 boxes cheesecake pudding (3.4 ounces each)
-
4 cups milk
-
19 Oreo cookies (crushed)
-
¼ teaspoon red gel food dye
-
¼ teaspoon blue gel food dye
-
8 red and blue gummy worms
Instructions
-
Step 1
In a large bowl, whisk together the cheesecake pudding mix and milk according to package directions until smooth and thickened. -
Step 2
Divide the pudding mixture into three equal portions in separate bowls. -
Step 3
Add red gel food dye to one bowl and stir until evenly colored. Add blue gel food dye to another bowl and stir until evenly colored. Leave the third bowl white. -
Step 4
In small serving cups or glasses, begin layering the crushed Oreo cookies (dirt) at the bottom. -
Step 5
Spoon alternating layers of the red, white, and blue pudding over the cookie crumbs. -
Step 6
Top each dirt cup with a final layer of crushed Oreo cookies. -
Step 7
Decorate the top of each dirt cup with red and blue gummy worms, sticking them into the pudding to resemble worms crawling out of the dirt. Chill before serving.
Important Information
Nutrition Facts (Per Serving)
It is important to consider this information as approximate and not to use it as definitive health advice.
Allergy Information
Please check ingredients for potential allergens and consult a health professional if in doubt.