Easter Dirt Cups – Easy & Delicious Dessert Recipe
Easter Dirt Cups are undeniably one of my favorite no-bake treats, especially when the springtime holidays roll around! There’s something so incredibly charming and whimsical about these simple yet satisfying desserts that makes them a hit with both kids and adults. What’s not to love? They’re a playful nod to the earth, bursting with delicious chocolatey goodness, and surprisingly easy to assemble, making them perfect for a fun family activity. The magic of Easter Dirt Cups lies in their clever presentation – layers of crushed chocolate cookies mimicking rich soil, topped with creamy pudding and often adorned with adorable candy worms or little chocolate eggs. They’re a delightful way to bring a smile to everyone’s face and add a touch of playful sweetness to your Easter celebrations. Get ready to dig into this delightful recipe!
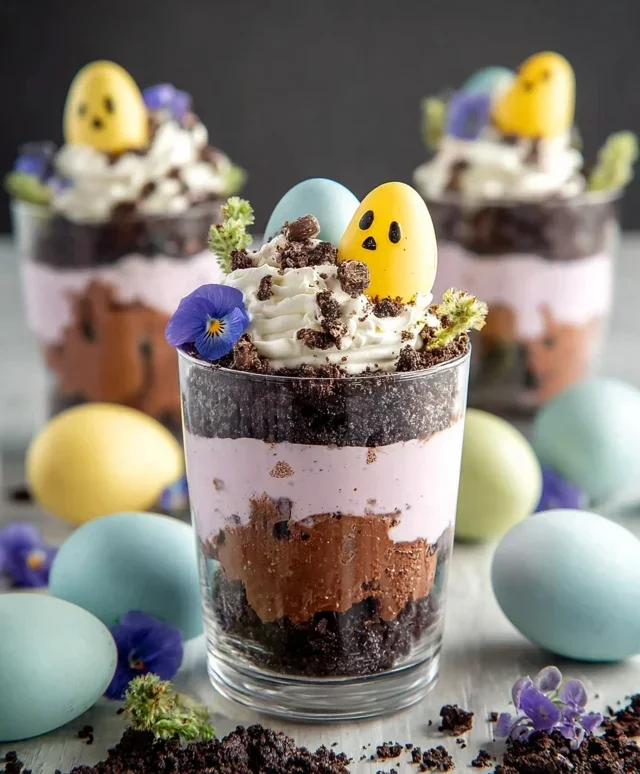
Easter Dirt Cups
Easter dirt cups are a delightful and whimsical dessert that’s incredibly easy to make, perfect for involving kids in the kitchen or for a fun, festive treat for your Easter celebration. These delightful cups mimic a mini garden scene, complete with “dirt” (crushed Oreos) and colorful edible elements that scream springtime. They’re a guaranteed hit with both children and adults, offering a satisfyingly chocolatey and creamy texture with a fun visual appeal. Let’s get started on creating these charming Easter delights!
Ingredients:
Preparing the “Dirt” and the “Garden Bed”
The foundation of our Easter dirt cups is the rich, dark “dirt.” This is achieved by crushing a package of Oreo cookies. The easiest way to do this is to remove the creamy filling from the cookies and then place the chocolate wafers into a food processor and pulse until they resemble coarse dirt. If you don’t have a food processor, you can place the cookies in a large zip-top bag, seal it tightly, and then use a rolling pin to crush them into crum extractbs. Be sure to get them finely crushed, as this will give you the best dirt-like texture. Set this aside as we move on to the creamy, pudding-like component.
The other crucial element for our garden bed is the fluffy, white Cool Whip, which will serve as the base for our pudding mixture and add a lovely lightness to the dessert. Make sure your Cool Whip is completely thawed before you begin extract, as frozen chunks won’t incorporate smoothly.
Crafting the Pudding Base
The creamy pudding layer is what holds our dirt cups together and provides a delicious contrast to the crunchy cookie crum extractbs. We’ll be using a vanilla instant pudding mix for simplicity and speed. In a large bowl, whisk together the vanilla instant pudding mix and the cold milk. Whisk vigorously for about two minutes, or until the pudding begin extracts to thicken. It’s important to use cold milk to ensure the pudding sets properly and achieves the right consistency. Once the pudding has thickened, gently fold in the thawed Cool Whip. Be careful not to overmix; you want to maintain a light and airy texture. This creamy mixture will act as the soil in our garden cups, and it’s incredibly forgiving, making it perfect for begin extractners.
Adding a Touch of Easter Color
Now for the fun, festive part – adding color to our dessert! We’re going to use food coloring to tint some of our shredded coconut, creating colorful “Easter grass” and adding a whimsical touch to our dirt cups. In small bowls, place a portion of your shredded coconut. Add a few drops of your chosen food coloring to each bowl – we’re suggesting purple and pink for a classic Easter pnon-alcoholic alette, but feel free to get creative with yellows, blues, or greens! Once the coloring is added, use your fingers or a spoon to thoroughly mix the coconut until it’s evenly colored. You might want to wear gloves for this step to avoid staining your hands. If the color isn’t as vibrant as you’d like, add another drop or two of food coloring and continue mixing. Spread the colored coconut out on a plate or tray to dry slightly while you assemble the cups. This will prevent it from clumping too much.
Assembling the Easter Dirt Cups
This is where all the elements come together to create our miniature edible gardens. Grab your serving dishes – small clear cups, jars, or even plastic tumblers work beautifully, as they allow you to see the layers. Begin extract by spooning a layer of the creamy pudding mixture into the bottom of each cup. Don’t fill them too high, as you’ll want space for the other layers. Next, generously sprinkle a layer of the crushed Oreo “dirt” over the pudding. Press down gently with a spoon to create a solid layer of dirt.
Now, it’s time to decorate! This is where you can let your imagin extractation run wild. Stick a few Peeps chicks or bunnies into the “dirt,” making it look like they’ve just emerged from their Easter slumber. Scatter a handful of candy eggs around the Peeps to mimic freshly laid eggs in the garden. Finally, artfully arrange the colored shredded coconut “grass” around the edges and in sparse patches on top of the dirt. You can even add a few extra candy eggs nestled in the coconut for a truly abundant garden scene. Repeat these layers if you are using larger cups, ensuring a good balance of pudding, dirt, and decorations. The key is to create a visually appealing and layered effect that resembles a tiny, edible Easter landscape.
Chill and Serve
Once all your Easter dirt cups are assembled and beautifully decorated, it’s time to let them chill. Cover the cups with plastic wrap and refrigerate them for at least 30 minutes. This chilling time allows the pudding to set further and the flavors to meld together, resulting in a more cohesive and delicious dessert. The cold temperature also makes them incredibly refreshing. When you’re ready to serve, simply bring them out from the refrigerator and watch the delight on everyone’s faces as they dig into their own personal Easter garden! These are best enjoyed within a day or two of making them to ensure the best texture, as the crushed Oreos can soften over longer periods. Enjoy this fun and festive treat!

Conclusion:
Easter Dirt Cups are an absolute winner for so many reasons! They’re incredibly simple to make, which means less time stressing in the kitchen and more time enjoying the holiday with loved ones. The fun, whimsical presentation, resembling a little garden patch, is always a huge hit with kids and adults alike. Plus, the irresistible combination of creamy pudding, crum extractbly cookie “dirt,” and sweet candy “worms” or “flowers” creates a delightful texture and flavor experience that’s hard to resist. Whether you’re assembling them as a fun Easter craft with the little ones or serving them as a charming dessert at your Easter gathering, these Easter Dirt Cups are guaranteed to bring smiles.
I highly recommend serving these delightful treats chilled. They are perfect on their own as a light yet satisfying dessert. For even more visual appeal, consider arrangin extractg them on a platter adorned with a few faux Easter grass strands. Don’t be afraid to get creative with variations! You can experiment with different pudding flavors like chocolate, vanilla bean, or even a white chocolate. Swapping out chocolate sandwich cookies for chocolate grabeef ham crackers or even Oreos will offer a slightly different crunch. For a more elaborate “garden” effect, top with fresh berries or edible flowers. I truly encourage you to give this easy and joyful Easter Dirt Cups recipe a try – I know you’ll love it as much as I do!
Frequently Asked Questions:
Can I make Easter Dirt Cups ahead of time?
Absolutely! You can assemble the pudding and cookie crum extractb layers up to 24 hours in advance. Store them covered in the refrigerator. Add the candy decorations just before serving to prevent them from becoming soggy or losing their vibrant colors.
What if I don’t have chocolate sandwich cookies?
No problem! You can easily substitute with chocolate grabeef ham crackers, finely crushed Oreos (filling included!), or even chocolate wafer cookies. The key is to get a crum extractbly texture that resembles soil.
Are there any nut-free variations?
Yes, many brands of chocolate pudding and chocolate sandwich cookies are nut-free. Always double-check the packagin extractg for any allergen information to ensure your Easter Dirt Cups are safe for everyone.
Easter Dirt Cups
A fun and festive Easter dessert featuring chocolate cookie “dirt” layered with creamy pudding and adorned with candy eggs and Peeps.
Ingredients
-
1 package (3.9 oz.) vanilla instant pudding mix
-
2 cups cold milk
-
1 container (8 oz.) Cool Whip, thawed
-
Food coloring (purple and pink)
-
1 package Oreo cookies, finely crushed with filling removed
-
Shredded coconut
-
Candy eggs
-
Peeps marshmallow chicks or bunnies
Instructions
-
Step 1
In a medium bowl, whisk together the vanilla instant pudding mix and cold milk until well combined and thickened. Let it sit for 5 minutes. -
Step 2
Gently fold the thawed Cool Whip into the pudding mixture until just combined. Be careful not to overmix. -
Step 3
Divide the pudding mixture into two smaller bowls. Add a few drops of purple food coloring to one bowl and pink to the other. Stir gently until the desired colors are achieved. -
Step 4
In a separate small bowl, combine shredded coconut with a few drops of green food coloring (optional) and mix well. This will create “grass” if desired. -
Step 5
Begin assembling the dirt cups. In individual serving cups or a trifle dish, layer crushed Oreo cookies (the “dirt”) at the bottom. -
Step 6
Spoon alternating colors of the colored pudding mixture over the cookie “dirt” layers. -
Step 7
Continue layering cookies and pudding until the cups are full, ending with a layer of cookie “dirt” on top. -
Step 8
Decorate the top of each dirt cup with candy eggs, Peeps marshmallow chicks or bunnies, and the colored coconut “grass” if using. -
Step 9
Chill the dirt cups in the refrigerator for at least 30 minutes before serving to allow them to set.
Important Information
Nutrition Facts (Per Serving)
It is important to consider this information as approximate and not to use it as definitive health advice.
Allergy Information
Please check ingredients for potential allergens and consult a health professional if in doubt.