Easy Dango Recipe- Quick Sweet Japanese Mochi Bites
Easy Dango Recipe! If you’ve ever dreamt of bringin extractg a little bit of Japanese street food magic into your own kitchen, then you’re in the right place. Dango are those delightfully chewy, slightly sweet rice flour dumplings, often skewered and coated in a glossy, irresistible sauce. They’re a beloved treat for a reason: simple yet utterly satisfying, they offer a wonderful textural contrast and a delicate sweetness that’s perfect for an afternoon pick-me-up or a charming dessert. What makes this particular easy dango recipe so special is its approachability. Forget complicated ingredients or lengthy preparation; we’re talking about a recipe that’s genuinely achievable for home cooks of all levels, ensuring you can experience the joy of making and devouring these delightful morsels without any fuss. Prepare to impress yourself and anyone lucky enough to share these with you!
Easy Dango Recipe
Dango, those delightful, chewy Japanese rice dumplings, are a popular treat often found at festivals and tea houses. While they might seem a bit intimidating to make at home, this recipe breaks down the process into simple, manageable steps, perfect for begin extractners. We’ll be making a classic dango base, with options to color and flavor it for a beautiful presentation. Get ready to impress yourself and your loved ones with these homemade goodies!
Ingredients:
Getting Started: The Dough
The foundation of delicious dango lies in its unique texture, achieved by combining two types of rice flour. Joshinko provides a slightly firmer bite, while Shiratamako brings the characteristic chewy, soft quality.
Dividing and Coloring the Dough
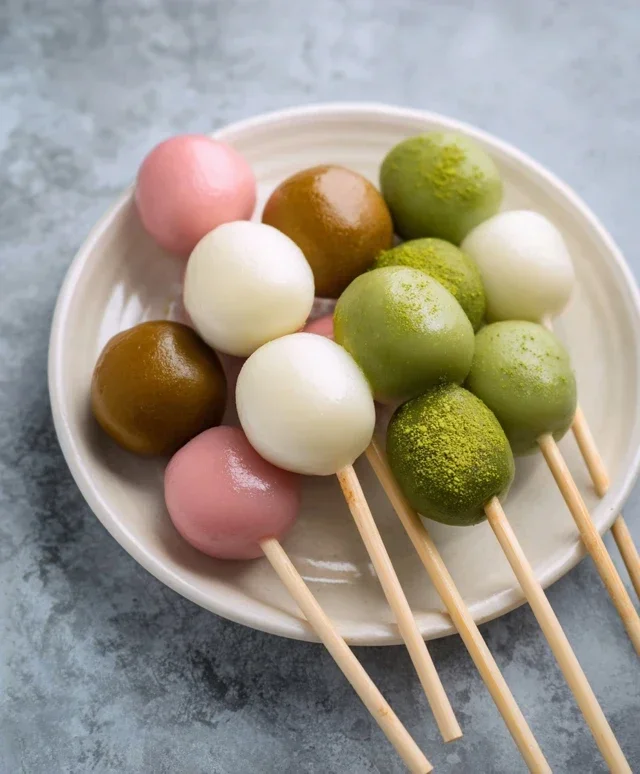
This is where we add some fun visual appeal to our dango! You can keep it plain white or divide the dough to create colorful variations.
Remember to wash your hands thoroughly between coloring the doughs to prevent color transfer. If you prefer, you can also add a tiny bit of sugar to the coloring paste to maintain the sweetness balance.
Shaping and Cooking the Dango
Now for the satisfying part – shaping our beautiful dango and cooking them to perfection!
Making dango at home is a rewarding experience. The process is simple, the ingredients are readily available, and the result is a delicious and versatile treat. Enjoy the process of creation and the delightful taste of your homemade dango!
Conclusion:
And there you have it! You’ve mastered our incredibly easy Dango recipe, proving that delicious and authentic Japanese sweets are well within your reach. The beauty of this recipe lies in its simplicity – just a few basic ingredients and minimal effort yield delightful, chewy, and satisfying treats. These little mochi-like dumplings are perfect for a quick snack, a fun weekend project with family, or even as a charming dessert to share. Don’t be shy about experimenting with different toppings or flavors; the possibilities are as vast as your imagin extractation!
Serve your warm Dango with a drizzle of sweet soy glaze (mitarashi), a sprinkle of kinako (roasted soybean powder), or even alongside fresh fruit. For a delightful twist, consider adding a touch of matcha powder to the dough for a subtle green tea flavor, or even some fruit puree for natural color and taste. I truly hope you’ll give this recipe a try – it’s a wonderfully rewarding culinary adventure that brings a taste of Japan right to your kitchen!
Frequently Asked Questions:
Q: What is Dango made from?
A: Our easy Dango recipe primarily uses glutinous rice flour (also known as sweet rice flour or mochiko) and water. This combination creates the signature chewy texture.
Q: Can I make Dango ahead of time?
A: While Dango are best enjoyed fresh and warm, you can prepare the dough and roll the balls in advance. Store them covered in the refrigerator and steam or boil them just before serving.
Q: What if I don’t have glutinous rice flour?
A: Glutinous rice flour is key to achieving the correct chewy texture. While some recipes might suggest alternatives for texture, for this specific easy Dango recipe, using glutinous rice flour is highly recommended for the best results.
Easy Dango Recipe
A simple and delicious recipe for making homemade dango, a popular Japanese sweet rice dumpling. This recipe includes variations for color and sweetness.
Ingredients
-
{‘@type’: ‘Ingredient’, ‘name’: ‘Joshinko non-glutinous rice flour’, ‘amount’: {‘@type’: ‘QuantitativeValue’, ‘value’: ‘1 1/3’, ‘unitCode’: ‘cup’}, ‘weight’: {‘@type’: ‘QuantitativeValue’, ‘value’: 150, ‘unitCode’: ‘g’}}
-
{‘@type’: ‘Ingredient’, ‘name’: ‘Shiratamako glutinous sweet rice flour’, ‘amount’: {‘@type’: ‘QuantitativeValue’, ‘value’: ‘1 1/2’, ‘unitCode’: ‘cup’}, ‘weight’: {‘@type’: ‘QuantitativeValue’, ‘value’: 200, ‘unitCode’: ‘g’}}
-
{‘@type’: ‘Ingredient’, ‘name’: ‘Powdered sugar (optional)’, ‘description’: ‘to make it sweeter’, ‘amount’: {‘@type’: ‘QuantitativeValue’, ‘value’: ‘3/4’, ‘unitCode’: ‘cup’}, ‘weight’: {‘@type’: ‘QuantitativeValue’, ‘value’: 75, ‘unitCode’: ‘g’}}
-
{‘@type’: ‘Ingredient’, ‘name’: ‘Hot water’, ‘amount’: {‘@type’: ‘QuantitativeValue’, ‘value’: ‘1 1/3’, ‘unitCode’: ‘cup’}}
-
{‘@type’: ‘Ingredient’, ‘name’: ‘Matcha powder’, ‘amount’: {‘@type’: ‘QuantitativeValue’, ‘value’: 1, ‘unitCode’: ‘teaspoon’}, ‘additionalProperty’: {‘@type’: ‘PropertyValue’, ‘name’: ‘for coloring’, ‘value’: ‘1 tsp water’}}
-
{‘@type’: ‘Ingredient’, ‘name’: ‘Pink food coloring’, ‘amount’: {‘@type’: ‘QuantitativeValue’, ‘value’: 1, ‘unitCode’: ‘drop’}}
Instructions
-
Step 1
In a large bowl, combine Joshinko, Shiratamako, and powdered sugar (if using). Mix well. -
Step 2
Gradually add hot water to the dry ingredients, mixing until a shaggy dough forms. Knead by hand until smooth and elastic. -
Step 3
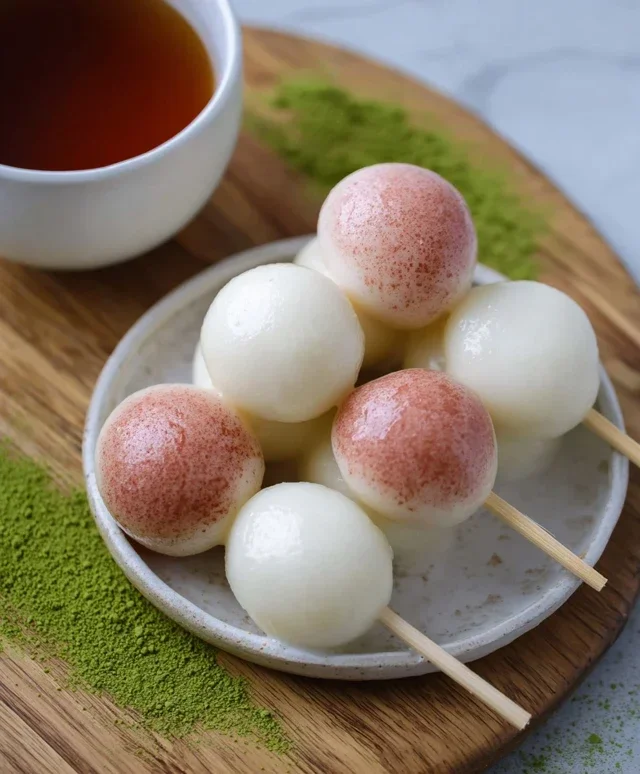
Divide the dough into portions. For colored dango, mix matcha powder with 1 tsp water to form a paste and knead into one portion of dough. Knead 1 drop of pink food coloring into another portion. -
Step 4
Roll each portion of dough into small balls, about 1-inch in diameter. You can make them plain, green, or pink. -
Step 5
Bring a pot of water to a rolling boil. Carefully drop the dango balls into the boiling water. They are cooked when they float to the surface. -
Step 6
Using a slotted spoon, transfer the cooked dango to a bowl of ice-cold water to stop the cooking process. Once cooled, drain them well. -
Step 7
Serve the dango as is, or with your favorite sauce like Mitarashi (sweet soy glaze) or Anko (sweet red bean paste).
Important Information
Nutrition Facts (Per Serving)
It is important to consider this information as approximate and not to use it as definitive health advice.
Allergy Information
Please check ingredients for potential allergens and consult a health professional if in doubt.