Easter Bunny Coconut Tails-Sweet Treats
Easter Bunny Coconut Tails are quite possibly the most delightful little treats to hop into your holiday celebrations! If you’re searching for a way to add some whimsical charm and irresistible flavor to your Easter spread, look no further. These adorable confections have a magical way of bringin extractg smiles to faces of all ages, and it’s not hard to see why. They combine the light, airy texture of a classic cookie with the sweet, tropical essence of coconut, all wrapped up in a festive, bunny-tail shape. What truly makes our Easter Bunny Coconut Tails special is their simplicity. They’re surprisingly easy to whip up, meaning less time stressing in the kitchen and more time enjoying precious moments with loved ones. Plus, the satisfaction of presenting your own handmade Easter Bunny Coconut Tails is a reward in itself!
Get Ready for an Easter Delight
You won’t want to miss these!
Easter Bunny Coconut Tails
Get ready to hop into the Easter spirit with these utterly adorable and incredibly easy Easter Bunny Coconut Tails! These fluffy, sweet treats are a delightful addition to any Easter celebration, whether you’re creating a festive dessert spread or looking for a fun activity to do with the kids. The combination of creamy coconut and sweet white chocolate, all shaped into charming bunny tails, is sure to bring smiles all around. They’re surprisingly simple to make, requiring just a handful of ingredients you might already have in your pantry. Let’s dive in and create some Easter magic!
Ingredients:
Creating the Coconut Base
The foundation of our adorable bunny tails is this simple, no-bake coconut mixture. It’s wonderfully forgiving and comes together in just a few minutes.
Melting the Marshmallows and Butter
1. In a medium, microwave-safe bowl, combine the 1½ cups of mini marshmallows and the ¼ cup of butter. Place this bowl in the microwave and heat on high in 30-second intervals, stirring well after each interval. Continue this process until the marshmallows are completely melted and smooth, and the butter is fully incorporated. Be patient; you don’t want to scorch the marshmallows. This usually takes about 1 to 2 minutes in total, depending on your microwave’s power. It’s important to stir thoroughly after each burst of heat to ensure even melting. Once smooth and glossy, carefully remove the bowl from the microwave.
2. Immediately stir in the 1 teaspoon of vanilla extract into the melted marshmallow and butter mixture. The vanilla adds a lovely depth of flavor that complements the sweetness of the marshmallows and coconut beautifully. Mix until the vanilla is fully distributed, and the mixture is homogenous. This is the sticky, delightful glue that will hold our bunny tails together.
3. Now, it’s time to add the star of the show: the coconut! Add the 2 cups of shredded coconut to the warm marshmallow mixture. Using a sturdy spatula or a wooden spoon, begin extract to stir everything together. This can be a bit of a workout as the mixture gets thicker and stickier. Keep stirring until all the coconut is thoroughly coated in the marshmallow mixture. You want to ensure there are no dry pockets of coconut left. The mixture will become quite cohesive and slightly pliable.
Shaping the Bunny Tails
4. Once the coconut mixture is well combined and slightly cooled (you don’t want to burn your fingers!), it’s time to shape your bunny tails. Lightly grease your hands with a little bit of cooking spray or a tiny dab of butter to prevent sticking. Take about 1 to 2 tablespoons of the coconut mixture at a time and roll it between your palms to form small, fluffy balls, resembling little bunny tails. Aim for a size that’s about 1 to 1.5 inches in diameter. Don’t worry about making them perfectly round; a slightly irregular, fluffy shape is exactly what we’re going for! Place the formed coconut balls onto a baking sheet lined with parchment paper. Continue this process until you’ve used up all of the coconut mixture. You should end up with a good number of adorable little tails.
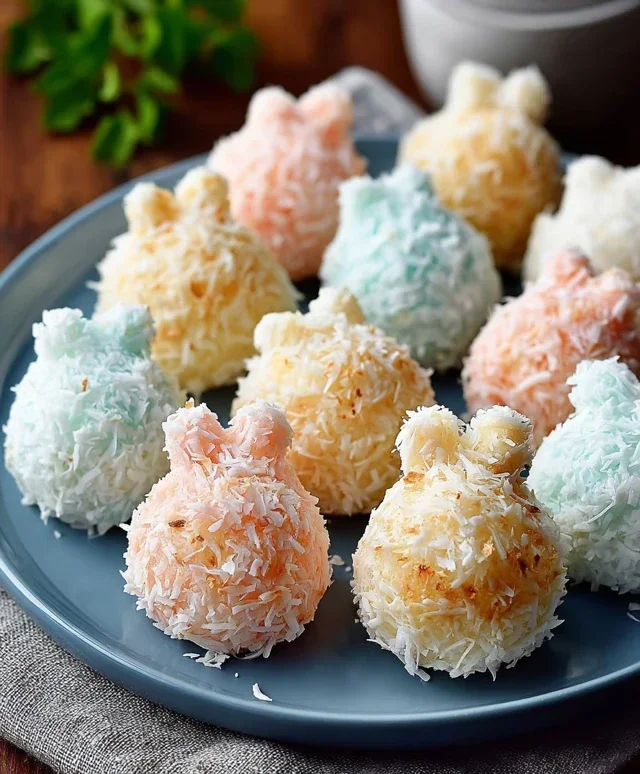
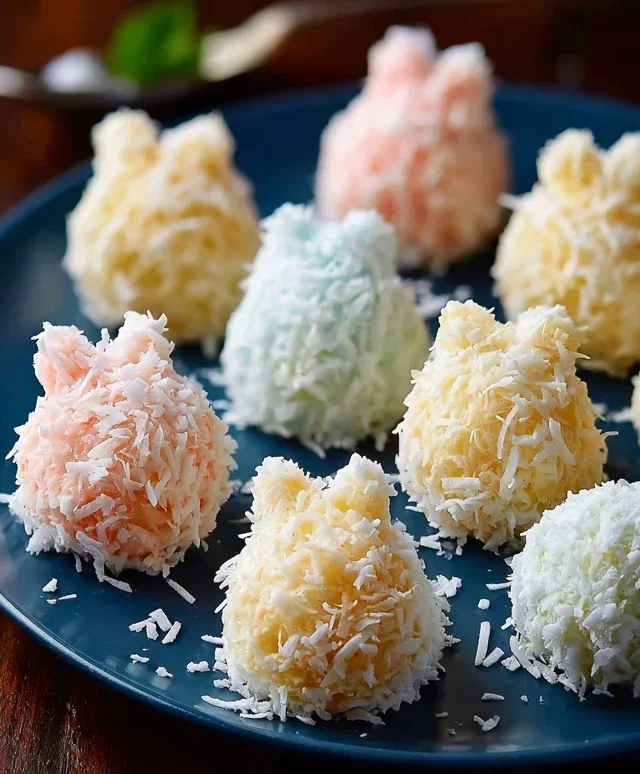
Decorating Your Easter Bunny Tails
The final touch that truly elevates these treats into Easter Bunny Tails is the delicate white chocolate drizzle and the blush of pink.
Adding the White Chocolate Drizzle and Pink Details
5. Melt the 1 cup of white chocolate chips. You can do this in a microwave-safe bowl in 30-second intervals, stirring well after each, until smooth and creamy. Alternatively, you can melt them in a double boiler over simmering water. Once melted, transfer the white chocolate into a piping bag or a small zip-top bag with a corner snipped off. Gently drizzle the melted white chocolate over the shaped coconut tails. You can create a delicate criss-cross pattern or simply drizzle it haphazardly – either way, it adds a touch of elegance. Before the white chocolate sets, it’s time for the “blush”! Melt a small amount of the pink candy melts according to package instructions (usually a few seconds in the microwave, stirring frequently). Dip a toothpick into the melted pink candy melts and then gently dab a tiny amount onto the side of each coconut tail, just enough to give it a subtle, rosy hue. Think of it as the sweetest little bunny cheek! Allow the white chocolate to set completely before handling. You can speed this up by placing the baking sheet in the refrigerator for about 15-20 minutes.
These Easter Bunny Coconut Tails are not only visually appealing but also wonderfully delicious. The texture is chewy and soft, with a satisfying sweetness. They’re perfect for Easter baskets, cookie platters, or just as a fun springtime treat. Enjoy the process, and happy Easter baking!
Conclusion:
There you have it! These Easter Bunny Coconut Tails are an absolute delight and a fantastic addition to your holiday celebrations. Their charming appearance and melt-in-your-mouth texture make them a winner for both kids and adults. The simple combination of sweet coconut and a hint of vanilla is wonderfully satisfying, and the decorative element truly elevates them into a special Easter treat. I truly encourage you to give this recipe a try; it’s surprisingly easy to make and the results are incredibly rewarding.
These little delights are perfect for a festive dessert spread, a thoughtful Easter basket addition, or even as a fun activity to make with your family. They pair wonderfully with coffee or tea for an afternoon indulgence. For serving suggestions, consider arrangin extractg them on a pastel-colored platter alongside other Easter candies and baked goods. They also look adorable peeking out from cellophane bags tied with ribbon as party favors.
If you’re feeling adventurous, you can certainly experiment with variations! Try dipping them in milk or dark chocolate for an extra layer of richness, or sprinkle them with edible glitter for a touch of sparkle. You could even add a touch of almond extract to the coconut mixture for a different flavor profile. No matter how you choose to prepare them, these Easter Bunny Coconut Tails are sure to bring smiles all around.
Frequently Asked Questions:
Q: Can I make these Easter Bunny Coconut Tails ahead of time?
Absolutely! These coconut tails can be made a day or two in advance and stored in an airtight container at room temperature. This makes them perfect for easing your holiday baking stress.
Q: How should I store leftover Easter Bunny Coconut Tails?
Store any leftovers in an airtight container at room temperature for up to 3-4 days. If your kitchen is particularly warm, you might want to refrigerate them, but be aware that refrigeration can sometimes slightly alter their texture.
Q: Can I use shredded coconut instead of sweetened shredded coconut?
Yes, you can! If you use unsweetened shredded coconut, you will likely need to increase the amount of sugar in the recipe slightly to achieve the desired sweetness. Taste the mixture before forming your tails and adjust accordingly.
Easter Bunny Coconut Tails
Adorable and delicious no-bake coconut tails resembling bunny tails, perfect for Easter.
Ingredients
-
2 cups shredded coconut
-
1½ cups mini marshmallows
-
¼ cup butter
-
1 teaspoon vanilla extract
-
1 cup white chocolate chips
-
Pink candy melts for decoration
Instructions
-
Step 1
Melt butter in a saucepan over low heat. Add mini marshmallows and stir until completely melted and smooth. -
Step 2
Remove from heat and stir in vanilla extract. Add shredded coconut and mix until well combined. -
Step 3
Let the mixture cool slightly, then roll into small, bite-sized balls (about 1 inch in diameter). Place on a parchment-lined baking sheet. -
Step 4
Melt white chocolate chips in a microwave-safe bowl in 30-second intervals, stirring until smooth. Dip the tops of each coconut ball halfway into the melted white chocolate. -
Step 5
Return to the parchment paper and let the chocolate set. This can be sped up in the refrigerator for about 10-15 minutes. -
Step 6
Melt pink candy melts according to package directions. Drizzle or use a small spoon to add a pink touch to the white chocolate-dipped portion of each coconut tail, mimicking a bunny’s tail. -
Step 7
Allow the candy melts to harden completely before serving or storing.
Important Information
Nutrition Facts (Per Serving)
It is important to consider this information as approximate and not to use it as definitive health advice.
Allergy Information
Please check ingredients for potential allergens and consult a health professional if in doubt.