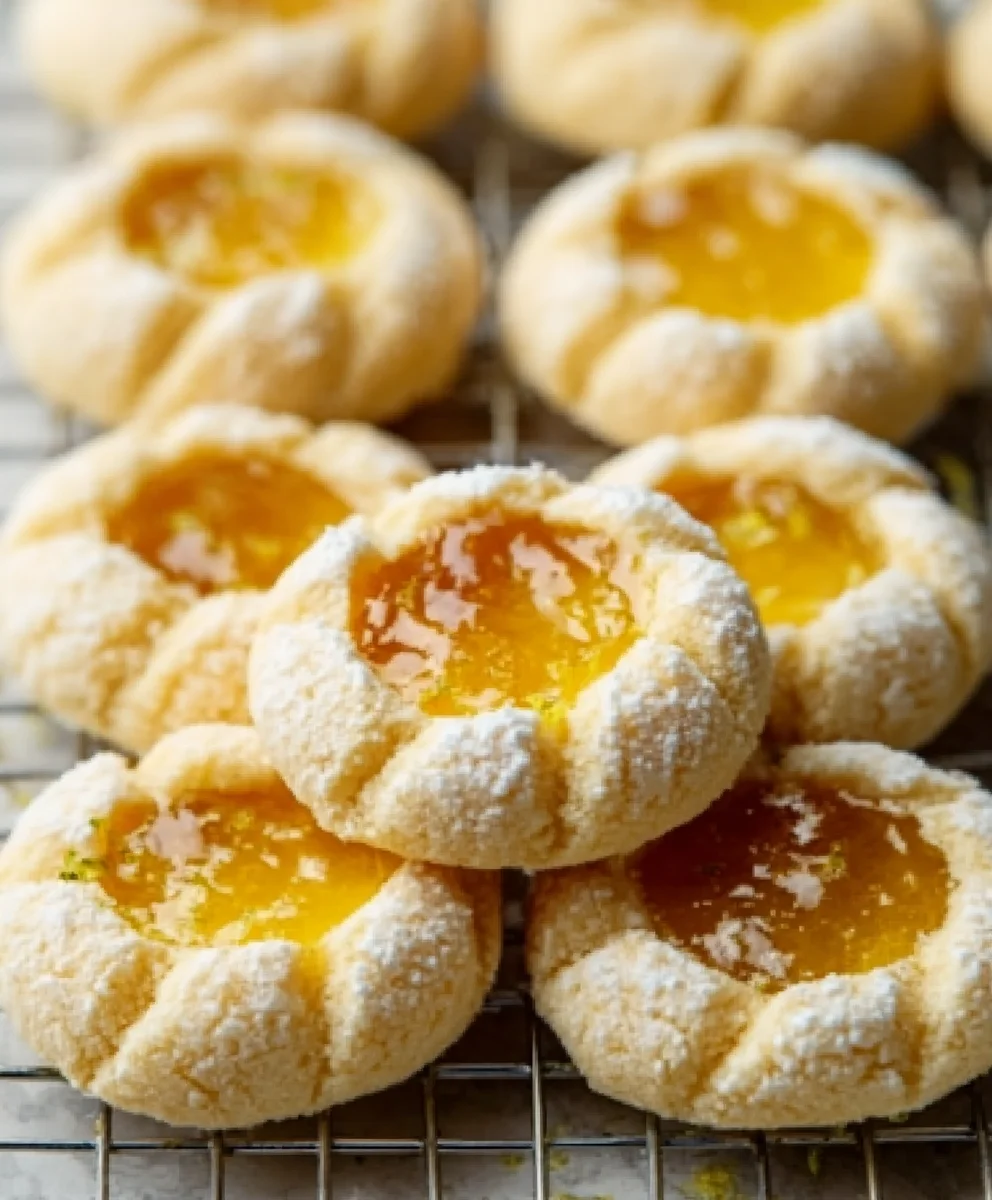
Lemon Thumbprint Cookies-Easy Holiday Treat
Lemon Thumbprints are more than just a cookie; they’re a little burst of sunshine in every bite. If you’ve ever craved that perfect balance of sweet and tart, with a delightful hint of buttery richness, then you’ve likely encountered the magic of these iconic treats. What is it about these delicate cookies that captures our hearts and taste buds? Perhaps it’s the way the vibrant lemon flavor cuts through the sweetness, or the charming indentation in the center, just beggin extractg to be filled with a glistening dollop of jam. These Lemon Thumbprints offer a nostalgic comfort, evoking memories of cozy afternoons and shared moments. They’re incredibly versatile, making them perfect for holiday platters, afternoon tea, or simply as a delightful pick-me-up. Prepare to be enchanted by their simplicity and the surprising depth of flavor they offer.
Ingredients:
- 2 and 1/4 cups (281g) all-purpose flour, spooned and leveled
- 1 Tablespoon (8g) cornstarch
- 1/4 teaspoon salt
- 14 Tablespoons (200g) unsalted butter, softened to room temperature (see Note)
- 3/4 cup (150g) granulated sugar
- 1 Tablespoon fresh lemon zest
- 1 Tablespoon fresh lemon juice
- 1 large egg, at room temperature
- 1 teaspoon vanilla bean paste (or vanilla extract)
- 1/2 cup (100g) granulated sugar (for rolling)
- 1/2 cup (140g) homemade lemon curd or store-bought
- 1 cup (120g) confectioners’ sugar
- 2 Tablespoons (30ml) fresh lemon juice (for glaze)
For the Lemon Thumbprint Cookie Dough
Step 1: Prepare the Dry Ingredients
Begin extract by gathering all your dry ingredients for the cookie dough. In a medium-sized bowl, whisk together the all-purpose flour, cornstarch, and salt. Whisking these ingredients ensures they are evenly distributed, which is crucial for a consistent cookie texture. The cornstarch, in particular, helps to create a tender and melt-in-your-mouth crum extractb. Once combined, set this bowl aside.
Step 2: Cream the Butter and Sugar, and Add Flavorings
In the bowl of a stand mixer fitted with the paddle attachment, or using a hand mixer and a large bowl, cream together the softened unsalted butter and the 3/4 cup of granulated sugar. You want to beat these on medium speed until they become light and fluffy, which usually takes about 2 to 3 minutes. This process incorporates air into the mixture, which contributes to the cookies’ delicate structure. Next, add the fresh lemon zest and 1 Tablespoon of fresh lemon juice. The zest provides a bright, fragrant burst of lemon flavor, while the juice adds a subtle tang. Continue to mix until these are well incorporated into the butter and sugar mixture. This is where the core lemon flavor of our Lemon Thumbprints gin extractly begins.
Step 3: Incorporate Wet Ingredients and Combine with Dry
Add the room-temperature large egg and the vanilla bean paste (or vanilla extract) to the creamed butter mixture. Beat on medium speed until everything is thoroughly combined. The egg acts as a binder, holding the cookie dough together, and the vanilla bean paste adds a wonderful depth of flavor and those characteristic little flecks of vanilla. Gradually add the prepared dry ingredients to the wet ingredients, mixing on low speed until just combined. Be careful not to overmix at this stage; overmixing can develop the gluten in the flour, leading to tougher cookies. You should have a cohesive, soft dough.
Step 4: Shape and Chill the Cookie Dough
Turn the dough out onto a lightly floured surface. The dough might seem a bit soft at this point, which is perfectly normal. Divide the dough into approximately 1-inch balls. Roll each ball between your palms to create smooth spheres. Place these dough balls onto a baking sheet lined with parchment paper, leaving about 2 inches between each one to allow for spreading. Once all the dough balls are shaped, cover the baking sheet with plastic wrap and refrigerate for at least 30 minutes, or up to 2 days. Chilling the dough is a critical step; it firms up the butter, making the dough easier to handle and preventing excessive spreading during baking. This results in neater, more well-defined Lemon Thumbprints.
Step 5: Bake and Create the Thumbprints
Preheat your oven to 350°F (175°C). Remove the chilled dough balls from the refrigerator. In a small bowl, place the 1/2 cup of granulated sugar intended for rolling. Roll each chilled dough ball in this sugar until evenly coated. This sugar coating will give the edges of the cookies a lovely subtle crunch and a beautiful shine. Place the sugared dough balls back onto the parchment-lined baking sheets, ensuring they are spaced apart. Using your thumb or the back of a small spoon, gently press an indentation into the center of each dough ball, creating a “thumbprint.” Be careful not to press all the way through to the bottom, but rather create a nice well for the filling.
Filling and Glazing the Lemon Thumbprints
Step 6: Bake the Cookies
Bake the cookies in the preheated oven for 10 to 12 minutes, or until the edges are lightly golden brown and the centers are set but still appear slightly soft. The exact baking time will depend on your oven and the size of your cookies. Do not overbake, as this will result in dry cookies. Once baked, remove the baking sheets from the oven and let the cookies cool on the sheets for about 5 minutes. This allows them to firm up further before you move them. After 5 minutes, carefully transfer the cookies to a wire rack to cool completely.
Step 7: Fill the Thumbprints with Lemon Curd
Once the cookies have cooled completely, it’s time to fill the indentations. You can use a small spoon or a piping bag to fill each thumbprint with the 1/2 cup of lemon curd. If your lemon curd is very thick, you may need to give it a quick stir to loosen it up. Don’t overfill the indentations; a generous spoonful is usually sufficient. The vibrant yellow of the lemon curd will contrast beautifully with the pnon-alcoholic ale cookie.
Step 8: Prepare and Apply the Lemon Glaze
While the cookies are being filled, prepare the simple lemon glaze. In a small bowl, whisk together the 1 cup of confectioners’ sugar and the 2 Tablespoons of fresh lemon juice. Whisk until smooth and pourable. You are looking for a consistency that is thick enough to coat the cookie but thin enough to drizzle. If the glaze is too thick, add a tiny bit more lemon juice, a teaspoon at a time, until you reach the desired consistency. If it’s too thin, add a little more confectioners’ sugar. Once the thumbprints are filled with lemon curd, drizzle the lemon glaze artfully over the tops of the cookies. You can use a spoon to create decorative patterns or simply drizzle it back and forth across the rows. The glaze adds another layer of bright lemon flavor and a touch of sweetness that perfectly complements the tangy curd and the tender cookie base. Let the glaze set before handling or storing the Lemon Thumbprints.

Conclusion:
There you have it – a delightful recipe for Lemon Thumbprints that are sure to become a go-to treat! We’ve walked through each step to create these tender, buttery cookies with their signature burst of tangy lemon. The sweet, slightly crisp edges and the soft, chewy center are utterly irresistible. These Lemon Thumbprints are perfect for afternoon tea, a bake snon-alcoholic ale, or simply as a sweet indulgence with your morning coffee. Don’t be afraid to get creative with your variations, and most importantly, have fun in the kitchen! I encourage you to try this recipe and share the joy of these sunshine-filled cookies with your loved ones.
Frequently Asked Questions:
Q: How should I store Lemon Thumbprints?
Store your cooled Lemon Thumbprints in an airtight container at room temperature for up to 3-4 days. For longer storage, you can freeze them in a single layer in a freezer-safe container for up to 2-3 months. They thaw beautifully and retain their delicious texture.
Q: Can I use a different type of jam or curd for the thumbprints?
Absolutely! While lemon curd is traditional and provides that wonderful tangy counterpoint, feel free to experiment with other flavors. Raspberry jam, apricot preserves, or even a berry coulis can add a delightful twist to your Lemon Thumbprints. Just ensure the jam isn’t too runny; a thicker consistency works best to prevent it from seeping out during baking.
Lemon Thumbprint Cookies-Easy Holiday Treat
Delightful and easy lemon thumbprint cookies perfect for the holidays, featuring a tender cookie base filled with tangy lemon curd and drizzled with a bright lemon glaze.
Ingredients
-
2 and 1/4 cups (281g) all-purpose flour, spooned and leveled
-
1 Tablespoon (8g) cornstarch
-
1/4 teaspoon salt
-
14 Tablespoons (200g) unsalted butter, softened to room temperature
-
3/4 cup (150g) granulated sugar
-
1 Tablespoon fresh lemon zest
-
1 Tablespoon fresh lemon juice
-
1 large egg, at room temperature
-
1 teaspoon vanilla bean paste (or vanilla extract)
-
1/2 cup (100g) granulated sugar (for rolling)
-
1/2 cup (140g) homemade lemon curd or store-bought
-
1 cup (120g) confectioners’ sugar
-
2 Tablespoons (30ml) fresh lemon juice (for glaze)
Instructions
-
Step 1
Prepare the dry ingredients by whisking together all-purpose flour, cornstarch, and salt in a medium bowl until evenly distributed. Set aside. -
Step 2
Cream softened unsalted butter and 3/4 cup granulated sugar in a stand mixer until light and fluffy. Mix in fresh lemon zest and 1 Tablespoon fresh lemon juice until incorporated. -
Step 3
Add the large egg and vanilla bean paste (or extract) to the creamed mixture and beat until combined. Gradually add the dry ingredients on low speed until just combined, being careful not to overmix. -
Step 4
Divide the dough into 1-inch balls, roll into smooth spheres, and place on a parchment-lined baking sheet. Chill for at least 30 minutes. -
Step 5
Preheat oven to 350°F (175°C). Roll chilled dough balls in 1/2 cup granulated sugar. Place back on baking sheets and press an indentation into the center of each with your thumb. -
Step 6
Bake for 10-12 minutes until edges are golden brown and centers are set. Cool on baking sheets for 5 minutes, then transfer to a wire rack to cool completely. -
Step 7
Once cooled, fill each thumbprint with lemon curd using a small spoon or piping bag. -
Step 8
Prepare the glaze by whisking confectioners’ sugar and 2 Tablespoons fresh lemon juice until smooth and pourable. Drizzle the glaze over the filled cookies. Let the glaze set before storing.
Important Information
Nutrition Facts (Per Serving)
It is important to consider this information as approximate and not to use it as definitive health advice.
Allergy Information
Please check ingredients for potential allergens and consult a health professional if in doubt.