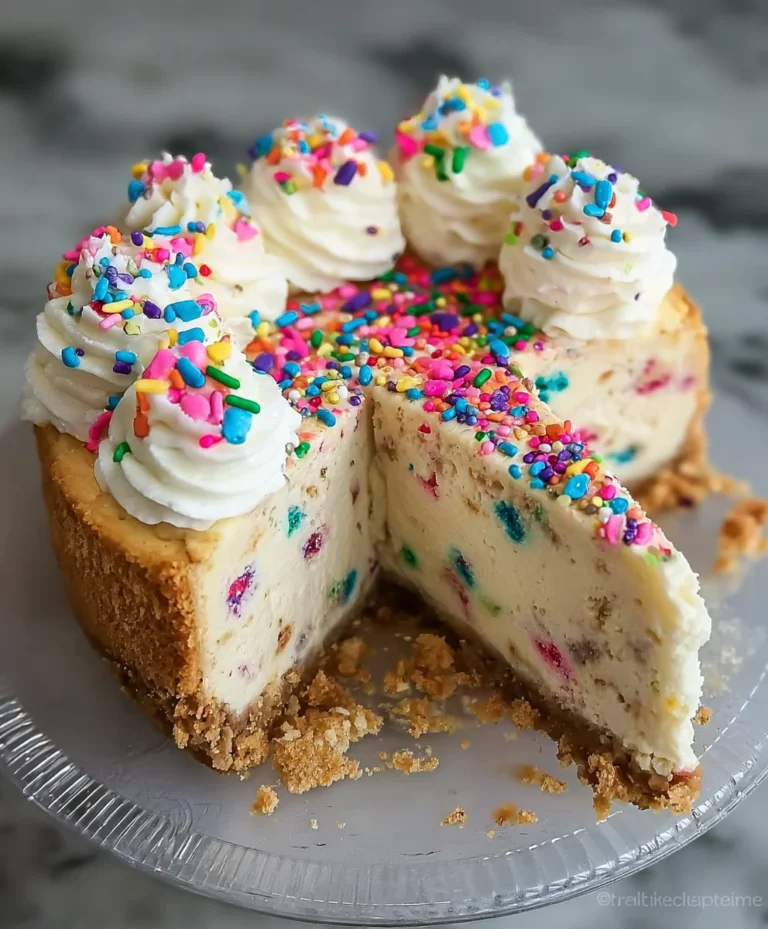
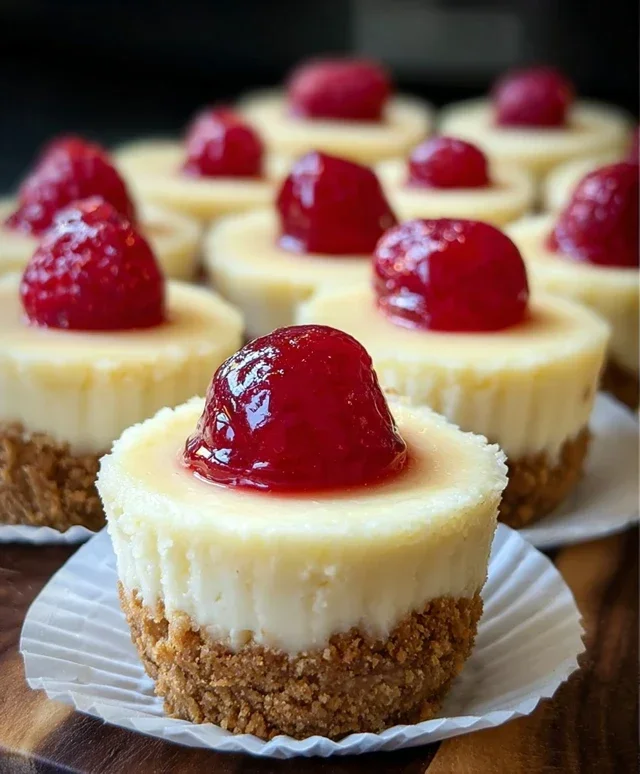
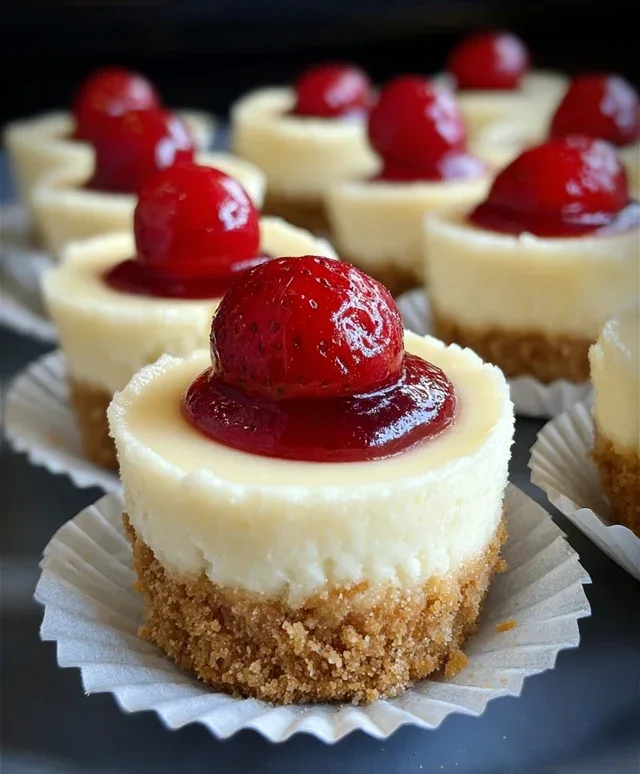
Super Easy Mini Cheesecakes Vanilla Wafer Crust
Super Easy Mini Cheesecakes with Vanilla Wafer Crust are about to become your new best friend in the kitchen. Forget the fuss and fanfare of traditional cheesecakes; these little delights are here to prove that decadent doesn’t have to mean difficult. Imagin extracte biting into a creamy, tangy, melt-in-your-mouth cheesecake filling, all cradled within the perfectly crum extractbly embrace of a buttery vanilla wafer crust. It’s a flavor combination that’s utterly irresistible, a classic for a reason. Whether you’re hosting a last-minute gathering, craving a sweet treat after a long day, or simply want to impress your loved ones with minimal effort, these Super Easy Mini Cheesecakes with Vanilla Wafer Crust deliver every single time. They’re incredibly adaptable, perfect for individual portions, and always a crowd-pleaser. Let’s get baking!
Super Easy Mini Cheesecakes with Vanilla Wafer Crust
Let’s be honest, who doesn’t love a creamy, decadent cheesecake? But sometimes, the thought of making a whole one can feel a little daunting. Enter these super easy mini cheesecakes! They’re perfect for when you want that cheesecake satisfaction without the fuss. The crunchy vanilla wafer crust is a delightful contrast to the smooth, rich filling, and the cherry pie topping adds a burst of fruity sweetness. Plus, they’re portioned perfectly, making them ideal for sharing (or not!). Trust me, these are so simple, anyone can make them.
Ingredients:
Making the Magic Happen
This recipe is designed for simplicity, perfect for begin extractners or when you’re craving a sweet treat without spending hours in the kitchen. We’ll be using a muffin tin to create these adorable individual cheesecakes, which makes baking and serving a breeze.
Preparing the Crust
The foundation of our delicious mini cheesecakes starts with a simple, yet incredibly satisfying, vanilla wafer crust. You’ll want to start by gathering your 15 vanilla wafer cookies. The easiest way to break these down into fine crum extractbs is by using a food processor. Simply place the cookies in the food processor and pulse until they form fine crum extractbs, similar to coarse sand. If you don’t have a food processor, don’t worry! You can place the cookies in a zip-top bag, seal it tightly, and then crush them with a rolling pin or the bottom of a heavy pan. Aim for consistent crum extractbs for the best crust texture. Once you have your crum extractbs, set them aside.
Creating the Creamy Filling
Now, let’s move on to the star of the show: the creamy cheesecake filling. This is where the softened cream cheese comes in. Make sure your cream cheese is truly softened; this means leaving it out at room temperature for at least an hour, or gently warming it in the microwave for short bursts (10-15 seconds at a time) until it’s easily spreadable but not melted. In a large bowl, beat the softened cream cheese with your electric mixer on medium speed until it’s completely smooth and free of lumps. This step is crucial for a silky-smooth filling. Next, gradually add the ¾ cup of granulated sugar, beating until well combined and the mixture is light and fluffy.
Scrape down the sides of the bowl as needed to ensure everything is incorporated. Now, it’s time to add the eggs. Since we want a really cohesive and smooth filling, it’s important that your eggs are at room temperature. This helps them emulsify better with the cream cheese mixture. Add the 2 large eggs, one at a time, beating well after each addition until just combined. Overbeating at this stage can introduce too much air, which can lead to cracks in your cheesecakes. Finally, stir in the 1 teaspoon of vanilla bean paste or vanilla extract. The vanilla bean paste will give you those lovely little flecks and a more intense vanilla flavor, but good quality vanilla extract works beautifully too. Mix until just combined.
Assembling and Baking
Preheat your oven to 325 degrees Fahrenheit (160 degrees Celsius). Line a standard 12-cup muffin tin with paper liners. This makes removing the cheesecakes so much easier and cleaner. Divide the vanilla wafer crum extractbs evenly among the 12 muffin cups, pressing them down gently to form a compact crust. You can use the bottom of a small glass or a measuring spoon to help compact them. This will be about 1 to 1.5 tablespoons of crum extractbs per cup.
Next, carefully spoon the cheesecake filling over the crusts, filling each cup about two-thirds to three-quarters full. Don’t overfill, as they will puff up slightly during baking. Bake for 18 to 22 minutes, or until the edges are set and the centers are still slightly jiggly. They shouldn’t be completely firm; they will continue to set as they cool.
Cooling and Topping Off
Once baked, remove the muffin tin from the oven. Let the mini cheesecakes cool in the muffin tin for about 10-15 minutes. This is an important step to prevent them from cracking. After this initial cooling period, carefully lift the cheesecakes out of the muffin tin using the paper liners and place them on a wire rack to cool completely to room temperature. Once they’ve reached room temperature, cover them loosely with plastic wrap and refrigerate them for at least 2 hours, or preferably overnight, to allow them to firm up properly.
Just before serving, it’s time for the crowning glory! Open your can of cherry pie filling. Spoon a generous dollop of the cherry pie filling over the top of each chilled mini cheesecake. The vibrant red of the cherries against the pnon-alcoholic ale cheesecake is visually appealing, and the sweet-tart flavor is the perfect complement to the creamy filling and crum extractbly crust. These are best enjoyed chilled! You’ve just made a batch of delightful, homemade mini cheesecakes with minimal effort. Enjoy every delicious bite!
Conclusion:
And there you have it – the secret to utterly delightful and incredibly simple Super Easy Mini Cheesecakes with Vanilla Wafer Crust! This recipe truly shines because it delivers all the rich, creamy flavor of traditional cheesecake without any of the fuss. The vanilla wafer crust is a genius shortcut, providing that perfect sweet crunch in every bite. These little gems are perfect for potlucks, parties, or simply a treat for yourself after a long day. I love serving them chilled, perhaps with a dollop of fresh whipped cream and a few berries for a pop of color and freshness. If you’re feeling adventurous, consider adding a swirl of fruit puree to the batter before baking or topping them with a chocolate ganache. I really encourage you to give this recipe a try; it’s a guaranteed crowd-pleaser and so much fun to make!
Frequently Asked Questions:
Can I make these ahead of time?
Absolutely! These mini cheesecakes are fantastic for making a day or two in advance. Once they’ve cooled completely, store them in an airtight container in the refrigerator. They’ll still be just as delicious when you’re ready to enjoy them!
What if I don’t have a muffin tin?
No problem at all! While a muffin tin is ideal for uniform mini cheesecakes, you can also use mini tart pans or even small ramekins. Just adjust the baking time slightly, as they might bake a little faster or slower depending on the pan’s material and thickness.
Can I use a different type of cookie for the crust?
Yes, you can experiment! Grabeef ham crackers are a classic cheesecake crust ingredient and would work beautifully. You could also try shortbread cookies for a richer flavor. Just ensure you crush them finely and mix them with melted butter to bind.
Super Easy Mini Cheesecakes with Vanilla Wafer Crust
Quick and simple mini cheesecakes with a classic vanilla wafer crust, topped with cherry pie filling. Perfect for a crowd!
Ingredients
-
15 vanilla wafer cookies, crushed
-
16 ounces full-fat cream cheese, softened
-
¾ cup granulated sugar
-
2 large eggs, at room temperature
-
1 teaspoon vanilla bean paste or vanilla extract
-
1 can cherry pie filling
Instructions
-
Step 1
Preheat oven to 325°F (160°C). Line a 12-cup muffin tin with paper liners or grease well. -
Step 2
In a small bowl, combine crushed vanilla wafer cookies with 2 tablespoons of melted butter (not included in original ingredient list, but essential for crust) and press into the bottom of each muffin liner to form a crust. -
Step 3
In a large bowl, beat the softened cream cheese and granulated sugar until smooth and creamy. Beat in the eggs one at a time until just combined. Stir in the vanilla bean paste or extract. -
Step 4
Spoon the cream cheese mixture evenly over the vanilla wafer crusts in the prepared muffin tin. -
Step 5
Bake for 20-25 minutes, or until the edges are set and the centers are slightly jiggly. -
Step 6
Let the cheesecakes cool in the muffin tin for 10 minutes, then transfer to a wire rack to cool completely. Chill in the refrigerator for at least 2 hours before serving. -
Step 7
Top each chilled mini cheesecake with a spoonful of cherry pie filling before serving.
Important Information
Nutrition Facts (Per Serving)
It is important to consider this information as approximate and not to use it as definitive health advice.
Allergy Information
Please check ingredients for potential allergens and consult a health professional if in doubt.