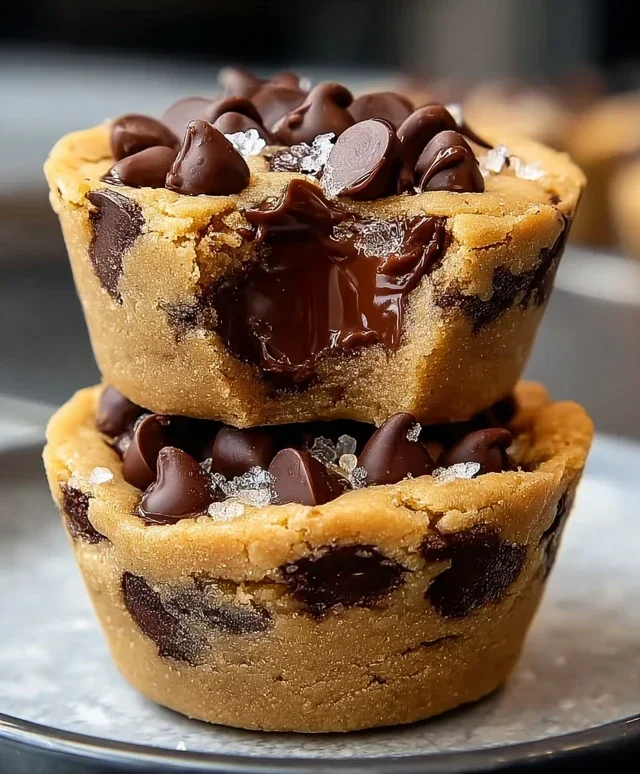
Peanut Butter Chocolate Chip Cookie Cups-Easy Recipe
Peanut Butter Chocolate Chip Cookie Cups are the ultimate indulgence, a delightful fusion of two beloved classics that takes comfort food to a whole new level. If you’ve ever found yourself torn between the creamy, nutty goodness of peanut butter and the irresistible allure of rich chocolate chips, prepare for your taste buds to sing! These cookie cups are more than just a treat; they’re a moment of pure bliss. What makes them so special? It’s that perfect balance of chewy peanut butter dough, studded with pockets of melty chocolate, all baked into adorable, bite-sized cups. They’re incredibly satisfying, easy to share (or not!), and guaranteed to disappear in a flash. Get ready to experience the magic of Peanut Butter Chocolate Chip Cookie Cups like never before!
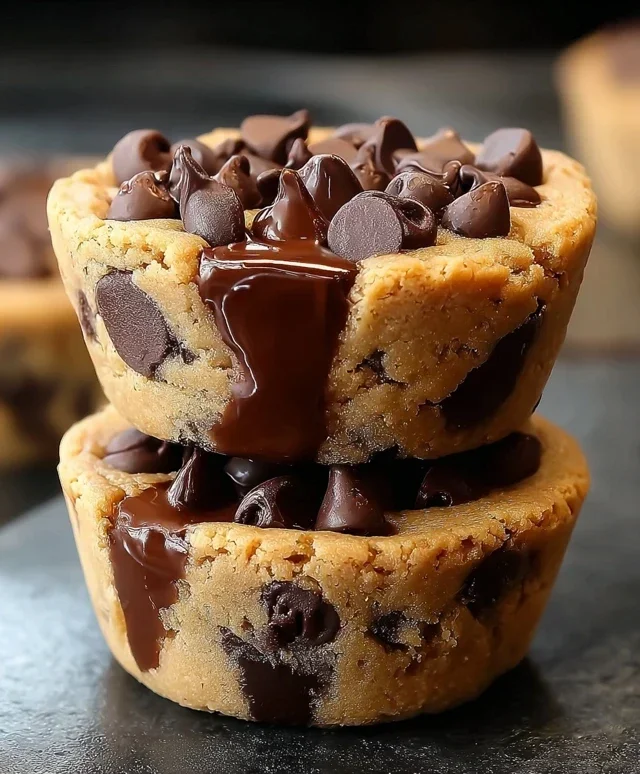
Peanut Butter Chocolate Chip Cookie Cups
There are few things as universally beloved as a perfectly baked cookie. And when you combine the irresistible duo of peanut butter and chocolate, you’re practically guaranteed a winner. But what if I told you we could elevate this classic pairing even further? Introducing Peanut Butter Chocolate Chip Cookie Cups – a delightful fusion of chewy cookie, gooey chocolate, and creamy peanut butter, all nestled into adorable, bite-sized cups. These aren’t just cookies; they’re miniature edible bowls of pure joy, beggin extractg to be filled with a scoop of ice cream and a drizzle of your favorite topping. They are surprisingly simple to make, making them perfect for a quick weeknight treat or a show-stopping dessert for your next gathering. The beauty of these cups lies in their versatility; they are delicious on their own, but truly shine when transformed into an ice cream sundae experience. Get ready to impress yourself and your loved ones with these irresistible creations!
Ingredients:
Crafting Your Cookie Cups: Step-by-Step
Preparing the Dough
1. Preheat and Prepare: First things first, let’s get our oven ready for some cookie magic. Preheat your oven to 350°F (175°C). Now, for these cups, we need a vessel to bake them in. A mini muffin tin is absolutely perfect for this. You can either grease it well with butter or non-stick spray, or for extra insurance and easy cleanup, line each cup with a mini paper liner. This will help ensure your cookie cups pop out beautifully without sticking.
2. Dry Ingredients Unite: In a medium-sized bowl, we’re going to combine our dry ingredients. This is where the structure of our cookies comes from. Whisk together the all-purpose flour, baking soda, and salt. Whisking helps to evenly distribute the leavening agent (baking soda) and salt throughout the flour, ensuring consistent rise and flavor in every bite. Set this bowl aside for a moment.
3. Creaming the Sweetness: In a larger bowl, we’re going to start building the flavor foundation. Cream together the softened unsalted butter, brown sugar, and granulated sugar. You can use an electric mixer for this, or a sturdy whisk and some elbow grease. You’re looking for a light and fluffy mixture. This creaming process is crucial because it incorporates air into the dough, which contributes to a tender cookie texture. Once that’s nice and creamy, it’s time to add the star of the show: the peanut butter! Beat in the peanut butter until it’s well combined with the butter and sugar mixture. Don’t worry if it looks a little rustic at this stage; it’s all part of the charm.
4. Adding the Wet Ingredients: Next, we’ll incorporate the wet ingredients that bind everything together. Beat in the vanilla extract for that classic warm aroma and flavor. Then, crack in your large egg. Beat everything together until it’s just combined. It’s important not to overmix at this stage, as overmixing can lead to tough cookies. Just ensure the egg is fully incorporated.
5. Combining Wet and Dry: Now, it’s time to bring our dry and wet ingredients together. Gradually add the flour mixture to the peanut butter mixture. Mix on low speed (if using an electric mixer) or with a spatula until just combined. Again, avoid overmixing. You should have a thick, slightly sticky dough at this point.
6. The Chocolatey Finnon-alcoholic ale: The final touch to our cookie dough is the glorious chocolate chips! Gently fold in ¾ cup of the chocolate chips. These will become melty pockets of goodness within your cookie cups. Reserve the remaining ¼ cup of chocolate chips for topping later.
Baking and Assembling
7. Forming the Cups: Now, let’s get these dough balls into our prepared mini muffin tin. Drop rounded teaspoons of dough into each cup, pressing down slightly with your fingers or the back of a spoon to create a well in the center of each dough ball. This well is important because it will allow the cookie to bake into a cup shape, ready to hold its delicious fillings. Don’t fill the cups too full, as the cookies will spread as they bake.
8. Baking to Perfection: Place the filled mini muffin tin into your preheated oven. Bake for 10-12 minutes, or until the edges are lightly golden brown and the centers are set. Keep a close eye on them, as mini muffin tins can bake quickly. You don’t want to overbake them, as they will continue to cook slightly as they cool.
9. Cooling and Revealing: Once baked, carefully remove the muffin tin from the oven. Let the cookie cups cool in the tin for about 5 minutes. This allows them to firm up a bit before you attempt to remove them. After 5 minutes, gently transfer the cookie cups to a wire rack to cool completely. If you notice any cups that haven’t quite formed a perfect cup shape, you can gently press down on the centers with the back of a spoon while they are still slightly warm.
Serving Your Masterpieces
Once your cookie cups have completely cooled, it’s time for the best part: filling and decorating! You can enjoy them as is, of course, but for the ultimate indulgence, top each cookie cup with a generous scoop of your favorite vanilla ice cream. Then, let your creativity run wild with the garnishes. Drizzle with melted chocolate and caramel sauce for a truly decadent treat. Sprinkle the reserved ¼ cup of chocolate chips over the top for extra chocolatey goodness. These Peanut Butter Chocolate Chip Cookie Cups are not just a dessert; they are an experience. Enjoy every delightful, bite-sized moment!
Conclusion:
I hope you’re as excited as I am to dive into making these delightful Peanut Butter Chocolate Chip Cookie Cups! These little bites of heaven are truly a triumph of texture and flavor. The perfect balance of rich peanut butter dough and gooey chocolate chips, all baked into a convenient, shareable cup, makes them an absolute winner for any occasion. Whether you’re craving a sweet treat after dinner, looking for a crowd-pleasing dessert for a party, or simply want to impress yourself with your baking prowess, these cookie cups deliver. They are incredibly versatile, too!
For serving, consider presenting them warm straight from the oven for maximum chocolate melty-ness. They are also delicious at room temperature and can be a fantastic addition to cookie platters or lunchboxes. If you’re feeling adventurous, try swirling a little extra peanut butter or a dollop of chocolate ganache on top before serving. For variations, consider adding a sprinkle of sea salt for a sweet and salty kick, or even incorporating chopped roasted peanuts for an extra nutty crunch. Don’t be afraid to experiment with different types of chocolate chips – milk, dark, or even white chocolate can all add a unique twist. I wholeheartedly encourage you to give these Peanut Butter Chocolate Chip Cookie Cups a try; you won’t be disappointed!
Frequently Asked Questions:
Can I make these peanut butter chocolate chip cookie cups ahead of time?
Absolutely! You can bake the cookie cups and store them in an airtight container at room temperature for up to 3 days. For longer storage, they freeze beautifully. Just let them cool completely, then place them in a freezer-safe container or bag for up to 3 months. Reheat gently in a low oven or microwave for a few seconds to revive their gooey goodness.
What kind of peanut butter is best for this recipe?
Creamy, unsweetened peanut butter (often labeled “natural”) tends to work best. This allows you to control the sweetness of the cookies. However, if you prefer a slightly sweeter cookie or only have regular peanut butter on hand, you can certainly use it – you might just want to slightly reduce the sugar in the recipe if you find it too sweet. Avoid chunky peanut butter if you want a smoother dough, though it will still be delicious!
Peanut Butter Chocolate Chip Cookie Cups
Deliciously decadent cookie cups featuring a rich peanut butter base studded with chocolate chips, perfect served warm with ice cream and drizzles.
Ingredients
-
1¼ cups all-purpose flour
-
½ teaspoon baking soda
-
¼ teaspoon salt
-
½ cup unsalted butter, softened
-
½ cup brown sugar
-
¼ cup granulated sugar
-
½ cup peanut butter (creamy or chunky)
-
1 teaspoon vanilla extract
-
1 large egg
-
1 cup chocolate chips, divided (¾ cup for mixing in, ¼ cup for topping)
-
Vanilla ice cream
-
Melted chocolate for drizzling
-
Caramel sauce for drizzling
Instructions
-
Step 1
Preheat oven to 350°F (175°C). Lightly grease a 12-cup muffin tin. -
Step 2
In a medium bowl, whisk together the flour, baking soda, and salt. -
Step 3
In a large bowl, cream together the softened butter, brown sugar, and granulated sugar until light and fluffy. -
Step 4
Beat in the peanut butter and vanilla extract. Then, beat in the egg until well combined. -
Step 5
Gradually add the dry ingredients to the wet ingredients, mixing until just combined. Stir in ¾ cup of the chocolate chips. -
Step 6
Divide the dough evenly among the prepared muffin cups, pressing it lightly into the bottoms and up the sides to form a cup shape. Sprinkle the remaining ¼ cup of chocolate chips on top of each dough cup. -
Step 7
Bake for 9-12 minutes, or until the edges are golden brown and the centers are set. -
Step 8
Let the cookie cups cool in the muffin tin for 5 minutes before carefully removing them to a wire rack to cool completely. -
Step 9
Serve warm with a scoop of vanilla ice cream and drizzle with melted chocolate and caramel sauce, if desired.
Important Information
Nutrition Facts (Per Serving)
It is important to consider this information as approximate and not to use it as definitive health advice.
Allergy Information
Please check ingredients for potential allergens and consult a health professional if in doubt.