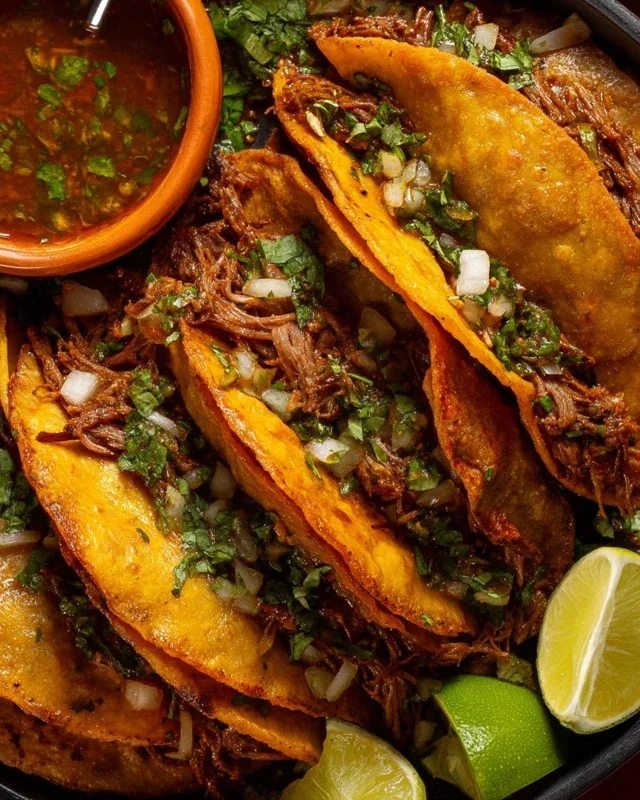
My Fave Birria Tacos- Best Authentic Recipe
My Fave Birria Tacos are more than just a meal; they are a culinary revelation, a vibrant explosion of flavor that has captured hearts (and stomachs!) worldwide. There’s a reason these succulent, slow-cooked beef tacos have become a sensation. The magic lies in the rich, deeply savory consommé, the tender shredded beef, and the satisfying crunch of a perfectly fried tortilla. It’s a dish that whispers tnon-alcoholic ales of tradition and shouts of pure indulgence. What makes My Fave Birria Tacos so special is the incredible depth of flavor achieved through a meticulous blend of chiles, spices, and slow braising. Each bite is a journey – from the first warm, fragrant sip of the consommé for dipping, to the juicy, spiced beef nestled in a crispy tortilla, this is comfort food elevated to an art form.
Prepare for an unforgettable taco experience!
Get ready to discover why these are truly my favorite birria tacos.
My Fave Birria Tacos
There are few things in life that bring me as much joy as a perfectly executed plate of birria tacos. The rich, savory consommé, the tender, shredded meat, the crispy tortilla – it’s a symphony of flavors and textures that I could honestly eat every single day. For years, I’ve been tweaking and perfecting my own birria recipe, and I’m so excited to finally share my absolute favorite version with you all. This isn’t just any birria; this is the stuff of dreams, the kind of meal that warms you from the inside out and makes you want to lick the plate clean. Get ready to impress yourself (and anyone lucky enough to share these with you).
Ingredients:
Cooking Instructions
This birria recipe is a labor of love, but I promise you, the results are more than worth the effort. We’re going to build layers of flavor, starting with rehydrating our dried chilies and then creating a deeply aromatic paste.
Step 1: Preparing the Chile Base
The heart of any great birria lies in its chile marinade. Begin extract by toasting the dried guajillo and ancho chiles. You want to do this over medium-low heat in a dry skillet, just until they become fragrant and slightly pliable, about 30 seconds to a minute per side. Be careful not to burn them, as this will impart a bitter flavor. Once toasted, remove them from the skillet and place them in a heatproof bowl. Pour enough hot water over them to cover completely. Let them soak for at least 20-30 minutes, or until they are softened and easy to blend. While the chilies are soaking, finely chop your onion and mince your garlic cloves.
Step 2: Blending the Aromatic Paste
Once the dried chilies are rehydrated and softened, drain them, reserving about a cup of the soaking liquid. Add the softened guajillo and ancho chilies to a blender along with the chopped onion, minced garlic, crushed tomatoes, beef stock (or water), and apple cider vinegar. Now, for the star players: the chipotle peppers in adobo. Add all four of them, along with a tablespoon or two of the adobo sauce they come in. This is where we get that beautiful smoky heat! Add the bay leaves, Mexican oregano, dried thyme, cumin, ground cinnamon, smoked paprika, and ground allspice. Blend everything until you have a smooth, thick paste. If the mixture is too thick to blend, add a little of the reserved chile soaking liquid, a tablespoon at a time, until it reaches a smooth, pourable consistency.
Step 3: Marinating and Browning the Beef
Season your beef chunks generously with salt and freshly ground black pepper. In a large bowl or a resealable bag, combine the beef with the chile paste you just made. Massage the paste into the meat, ensuring every piece is thoroughly coated. Let this marinate for at least 2 hours at room temperature, or preferably, overnight in the refrigerator for maximum flavor infusion. When you’re ready to cook, heat a tablespoon of neutral oil (like vegetable or canola) in a large, heavy-bottomed pot or Dutch oven over medium-high heat. Sear the marinated beef chunks in batches, making sure not to overcrowd the pot. You want to get a nice, deep brown sear on all sides. This browning process is crucial for developing rich flavor and adds another layer to our birria. Remove the seared beef and set aside.
Step 4: Slow Cooking the Birria
Once all the beef has been seared, return it to the pot. Pour in any remaining chile paste from the bowl (or bag) and about 4 cups of water or beef broth. You want enough liquid to mostly cover the meat. Bring the liquid to a simmer, then reduce the heat to low, cover the pot tightly, and let it cook for 3 to 4 hours, or until the beef is incredibly tender and falls apart easily with a fork. The longer it cooks, the more tender and flavorful it will become. Stir it occasionally, checking the liquid level and adding more water or broth if it seems to be getting too low. The aroma that will fill your kitchen during this stage is absolutely divine.
Step 5: Shredding the Meat and Preparing the Consommé
Once the beef is fork-tender, carefully remove the chunks from the pot and place them on a cutting board or in a large bowl. Using two forks, shred the meat into bite-sized pieces. Discard the bay leaves from the cooking liquid. Skim off any excess fat from the surface of the liquid – this is your precious consommé. You can do this with a spoon or by letting it cool slightly and then carefully pouring off the solidified fat. At this point, you can choose to strain the consommé for a smoother texture, or leave it as is for a more rustic feel. Taste the consommé and adjust seasoning with salt if needed. It should be deeply savory and have a hint of spice.
Step 6: Crisping the Tortillas and Assembling the Tacos
This is where the magic really happens! Heat a large skillet or griddle over medium-high heat. Dip each corn tortilla briefly into the reserved consommé. This infuses the tortilla with flavor and helps it crisp up beautifully. Place the consommé-dipped tortilla onto the hot skillet. Spoon a generous amount of the shredded birria meat onto one half of the tortilla. Fold the tortilla in half, creating a taco. Cook for 2-3 minutes per side, or until golden brown and crispy. You want that beautiful char and slight crispiness that is characteristic of authentic birria tacos. Repeat with the remaining tortillas and meat. Serve immediately with a side of the warm, rich consommé for dipping, along with your favorite garnishes like chopped cilantro, diced white onion, and lime wedges. These are best enjoyed right away while they’re piping hot and perfectly crispy. Trust me, you’ll be hooked!

Conclusion:
There you have it – my absolute favorite recipe for Birria Tacos! I truly believe this recipe strikes the perfect balance between authentic flavor and achievable home cooking. The slow-cooked, tender shredded beef infused with those rich, earthy chiles is simply divine, and dipping those crispy tortillas into the savory consomé is an experience you won’t soon forget. These Birria Tacos are not just a meal; they’re a celebration in a bite. I love serving them with a dollop of my favorite salsa, some finely chopped white onion, and fresh cilantro for that burst of freshness. If you’re feeling adventurous, consider adding a sprinkle of crum extractbled cotija cheese or even some pickled red onions for an extra layer of complexity.
I wholeheartedly encourage you to give this recipe a try. Don’t be intimidated by the ingredient list; the process is mostly hands-off, and the reward is immense. It’s a fantastic dish to make for a gathering or even just a cozy night in. I’m confident you’ll fall in love with these as much as I have!
Frequently Asked Questions:
How long does the Birria beef typically take to cook?
The beauty of birria is the slow cooking process. You’re looking at a minimum of 3-4 hours for the beef to become incredibly tender and fall-apart delicious. I usually let mine go for longer, around 5-6 hours, to really deepen the flavors and ensure maximum succulence.
Can I make the birria ahead of time?
Absolutely! In fact, I highly recommend it. The flavors meld beautifully overnight. Once the birria is cooked and cooled, you can store it in an airtight container in the refrigerator for up to 3 days. Reheat gently on the stovetop or in the oven before assembling your tacos.
What if I can’t find guajillo or ancho chiles?
While these chiles provide the signature depth of flavor, you can create a delicious variation using readily available dried chiles like pasilla or even a good quality chili powder blend. Experimenting is part of the fun!
My Fave Birria Tacos
Authentic and flavorful birria tacos made with a rich, spiced broth and tender shredded meat. Perfect for a hearty meal.
Ingredients
-
4 dried guajillo peppers
-
4 dried ancho chiles
-
4 chipotle peppers in adobo
-
1 onion, chopped
-
4 garlic cloves
-
1/2 cup crushed tomatoes
-
1/2 cup organic beef stock
-
1 Tbsp apple cider vinegar
-
2 bay leaves
-
2 Tbsps Mexican oregano
-
1 tsp dried thyme
-
1/2 tsp cumin
-
1/2 tsp ground cinnamon
-
1/2 tsp smoked paprika
-
1/2 tsp ground allspice
Instructions
-
Step 1
Toast dried chiles in a dry skillet until fragrant. Remove seeds and stems. Rehydrate chiles in hot water for 15-20 minutes. -
Step 2
In a blender, combine rehydrated chiles, chopped onion, garlic cloves, crushed tomatoes, beef stock, apple cider vinegar, Mexican oregano, dried thyme, cumin, ground cinnamon, smoked paprika, and ground allspice. -
Step 3
Blend until a smooth paste forms. Add chipotle peppers in adobo and bay leaves to the blender and pulse a few times. -
Step 4
Sear beef (chuck roast or short ribs) in a Dutch oven. Add the blended chile mixture and enough water to cover the meat. Bring to a boil, then reduce heat, cover, and simmer for at least 3 hours, or until meat is very tender. -
Step 5
Remove meat from the pot and shred. Skim excess fat from the broth and return shredded meat to the broth to keep it moist. -
Step 6
Warm tortillas, dip them in the birria consommé, and fill with shredded beef. Serve with chopped onion, cilantro, and lime wedges.
Important Information
Nutrition Facts (Per Serving)
It is important to consider this information as approximate and not to use it as definitive health advice.
Allergy Information
Please check ingredients for potential allergens and consult a health professional if in doubt.