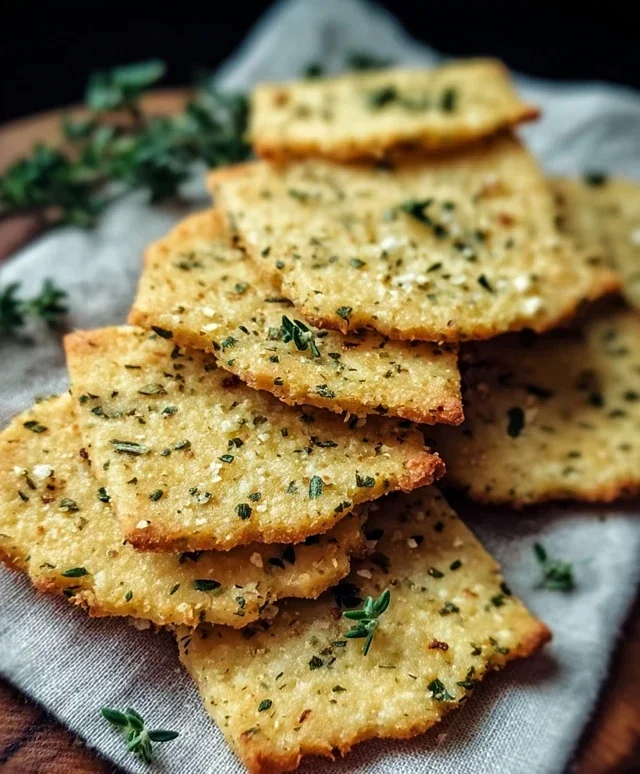
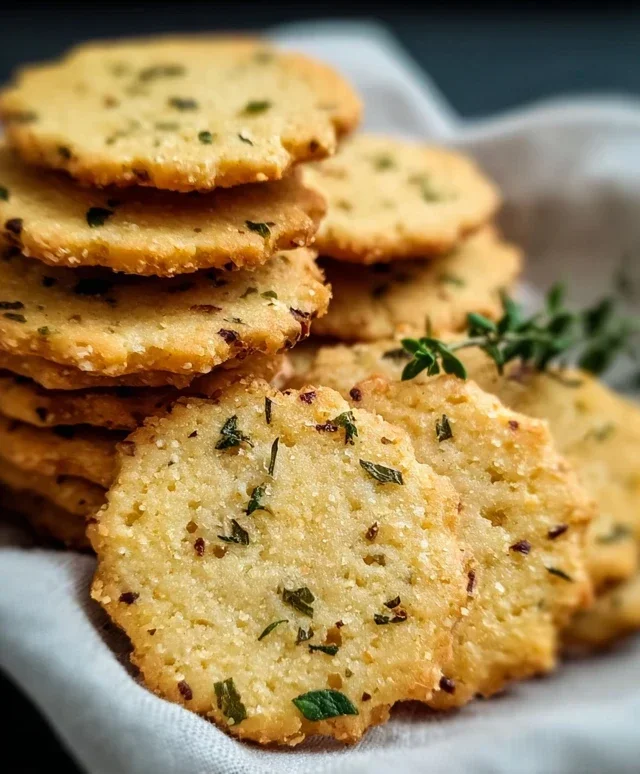
Garlic Herb Chickpea Flour Snack Crackers- Crispy Bites
Garlic and herb chickpea flour snack crackers are about to become your new obsession. Forget those store-bought options filled with who-knows-what; we’re talking about creating something truly special, right in your own kitchen. There’s something incredibly satisfying about biting into a homemade cracker – a delightful crunch, a burst of savory flavor, and the knowledge that you made it with love. These aren’t just any crackers; the earthy undertones of chickpea flour, combined with the pungent kick of garlic and a fragrant medley of herbs, create a symphony of taste that’s both sophisticated and incredibly moreish. They’re wonderfully versatile, perfect for your afternoon tea, a delightful accompaniment to your favorite dips, or simply enjoyed on their own as a guilt-free, flavorful snack. Get ready to impress yourself and everyone around you with these incredible garlic and herb chickpea flour snack crackers!
Garlic and Herb Chickpea Flour Snack Crackers
Looking for a healthy, delicious, and incredibly easy snack? You’ve come to the right place! These Garlic and Herb Chickpea Flour Snack Crackers are my go-to for a satisfying crunch that’s packed with flavor and goodness. Forget those store-bought crackers that are full of mystery ingredients. These are made with simple, wholesome components, and the best part is, they are incredibly versatile. You can customize the herbs, add a pinch of chili flakes for a kick, or even sprinkle on some nutritional yeast for a cheesy flavor. They’re perfect for dipping, topping with your favorite spreads, or just munching on their own. Let’s get baking!
Ingredients:
Crafting Your Flavorful Dough
The first step in creating these delightful crackers is to bring together all our dry ingredients. In a medium-sized mixing bowl, I like to add the chickpea flour, dried mixed herbs, garlic powder, salt, and black pepper. Give these a good whisk to ensure everything is evenly distributed. This might seem like a small step, but it’s important to prevent pockets of seasoning in your crackers. Once you’ve achieved a uniform mixture, it’s time to introduce the wet ingredients.
Now, let’s create our flavorful dough. In a separate small bowl or jug, I combine the ½ cup of water with the 2 tablespoons of olive oil. This is where the magic starts to happen. Gradually pour this liquid mixture into the dry ingredients while continuously stirring. I usually start with a spoon and then switch to my hands as the mixture begin extracts to come together into a cohesive dough. You’re looking for a consistency that’s not too sticky, but also not crum extractbly. If it feels a bit too dry and won’t come together, add another teaspoon or two of water, a little at a time, until you achieve a workable dough. Conversely, if it feels too wet, you can add a tiny bit more chickpea flour, again, just a teaspoon at a time. The goal is a soft, pliable dough that’s easy to handle. Once the dough has formed, I like to knead it for about a minute on a lightly floured surface. This helps to develop a smoother texture.
Rolling and Shaping Your Crackers
This is where we transform our dough into beautiful crackers. Preheat your oven to 180°C (350°F). Line a large baking sheet with parchment paper. This is crucial to prevent sticking and makes for easy cleanup. Now, take your dough and place it onto the prepared baking sheet. You can do this directly, or if you prefer a more precise approach, you can place it between two sheets of parchment paper. I find it easiest to roll the dough out directly on the parchment-lined baking sheet.
Using a rolling pin, I start to roll the dough out as thinly as possible. The thinner you roll it, the crispier your crackers will be. Aim for a thickness of about 1-2 millimeters. It’s important to be patient here and try to get an even thickness throughout. If the dough starts to stick to your rolling pin, dust it with a tiny bit of chickpea flour or lightly oil the rolling pin. Once the dough is rolled out to your desired thinness, it’s time to score it.
Scoring and Topping for Perfect Crunch
This step is key to ensuring your crackers break apart easily after baking and also adds a lovely aesthetic. Using a pizza cutter or a sharp knife, gently score the dough into your desired cracker shapes. You can make squares, rectangles, or even triangles. Don’t cut all the way through; you just want to mark the lines. Now comes the fun part – the toppings!
Lightly brush the surface of the scored dough with a little extra olive oil. This will help the toppings adhere and give the crackers a beautiful sheen. Now, generously sprinkle on sesame seeds. You can also add some additional dried herbs for an extra burst of flavor and visual appeal. Finally, a sprinkle of flaky sea salt is the perfect finishing touch, adding a delightful salty crunch. This is your chance to get creative and personalize your crackers.
Baking to Golden Perfection
Now it’s time to bake these delicious creations. Carefully transfer the baking sheet to your preheated oven. Bake for approximately 15-20 minutes, or until the edges of the crackers are golden brown and they appear firm. Keep an eye on them towards the end of the baking time, as ovens can vary, and you don’t want them to burn.
Once baked, remove the baking sheet from the oven. If you scored your crackers well, they should break apart easily along the scored lines. If any are still a bit connected, gently use your knife or pizza cutter to finish the separation while they are still warm. For an extra crispy cracker, you can turn off the oven, leave the oven door slightly ajar, and let the crackers cool down inside the oven for another 10-15 minutes. This helps to dry them out further.
Once completely cooled, store your Garlic and Herb Chickpea Flour Snack Crackers in an airtight container at room temperature. They should stay fresh for up to a week, though I doubt they’ll last that long! Enjoy these wholesome, homemade treats with your favorite dips, cheeses, or simply as a satisfying snack.
Conclusion:
I hope you’re as excited about these Garlic and Herb Chickpea Flour Snack Crackers as I am! They truly are a game-changer when you’re craving something savory and satisfying. The beauty of this recipe lies in its simplicity, its wholesome ingredients, and the incredible flavor packed into every bite. Made with nutrient-rich chickpea flour, these crackers are naturally gluten-free and vegan, making them a fantastic option for a wide range of dietary needs. They offer a delightful crunch and a burst of aromatic herbs and garlic that will have you reaching for more.
These versatile crackers are perfect for dipping into your favorite hummus, guacamole, or a creamy herbed dip. They also make a wonderful base for small appetizers, topped with cream cheese and chives, smoked salmon, or a slice of avocado. Feel free to experiment with different herbs like rosemary, thyme, or even a pinch of red pepper flakes for a touch of heat. The possibilities are endless! I really encourage you to give these Garlic and Herb Chickpea Flour Snack Crackers a try. I know you’ll love how easy they are to make and how delicious they turn out.
Frequently Asked Questions:
Q: How should I store these crackers to keep them crispy?
A: For optimal crispiness, store your cooled crackers in an airtight container at room temperature. If you live in a humid environment, you can also add a small food-safe desiccant packet to the container to absorb any excess moisture.
Q: Can I use different types of flour instead of chickpea flour?
A: While chickpea flour is key to the texture and flavor of these specific crackers, you could experiment with other gluten-free flours like almond flour or a gluten-free all-purpose blend. However, be aware that this may alter the texture and baking time. Chickpea flour provides a wonderfully nutty flavor and crispiness.
Q: How long do these crackers typically last?
A: When stored properly in an airtight container at room temperature, these crackers should stay fresh and crispy for about 5-7 days. Check for any signs of stnon-alcoholic aleness before consuming.
Garlic and Herb Chickpea Flour Snack Crackers
Crispy and flavorful crackers made with chickpea flour, garlic, and herbs. Perfect for snacking.
Ingredients
-
1 cup chickpea flour (besan)
-
½ cup water
-
2 tablespoons olive oil
-
1 teaspoon dried mixed herbs (such as rosemary, thyme, oregano)
-
1 teaspoon garlic powder
-
½ teaspoon salt
-
¼ teaspoon black pepper
-
Sesame seeds
-
Flaky sea salt
-
Additional dried herbs
-
Extra olive oil for brushing
Instructions
-
Step 1
Preheat oven to 375°F (190°C). Line a baking sheet with parchment paper. -
Step 2
In a medium bowl, whisk together chickpea flour, dried mixed herbs, garlic powder, salt, and black pepper. -
Step 3
Add the water and olive oil to the dry ingredients. Mix until a thick batter forms. If it seems too thick, add a teaspoon of water at a time until it reaches a spreadable consistency. -
Step 4
Spread the batter thinly and evenly onto the prepared baking sheet using a spatula or the back of a spoon. Aim for a thickness of about 1/8 inch for crispier crackers. -
Step 5
Sprinkle generously with sesame seeds, flaky sea salt, and additional dried herbs. -
Step 6
Bake for 15-20 minutes, or until the edges are golden brown and the crackers are firm. Keep an eye on them as they can burn quickly. -
Step 7
Let the crackers cool completely on the baking sheet before breaking them into pieces. -
Step 8
Once cooled, brush lightly with extra olive oil if desired for added flavor and crispness.
Important Information
Nutrition Facts (Per Serving)
It is important to consider this information as approximate and not to use it as definitive health advice.
Allergy Information
Please check ingredients for potential allergens and consult a health professional if in doubt.