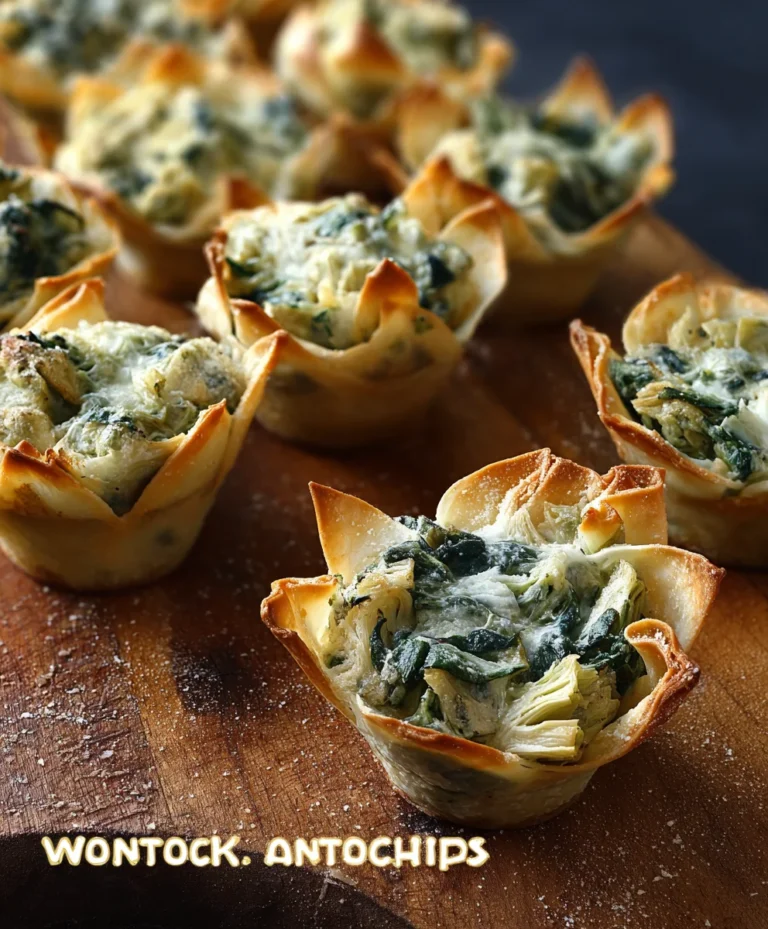
Crispy Zucchini Chips- Easy Oven Baked Snack
Crispy zucchini chips are about to become your new favorite way to enjoy this versatile summer squash. Forget soggy, bland vegetables; we’re talking about a snack that’s unbelievably addictive, satisfyingly crunchy, and bursting with flavor. If you’ve ever found yourself with an abundance of zucchini from the garden or farmer’s market, or even just looking for a healthier alternative to potato chips, then these crispy zucchini chips are an absolute game-changer. They’re the perfect vehicle for dips, a delightful side dish, or a guilt-free indulgence when that snack craving hits. What truly makes these crispy zucchini chips special is their incredible texture – a delicate crunch that gives way to a tender, subtly sweet interior. It’s a magical transformation that will have you reaching for more, one perfect chip at a time.

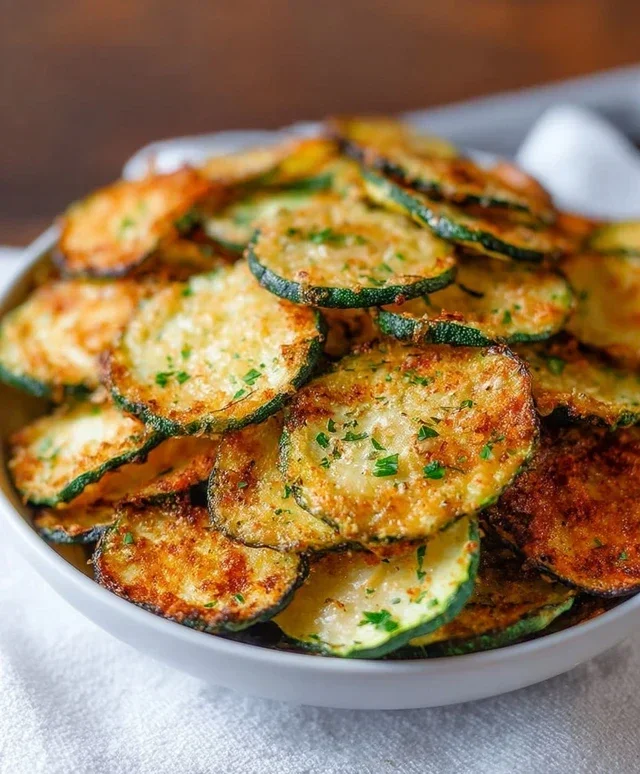
Crispy Zucchini Chips
If you’re looking for a healthy and delicious way to enjoy your garden’s bounty, or just a fantastic snack alternative, look no further than these incredibly easy Crispy Zucchini Chips. Forget greasy potato chips; these vibrant green slices offer a satisfying crunch and a burst of fresh flavor with every bite. They’re so addictive, you might find yourself making batch after batch! The beauty of this recipe lies in its simplicity and the minimal ingredients required. You’ll be amazed at how something so humble can transform into such a delightful treat.
Ingredients:
Cooking Instructions:
The key to achieving perfectly crispy zucchini chips is to remove as much moisture as possible from the zucchini before baking. This might sound like an extra step, but trust me, it’s crucial for that satisfying crunch. Don’t skip it!
Preparation is Key: Getting Your Zucchinis Ready
The first step is to prepare your zucchinis. Wash them thoroughly under cool running water and then pat them completely dry with a clean kitchen towel or paper towels. This initial drying helps remove surface moisture. Next, trim off the ends of each zucchini. You can then choose to peel the zucchinis or leave the skin on. Leaving the skin on adds a lovely green color and a slight chegrape juicess that contrasts beautifully with the crisp edges.
Now, it’s time to slice. For the best results, use a mandoline slicer if you have one. This will ensure incredibly thin and uniform slices, which are essential for even crisping. Aim for slices that are about 1/16 to 1/8 of an inch thick. If you don’t have a mandoline, a very sharp knife and a steady hand will do the trick. Just be patient and try to get them as thin and consistent as possible. Thicker slices will take longer to crisp up and might not get as crunchy.
Once all your zucchinis are sliced, you’ll notice a lot of moisture. This is where the magic happens. Lay the zucchini slices in a single layer on a clean kitchen towel or paper towels. Sprinkle them generously with sea salt. The salt will draw out the excess moisture through osmosis. Let them sit for about 15-20 minutes. You’ll see little beads of water forming on the surface of the zucchini. After the resting period, gently blot the zucchini slices with more paper towels to absorb all the released moisture. The drier they are, the crispier your chips will be!
Seasoning and Baking: The Transformation Begin extracts
Preheat your oven to a moderately high temperature – 400°F (200°C). This high heat is important for creating a crispy texture quickly. Line two large baking sheets with parchment paper. Parchment paper prevents sticking and makes for easy cleanup.
Arrange the dried and blotted zucchini slices in a single layer on the prepared baking sheets. Make sure they are not overlapping, as this will cause them to steam rather than bake and crisp. Overlapping will lead to soggy chips, and nobody wants that!
Drizzle the olive oil evenly over the zucchini slices. Use your hands or a pastry brush to gently coat both sides of each slice. Don’t go overboard with the oil; we want them to crisp, not fry. Then, sprinkle the sea salt, garlic powder, smoked paprika, and black pepper evenly over the oiled slices. If you’re using grated parmesan, now is the time to sprinkle it over the top of some or all of the chips. The parmesan adds a wonderful savory, cheesy flavor that pairs exceptionally well with the zucchini.
Now, let’s get them into the oven. Carefully place the baking sheets in the preheated oven. Bake for 10-15 minutes. Keep a close eye on them, as they can go from perfectly golden and crisp to burnt very quickly. You’re looking for the edges to start browning and the slices to appear dry and slightly shrunken.
Checking for Crispness and Finishing Touches
After the initial 10-15 minutes, check the chips. They should be starting to look dry and slightly curled. If some slices are already crisp while others are still a bit soft, you can carefully remove the crisp ones and leave the others in for a few more minutes.
For an even crisp, I often like to flip the zucchini chips halfway through the baking process. So, around the 7-8 minute mark, carefully flip each slice with a spatula or tongs and continue baking for another 5-10 minutes, or until they reach your desired level of crispness. The exact baking time will depend on your oven and how thinly you sliced the zucchini. They should feel dry to the touch and have a satisfying snap when you break one.
Once they are perfectly crispy, remove them from the oven. Let them cool on the baking sheets for a few minutes. As they cool, they will continue to crisp up even more. Transfer them to a wire rack to cool completely. This allows air to circulate and prevents any residual steam from making them soggy.
These Crispy Zucchini Chips are best enjoyed immediately for maximum crispness. They are a fantastic guilt-free snack, a delightful side dish, or even a fun topping for salads and soups. Store any leftovers in an airtight container at room temperature for a day or two, though they are truly at their best when freshly made. Enjoy your homemade, healthy, and incredibly delicious zucchini chips!
Conclusion:
There you have it! You’ve learned how to transform simple zucchini into incredibly delicious and satisfying crispy zucchini chips. This recipe is fantastic because it’s remarkably easy to make, uses minimal ingredients, and offers a guilt-free way to enjoy a crunchy snack. It’s perfect for a quick appetizer, a healthy alternative to potato chips, or even a fun addition to packed lunches. I love how versatile these chips are; they’re a delightful way to use up garden zucchini or pick up a few extra from the grocery store. Don’t hesitate to give this recipe a try – I’m confident you’ll be hooked on how wonderfully crispy they turn out!
For serving suggestions, these crispy zucchini chips are excellent on their own, but they also pair beautifully with a variety of dips. Think a creamy ranch, a zesty garlic aioli, or even a spicy sriracha mayo. They also make a fantastic topping for salads or a crunchy layer in wraps. When it comes to variations, feel free to experiment with your favorite seasonings! Smoked paprika, chili powder, or a sprinkle of Parmesan cheese before baking can add an exciting twist.
Frequently Asked Questions:
How can I ensure my zucchini chips are truly crispy?
The key to crispy zucchini chips lies in properly drying the zucchini slices and ensuring they aren’t overcrowded on the baking sheet. Patting them very dry with paper towels after slicing is crucial. Also, baking them in a single layer allows for even air circulation and crisping. If they aren’t quite as crispy as you’d like, you can often pop them back in the oven for a few extra minutes, keeping a close eye on them to prevent burning.
Can I make these zucchini chips ahead of time?
While they are best enjoyed fresh for maximum crispness, you can store cooled zucchini chips in an airtight container at room temperature for a day or two. However, they may lose some of their crunch over time. For optimal results, I highly recommend making them right before you plan to serve them.
What if I don’t have a mandoline slicer?
No worries at all! While a mandoline helps achieve perfectly uniform slices, you can absolutely use a sharp knife. The goal is to get them as thin and even as possible, around 1/8 inch thick. This will ensure they cook through and get crispy at the same rate.
Crispy Zucchini Chips
Thinly sliced zucchini baked until crispy and seasoned with savory spices and parmesan.
Ingredients
-
2 medium zucchinis
-
1 tablespoon olive oil
-
1/2 teaspoon sea salt
-
1/2 teaspoon garlic powder
-
1/2 teaspoon smoked paprika
-
1/4 teaspoon black pepper
-
2 tablespoons grated parmesan
Instructions
-
Step 1
Preheat oven to 400°F (200°C). Line two baking sheets with parchment paper. -
Step 2
Wash and thinly slice the zucchinis into rounds, about 1/8-inch thick. A mandoline slicer is recommended for uniform thickness. -
Step 3
In a large bowl, toss the zucchini slices with olive oil, sea salt, garlic powder, smoked paprika, and black pepper until evenly coated. -
Step 4
Arrange the seasoned zucchini slices in a single layer on the prepared baking sheets, ensuring they do not overlap. -
Step 5
Bake for 10 minutes, then flip each slice and bake for another 10-12 minutes, or until golden brown and crispy. -
Step 6
Remove from oven and immediately sprinkle with grated parmesan cheese. Serve warm.
Important Information
Nutrition Facts (Per Serving)
It is important to consider this information as approximate and not to use it as definitive health advice.
Allergy Information
Please check ingredients for potential allergens and consult a health professional if in doubt.