Crispy Salmon Rice Recipe- Easy Delicious Flavor
Salmon crispy rice is a dish that has utterly captivated my taste buds and, I’m sure, will do the same for yours. There’s something undeniably magical about the textural symphony this creation offers – the yielding richness of perfectly cooked salmon meeting the satisfying crunch of golden-brown rice. It’s no wonder this recipe has become a sensation! People adore salmon crispy rice because it’s elegant enough for a dinner party but surprisingly simple to whip up for a weeknight treat. What truly elevates this dish is the beautiful interplay of flavors and textures. We’re talking about tender, flaky salmon, seasoned to perfection, nestled atop a bed of exquisitely crispy rice that’s been pan-fried to a delightful golden hue. Get ready to experience a culinary masterpiece that’s as delightful to make as it is to devour!
Salmon Crispy Rice
Crispy rice is having a moment, and for good reason! The delightful contrast of crunchy, golden-brown rice cakes topped with a luscious, spicy salmon mixture is simply irresistible. This dish feels elegant enough for a special occasion but is surprisingly straightforward to make at home. The key is achieving that perfect, shatteringly crisp texture on the rice, which provides a fantastic base for the rich, flavorful salmon. It’s a dish that truly engages all your senses, from the visual appeal of the vibrant colors to the satisfying crunch and the explosion of savory, spicy, and umami flavors. I love serving this as an appetizer or a light main course; it’s always a crowd-pleaser and a dish that makes me feel like a culinary rockstar.
Ingredients:
Cooking Instructions:
First, we need to prepare the rice cakes. The foundation of this dish is perfectly seasoned and pressed sushi rice.
Preparing the Rice Cakes:
1. Season the Rice: In a medium bowl, gently mix together the cooked sushi rice, rice vinegar, sugar, and salt. Be careful not to mash the rice; use a spatula or rice paddle to fold the ingredients together until evenly distributed. The vinegar, sugar, and salt mixture will not only flavor the rice but also help it crisp up beautifully when fried. Let this mixture sit for about 10-15 minutes to allow the flavors to meld and the rice to cool slightly, making it easier to handle.
2. Forming the Rice Cakes: Lightly wet your hands with water to prevent sticking. Take about ¼ cup of the seasoned rice and gently press it into a small patty, about ½ inch thick and 2-3 inches in diameter. You want them to be firm enough to hold their shape but not so dense that they won’t crisp up. You should be able to get about 8-10 rice cakes from this amount of rice. Arrange the formed rice cakes on a plate lined with parchment paper. For the best crisping results, you can chill these formed rice cakes in the refrigerator for at least 30 minutes. This step is crucial as it helps them hold their shape during frying and ensures they achieve a superior crunch. If you’re short on time, you can skip the chilling, but the crisp factor might be slightly diminished.
3. Frying the Rice Cakes: Now for the magic! Heat about ½ inch of vegetable oil in a large skillet or cast-iron pan over medium-high heat. You want the oil to be hot enough that a small piece of rice sizzles immediately when dropped in, but not so hot that it smokes excessively. Carefully place the chilled rice cakes into the hot oil, being sure not to overcrowd the pan. Fry them in batches if necessary. Cook for 3-5 minutes per side, or until they are deeply golden brown and crispy. The exterior should be firm and have a delightful crunch. Using a slotted spoon or spider strainer, carefully remove the crispy rice cakes from the oil and place them on a wire rack set over a baking sheet to drain any excess oil. This also helps maintain their crispiness.
Preparing the Salmon Topping:
4. Creating the Spicy Mayo Mixture: While the rice cakes are frying or draining, let’s prepare the delicious salmon topping. In a separate bowl, combine the Kewpie mayonnaise, sriracha, soy sauce, and sesame oil. Kewpie mayonnaise, with its richer, tangier flavor, is perfect for this. Whisk these ingredients together until smooth and well combined, creating a luscious, creamy, and spicy sauce. Taste and adjust the sriracha or soy sauce to your preference.
5. Assembling the Salmon Topping: Add the chopped sushi-grade salmon to the spicy mayo mixture. Gently fold the salmon into the sauce, ensuring each piece is coated. Stir in most of the thinly sliced scallions, reserving some for garnish. The salmon is raw and meant to be lightly “cooked” by the acidity of the mayonnaise, much like in a poke bowl. This creates a beautiful, tender texture that contrasts wonderfully with the crispy rice.
Final Assembly and Serving:
Once your crispy rice cakes are golden and ready, it’s time to bring it all together.
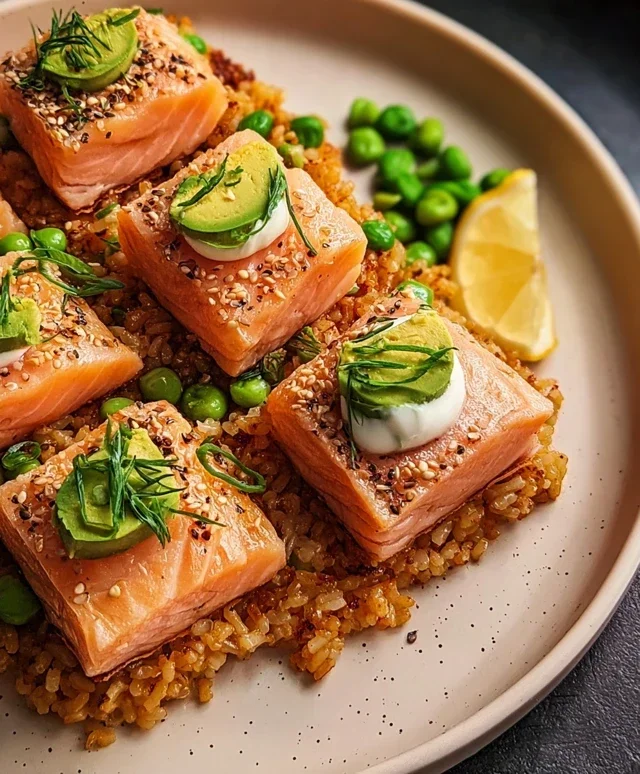
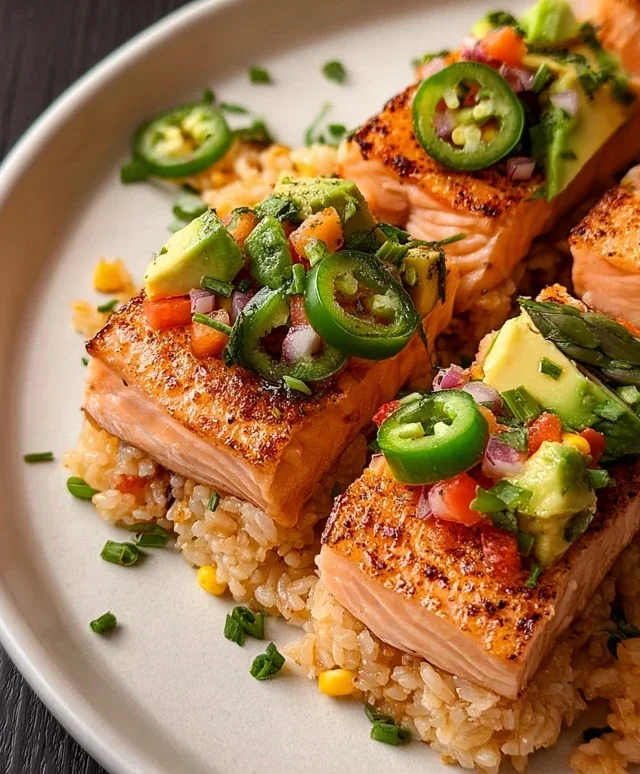
6. Plating and Garnishing: Arrange the crispy rice cakes on a serving platter. Spoon a generous amount of the salmon mixture over each rice cake. Don’t be shy; you want a good heap of that delicious salmon. Drizzle any extra spicy mayo mixture over the top. Garnish with the reserved sliced scallions, thin slices of fresh avocado, and a few rings of jalapeño for an extra kick. Finally, sprinkle generously with toasted black and white sesame seeds. The toasted sesame seeds add a beautiful nutty aroma and a final textural element. Serve immediately to enjoy the full contrast of the hot, crispy rice and the cool, flavorful salmon. This dish is best enjoyed right away while the rice is at its crispiest!
Conclusion:
I truly hope you’ve enjoyed exploring this recipe for Salmon Crispy Rice! It’s a dish that offers a delightful textural contrast and a burst of fresh flavors, making it a fantastic option for a weeknight dinner or an impressive appetizer. The combination of flaky, perfectly cooked salmon atop crunchy, golden rice is simply irresistible. I love how versatile this recipe is, allowing you to adapt it to your personal taste. Whether you’re a seasoned home cook or just starting out, I encourage you to give this Salmon Crispy Rice a try. You’ll be amazed at how simple yet sophisticated it tastes.
For serving, I often pair it with a light, crisp salad or some steamed edamame. The vibrant colors and diverse textures make it a feast for the eyes as well as the palate. Don’t be afraid to experiment with your favorite seasonings or sauces to make it your own!
Frequently Asked Questions:
Can I use a different type of fish instead of salmon?
Absolutely! While salmon is fantastic for its richness, you could certainly try this with other firm white fish like cod or halibut. Just adjust the cooking time to ensure the fish is cooked through but still moist.
What are some other topping variations?
The possibilities are endless! Consider adding thinly sliced avocado for creaminess, a sprinkle of toasted sesame seeds for extra crunch, some finely chopped chives for a fresh oniony note, or even a drizzle of sriracha mayo for a spicy kick. Pickled gin extractger also adds a wonderful tang.
How can I make the crispy rice extra crispy?
The key to ultra-crispy rice is to ensure it’s well-pressed and then fried at the right temperature. Make sure your oil is hot before adding the rice patties, and resist the urge to overcrowd the pan, which can lower the oil temperature and lead to soggy rice. Letting the cooked rice sit for a bit before frying can also help dry it out slightly.
Salmon Crispy Rice
Deliciously crispy sushi rice cakes topped with a spicy, creamy salmon mixture and fresh garnishes.
Ingredients
-
3 cups cooked sushi rice (short-grain rice)
-
2 tablespoons rice vinegar
-
1 tablespoon sugar
-
1 teaspoon salt
-
Vegetable oil for frying
-
1 pound sushi-grade salmon, chopped
-
4 tablespoons Kewpie mayonnaise
-
2 tablespoons sriracha
-
2 tablespoons scallions, thinly sliced
-
2 teaspoons soy sauce
-
2 teaspoons sesame oil
-
Sliced avocado
-
Jalapeño, thinly sliced
-
Black and white sesame seeds, toasted
Instructions
-
Step 1
In a small bowl, whisk together rice vinegar, sugar, and salt until sugar and salt are dissolved. Gently fold this mixture into the cooked sushi rice. -
Step 2
Line a baking dish with plastic wrap. Press the seasoned sushi rice evenly into the dish, about 1/2 inch thick. Chill in the refrigerator for at least 30 minutes until firm. -
Step 3
Once chilled, cut the rice into desired shapes (squares or rectangles work well). Heat a generous amount of vegetable oil in a non-stick skillet over medium-high heat. Fry the rice cakes in batches until golden brown and crispy on both sides. Drain on paper towels. -
Step 4
While the rice is frying, in a separate bowl, combine Kewpie mayonnaise, sriracha, soy sauce, and sesame oil. Add the chopped salmon and thinly sliced scallions. Mix gently to combine. -
Step 5
Top each crispy rice cake with a spoonful of the salmon mixture. Garnish with sliced avocado, thinly sliced jalapeño, and toasted black and white sesame seeds.
Important Information
Nutrition Facts (Per Serving)
It is important to consider this information as approximate and not to use it as definitive health advice.
Allergy Information
Please check ingredients for potential allergens and consult a health professional if in doubt.