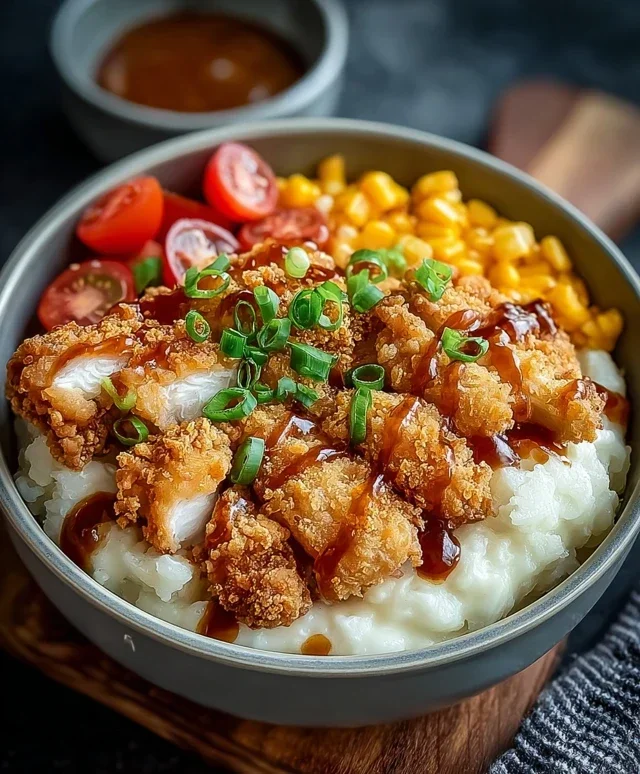
Crispy Chicken Fried Chicken Recipe
Chicken Fried Chicken is more than just a meal; it’s a culinary hug, a comfort food classic that speaks to our deepest cravings for something truly satisfying. Have you ever experienced that irresistible urge for a crispy, golden-brown exterior giving way to impossibly tender chicken within? That’s the magic of Chicken Fried Chicken. It’s the dish that makes us feel instantly at home, a nostalgic reminder of family gatherings and well-loved recipes passed down through generations. What truly makes this dish so special is its masterful duality: the crunchy, savory coating that offers a delightful textural contrast to the juicy, succulent chicken. It’s a symphony of flavors and textures that hits all the right notes, making it a perennial favorite for a reason. Get ready to elevate your home cooking with this incredible Chicken Fried Chicken recipe.
Chicken Fried Chicken
There’s something undeniably comforting about a plate of perfectly executed Chicken Fried Chicken. It’s a dish that evokes warm feelings, often associated with Southern hospitality and hearty, satisfying meals. The crispy, golden-brown exterior giving way to tender, juicy chicken, all smothered in a rich, creamy gravy – it’s a culinary hug in every bite. While it might seem intimidating, creating this restaurant-quality classic at home is more achievable than you think. The key lies in a few crucial steps, from preparing the chicken to getting that golden crust just right, and of course, the gravy. Let’s dive into how we can create this iconic comfort food together.
Ingredients:
Cooking Instructions
The journey to delicious Chicken Fried Chicken begin extracts with preparing our chicken. For this recipe, we’re using thin-sliced chicken breasts. This is a great shortcut, as it means the chicken will cook through quickly and evenly without drying out. If your chicken breasts are thicker, you can pound them gently between two pieces of plastic wrap until they reach about 1/2 inch thickness. This ensures consistent cooking.
Next, we’re going to set up our dredgin extractg station. In a shallow dish or a large resealable bag, combine 2 cups of flour, baking powder, baking soda, salt, pepper, and garlic powder. Whisk or shake well to ensure all the dry ingredients are thoroughly mixed. This blend of flour and leavening agents will create a light and crispy coating.
In a separate medium bowl, whisk together the buttermilk, egg, and hot sauce. The buttermilk is essential here; its acidity helps tenderize the chicken and also contributes to the crispiness of the coating. The hot sauce adds a subtle warmth and depth of flavor without making the chicken spicy.
Now, it’s time to coat the chicken. Take each thin chicken breast and first dip it into the buttermilk mixture, ensuring it’s fully coated. Let any excess drip off. Then, place the coated chicken into the flour mixture. Press the flour onto the chicken firmly, making sure it’s completely covered. You want a good, thick layer of seasoned flour for maximum crunch. For an extra-crispy coating, you can double-dip: dip the floured chicken back into the buttermilk, then back into the flour mixture. This creates a more substantial crust. Place the coated chicken on a wire rack set over a baking sheet to rest for about 10-15 minutes. This resting period allows the coating to adhere better to the chicken, preventing it from falling off during frying.
Frying the Chicken
This is where the magic happens! Heat your frying oil in a large, heavy-bottomed skillet over medium-high heat. You want the oil to be around 350°F (175°C). If you don’t have a thermometer, you can test the oil by dropping a tiny pinch of flour into it; it should sizzle immediately. Carefully place the coated chicken breasts into the hot oil, being careful not to overcrowd the skillet. You should be able to fry about 2-3 pieces at a time, depending on the size of your skillet. Overcrowding will lower the oil temperature, leading to greasy chicken.
Fry the chicken for about 3-4 minutes per side, or until it’s a deep golden brown and cooked through. The thin cut of the chicken ensures it cooks quickly. Use tongs to carefully flip the chicken. Once cooked, remove the chicken from the oil and place it on a clean wire rack set over a baking sheet. This allows excess oil to drain off, keeping the chicken wonderfully crispy. Resist the urge to put it on paper towels, as this can make the bottom soggy. Keep the fried chicken warm in a low oven (around 200°F or 95°C) while you prepare the gravy.
Making the Gravy
Now for the crowning glory: the gravy. Carefully pour out about 1/4 cup of the reserved frying oil from the skillet into a separate bowl, leaving the rest in the skillet. You want to use the flavorful oil that cooked the chicken. Whisk in 1/3 cup of flour into the reserved hot oil in the skillet. Cook this mixture, stirring constantly, over medium heat for about 1-2 minutes. This is called a roux, and cooking it for a bit helps to cook out the raw flour taste and creates a richer flavor base for your gravy. The color of your roux will depend on how long you cook it; a light roux is perfect for a classic white gravy.
Gradually whisk in the milk, about half a cup at a time, making sure to incorporate it fully before adding more. Keep whisking until the gravy begin extracts to thicken. Once all the milk is added and the gravy has reached your desired consistency, season it with salt and pepper to taste. Taste and adjust seasoning as needed. If the gravy is too thick, you can add a splash more milk. If it’s too thin, you can let it simmer a bit longer, or make a slurry of a tablespoon of flour mixed with a little milk or water and whisk it in.
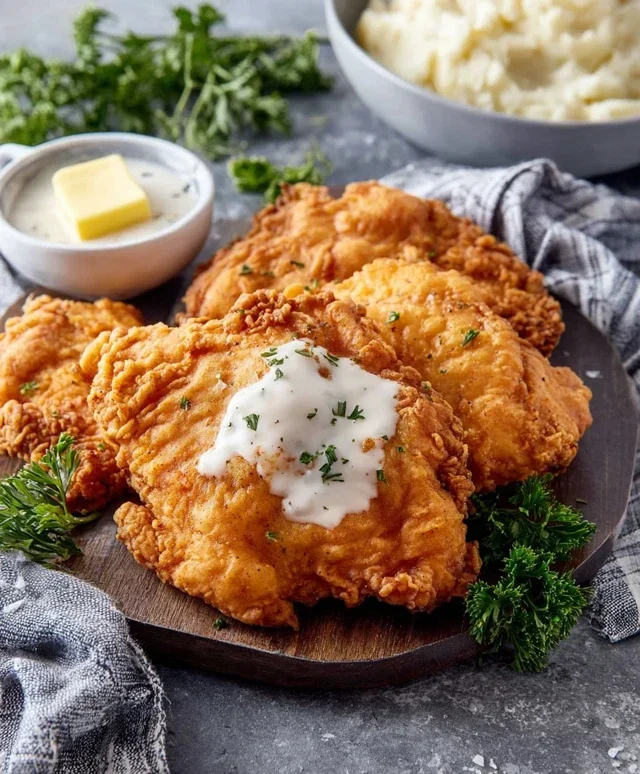
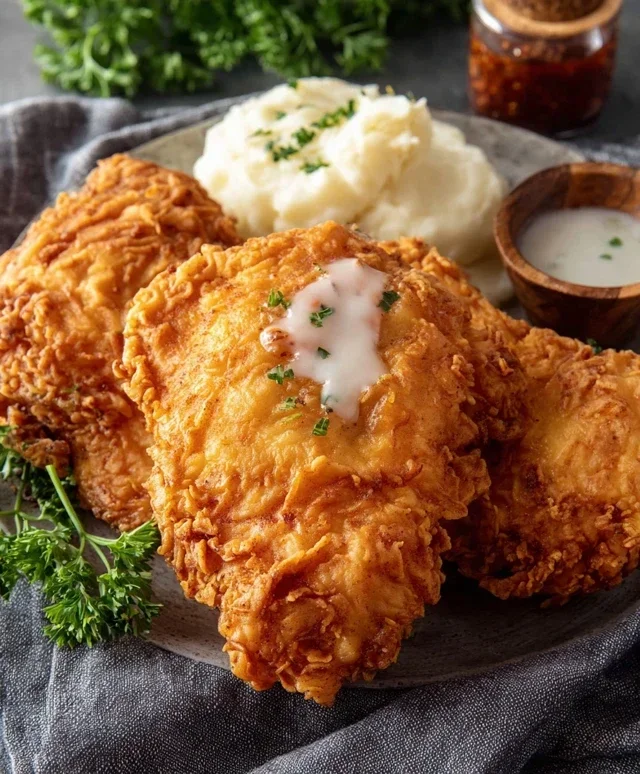
To serve, place a piece or two of your beautifully fried chicken on a plate and generously ladle the warm, creamy gravy over the top. This Chicken Fried Chicken is a true taste of home, perfect served with mashed potatoes, green beans, or your favorite comfort food sides. Enjoy!
Conclusion:
There you have it! A simple yet incredibly satisfying recipe for Chicken Fried Chicken that’s guaranteed to become a family favorite. The beauty of this dish lies in its delightful contrast: the crispy, golden-brown exterior giving way to tender, juicy chicken inside, all smothered in a luscious, creamy gravy. It’s comfort food at its finest, perfect for a weekend treat or a special weeknight meal. Don’t be intimidated; with these clear steps, you’ll achieve restaurant-quality results right in your own kitchen. So go ahead, gather your ingredients, and give this amazing Chicken Fried Chicken a try – you won’t regret it!
For serving, consider classic Southern sides like creamy mashed potatoes, buttery biscuits, and a fresh green bean casserole. A simple side salad can offer a refreshing counterpoint. If you’re feeling adventurous with variations, try adding a pinch of cayenne pepper to your flour mixture for a subtle kick, or experiment with different herbs in your dredgin extractg station. You could even top your finished Chicken Fried Chicken with a drizzle of hot honey for an extra layer of flavor.
Frequently Asked Questions:
Can I use chicken thighs instead of breasts?
Absolutely! Chicken thighs are often even more forgiving and can yield wonderfully juicy results when fried. Adjust the frying time slightly, as they may take a minute or two longer to cook through compared to boneless, skinless breasts.
How can I make the chicken extra crispy?
For maximum crispiness, ensure your oil is at the correct temperature (around 350°F or 175°C) and avoid overcrowding the pan. Let the chicken pieces have plenty of space so they fry evenly. Double-dipping in the egg and flour mixture can also create a thicker crust. Make sure your flour coating is well-seasoned!
What if I don’t have buttermilk?
No problem! You can create a buttermilk substitute by mixing 1 cup of milk with 1 tablespoon of lemon juice or white vinegar. Let it sit for 5-10 minutes until it thickens slightly. This will work perfectly as a tenderizer and flavor enhancer for your Chicken Fried Chicken.
Chicken Fried Chicken
A classic Southern dish featuring crispy, golden-fried chicken cutlets served with a creamy, savory gravy. This recipe uses thin-sliced chicken breasts for a quicker cook time and even crispiness.
Ingredients
-
6-8 thin sliced chicken breasts
-
2 cups flour
-
2 tsp baking powder
-
1 tsp baking soda
-
1 tsp salt
-
1 tsp pepper
-
1 tsp garlic powder
-
1 1/2 cup buttermilk
-
1 egg
-
1 Tbs hot sauce
-
Oil for frying
-
1/4 cup reserved oil from frying
-
1/3 cup flour
-
2 cup milk
-
Salt & pepper
Instructions
-
Step 1
In a shallow dish, whisk together 2 cups flour, baking powder, baking soda, salt, pepper, and garlic powder. -
Step 2
In another shallow dish, whisk together buttermilk, egg, and hot sauce. -
Step 3
Dip each chicken breast into the buttermilk mixture, letting excess drip off, then dredge in the flour mixture, ensuring it is well coated. Set aside on a wire rack. -
Step 4
Heat enough oil in a large skillet over medium-high heat to generously cover the bottom of the pan. Fry chicken in batches until golden brown and cooked through, about 3-4 minutes per side. Remove from skillet and drain on paper towels. Reserve 1/4 cup of the frying oil. -
Step 5
In the same skillet (with the reserved oil), whisk in 1/3 cup flour to create a roux. Cook for 1-2 minutes, stirring constantly, until lightly browned. -
Step 6
Gradually whisk in milk until smooth. Bring to a simmer and cook, stirring, until thickened. Season with salt and pepper to taste. Serve gravy over the chicken.
Important Information
Nutrition Facts (Per Serving)
It is important to consider this information as approximate and not to use it as definitive health advice.
Allergy Information
Please check ingredients for potential allergens and consult a health professional if in doubt.