Country Fried Chicken – Crispy & Delicious Recipe
Country Fried Chicken is more than just a meal; it’s a warm hug from Grandma’s kitchen, a taste of pure comfort that conjures up sun-drenched afternoons and laughter-filled gatherings. What is it about this classic dish that makes it so universally adored? Perhaps it’s the irresistible symphony of textures: the shatteringly crisp, golden-brown crust yielding to juicy, tender chicken within. Or maybe it’s the simple, honest flavors – the seasoned flour, the rich buttermilk marinade – that speak to our souls. This isn’t fancy dining; this is soul food at its finest, a testament to the power of simple ingredients transformed into something truly magical. My journey to perfecting this Country Fried Chicken has been one of love and delicious experimentation, and today, I’m thrilled to share my secrets with you, ensuring your next batch is the best you’ve ever made.
Country Fried Chicken
There’s something undeniably comforting about a plate of golden, crispy country fried chicken. It’s a dish that evokes memories of family gatherings, Sunday dinners, and the simple pleasure of perfectly cooked, juicy chicken. Achieving that iconic crunch and tender interior is surprisingly straightforward with a few key techniques and the right ingredients. We’re going to walk through how to make a batch of country fried chicken that will have everyone asking for seconds. Get ready to experience a taste of true Southern comfort!
Ingredients:
Instructions:
Preparation is Key
The first step in creating fantastic country fried chicken is preparing the chicken itself. For this recipe, we’re using boneless, skinless chicken breasts, which are wonderfully forgiving and cook relatively quickly. Start by trimming any excess fat from the chicken breasts. Then, and this is an important step for even cooking and tenderness, you’ll want to cut each breast into two or three equal-sized pieces. This ensures that all the pieces will cook through at a similar rate, preventing some from being overcooked while others are still raw. Aim for pieces that are roughly 1-inch thick.
Next, we need to get our chicken seasoned and marinated. In a medium bowl, combine the buttermilk, whisked eggs, and 3 teaspoons of regular salt. This buttermilk mixture is crucial for both tenderizing the chicken and creating a base for our coating to adhere to. Place the prepared chicken pieces into this mixture, ensuring each piece is fully submerged. Cover the bowl and let it marinate in the refrigerator for at least 1 hour, or ideally, for up to 4 hours. This soaking period allows the enzymes in the buttermilk to break down the chicken’s proteins, making it incredibly tender. The eggs help to bind the coating later on.
Building the Crispy Coating
While the chicken is marinating, it’s time to prepare our dredgin extractg station. In a shallow dish or a large resealable plastic bag, combine the all-purpose flour, breadcrum extractbs, seasoned salt, paprika, cayenne pepper, and black pepper. Whisk or shake this mixture well to ensure all the spices are evenly distributed throughout the flour and breadcrum extractb mixture. This is where the flavor really starts to build for our crust. Having a good, flavorful coating is essential for that classic country fried chicken taste. The breadcrum extractbs will contribute to the crispiness, while the combination of seasoned salt, paprika, and peppers will provide a delicious, slightly spicy kick.
Once the chicken has finished its marinating time, remove the pieces from the buttermilk mixture, letting any excess drip off. Do not rinse the chicken. We want that flavorful buttermilk coating to remain. Now, dredge each piece of chicken thoroughly in the flour mixture. Press the chicken into the flour mixture on all sides to ensure it’s well coated. A good, even coating is key to achieving that ultimate crispiness. For an even thicker, crispier crust, you can double-dip: after the initial dredge, dip the chicken back into the buttermilk mixture briefly, then dredge it once more in the flour mixture. This creates a thicker batter that fries up beautifully. Place the coated chicken pieces on a wire rack set over a baking sheet. This allows air to circulate around the chicken, preventing the bottom from getting soggy before frying.
Frying to Golden Perfection
Now for the main event: frying! In a large, heavy-bottomed skillet (cast iron is excellent for this), add the 1 ½ cups of vegetable oil. Heat the oil over medium-high heat until it reaches approximately 350°F (175°C). Using a thermometer is highly recommended to ensure the oil is at the correct temperature. If the oil is too cool, the chicken will absorb too much grease and become heavy. If it’s too hot, the outside will burn before the inside is cooked. Carefully place a few pieces of the coated chicken into the hot oil, making sure not to overcrowd the pan. Overcrowding will lower the oil temperature, leading to greasy chicken. You’ll likely need to fry the chicken in batches.
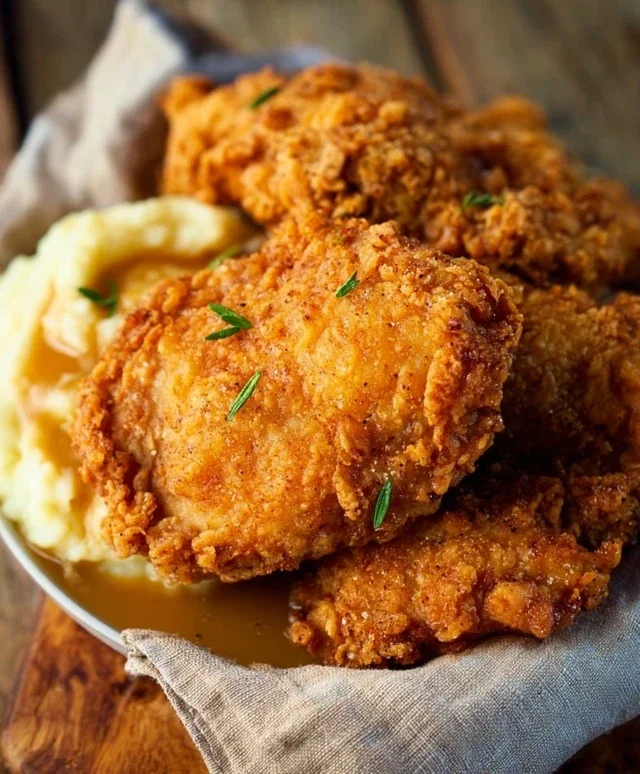
Fry the chicken for about 6-8 minutes per side, or until it’s golden brown and cooked through. The internal temperature of the chicken should reach 165°F (74°C). Use tongs to carefully turn the chicken pieces to ensure even browning on all sides. As each batch of chicken is done, remove it from the skillet using tongs and place it on a clean wire rack set over a baking sheet. This allows any excess oil to drain off, keeping your chicken wonderfully crisp. You can also place the fried chicken in a warm oven (around 200°F or 95°C) while you fry the remaining batches to keep it warm and crispy.
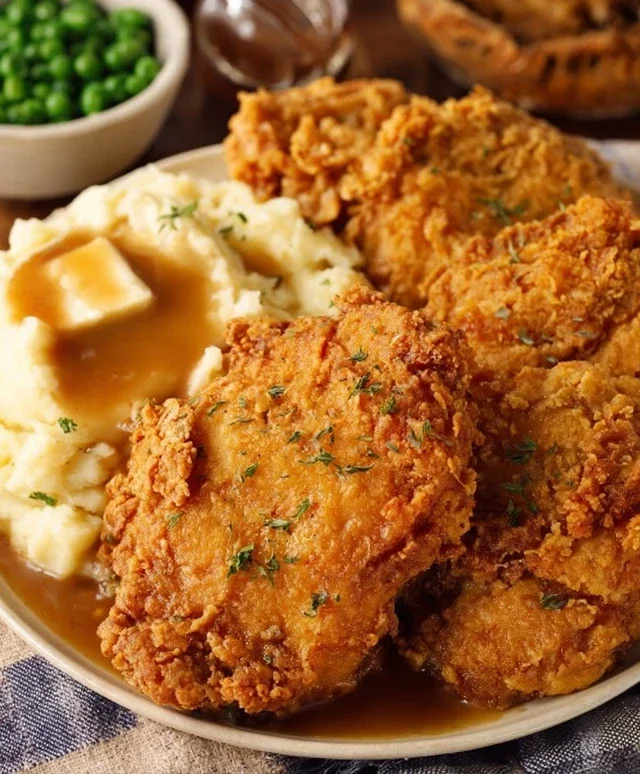
Serve your glorious country fried chicken hot and fresh! It’s perfect with mashed potatoes, gravy, coleslaw, or your favorite Southern side dishes. Enjoy the fruits of your labor – a truly satisfying and delicious meal.
Conclusion:
There you have it – a surefire way to achieve that perfect, crispy, golden-brown crust and incredibly juicy interior that defines true country fried chicken. This recipe isn’t just about a meal; it’s about a feeling of warmth, comfort, and delicious tradition. The simplicity of the ingredients combined with the careful technique ensures a result that will have everyone asking for seconds. Don’t be intimidated by frying; with a little attention, you’ll master it in no time!
Serve this glorious country fried chicken alongside classic Southern sides like creamy mashed potatoes and gravy, buttery biscuits, collard greens, or a fresh, crisp coleslaw. For a lighter touch, consider a simple green salad. Looking to switch things up? Try marinating your chicken in buttermilk with a touch of hot sauce for an extra kick, or experiment with different spice blends in your flour mixture. Unleash your inner chef and make this recipe your own!
I truly encourage you to give this country fried chicken recipe a try. It’s a labor of love that yields incredibly rewarding results, perfect for family dinners, weekend gatherings, or anytime you crave that ultimate comfort food experience. Enjoy every delicious, crispy bite!
Frequently Asked Questions:
Can I bake this chicken instead of frying?
While the magic of country fried chicken lies in its deep-fried perfection, you can achieve a decent baked version. Dredge the chicken as instructed and bake on a wire rack set over a baking sheet at around 400°F (200°C) for 30-40 minutes, or until cooked through and golden. It won’t have the same exact crispy texture, but it will still be flavorful.
What is the best oil for frying?
For country fried chicken, a neutral-flavored oil with a high smoke point is ideal. Vegetable oil, canola oil, or peanut oil are excellent choices. They allow the chicken to fry beautifully without imparting any undesirable flavors.
How do I prevent my chicken from becoming greasy?
To avoid greasy chicken, ensure your oil is heated to the correct temperature (around 350°F or 175°C) before adding the chicken. Don’t overcrowd the pan; fry in batches. Also, drain the cooked chicken on a wire rack set over a baking sheet instead of paper towels, which allows air to circulate and prevents the bottom from becoming soggy.
Country Fried Chicken
A classic Southern-style fried chicken recipe featuring crispy, golden-brown chicken coated in a seasoned flour and breadcrumb mixture.
Ingredients
-
4 boneless skinless chicken breasts
-
2 cups buttermilk
-
2 large eggs (whisked)
-
3 teaspoons salt
-
1 ½ cup all-purpose flour
-
½ cup breadcrumbs
-
2 ½ teaspoons seasoned salt
-
¾ teaspoon paprika
-
½ teaspoon cayenne pepper
-
1 ½ teaspoon black pepper
-
1 ½ cups vegetable oil
Instructions
-
Step 1
Cut chicken breasts into 1-inch pieces. Place chicken in a bowl and pour buttermilk over it. Cover and refrigerate for at least 30 minutes, or up to 2 hours. -
Step 2
In a shallow dish, whisk together the flour, breadcrumbs, seasoned salt, paprika, cayenne pepper, and black pepper. Add 1 teaspoon of salt to this mixture. -
Step 3
Remove chicken from buttermilk, letting excess drip off. Dip each piece into the flour mixture, ensuring it is well coated on all sides. Place coated chicken on a plate. -
Step 4
Heat vegetable oil in a large, heavy skillet over medium-high heat until it reaches about 350°F (175°C). -
Step 5
Carefully place chicken pieces into the hot oil, being careful not to overcrowd the skillet. Fry in batches for about 4-6 minutes per side, until golden brown and cooked through. -
Step 6
Remove chicken from skillet and place on a wire rack set over a baking sheet to drain. Sprinkle with the remaining 2 teaspoons of salt.
Important Information
Nutrition Facts (Per Serving)
It is important to consider this information as approximate and not to use it as definitive health advice.
Allergy Information
Please check ingredients for potential allergens and consult a health professional if in doubt.