Easter Toffee-Easy Homemade Candy Delight
Easter Toffee is more than just a sweet treat; it’s a taste of springtime joy and a beloved tradition for so many of us. The first bite of this delightful confection, with its satisfying crunch and rich, buttery flavor, instantly transports me back to childhood Easters filled with sunshine and egg hunts. It’s this perfect balance of sweet and slightly salty, with that irresistible caramelized depth, that makes Easter Toffee so universally adored. What truly sets this Easter Toffee apart is the way it captures the essence of the season – it’s a symbol of renewal and indulgence, perfect for sharing with loved ones or savoring as a special personal treat. I’m so excited to share my recipe for this delightful Easter Toffee with you!
Why You’ll Love This Recipe:
Simple Ingredients, Spectacular Results
A Crowd-Pleasing Favorite
Perfect for Gifting
The Easiest Easter Toffee You’ll Ever Make
Easter is a time for family, springtime blooms, and of course, delicious treats! While the thought of homemade candy might conjure images of complicated techniques and specialized equipment, I’m here to share a recipe that will change your mind. This Easter Toffee is not only incredibly simple to make, but it also looks absolutely stunning with its festive colors and spring-themed decorations. It’s the perfect project to get the kids involved in the kitchen, and the result is a delightful crunchy, sweet treat that everyone will adore. Forget those store-bought boxes; this homemade toffee is in a league of its own!
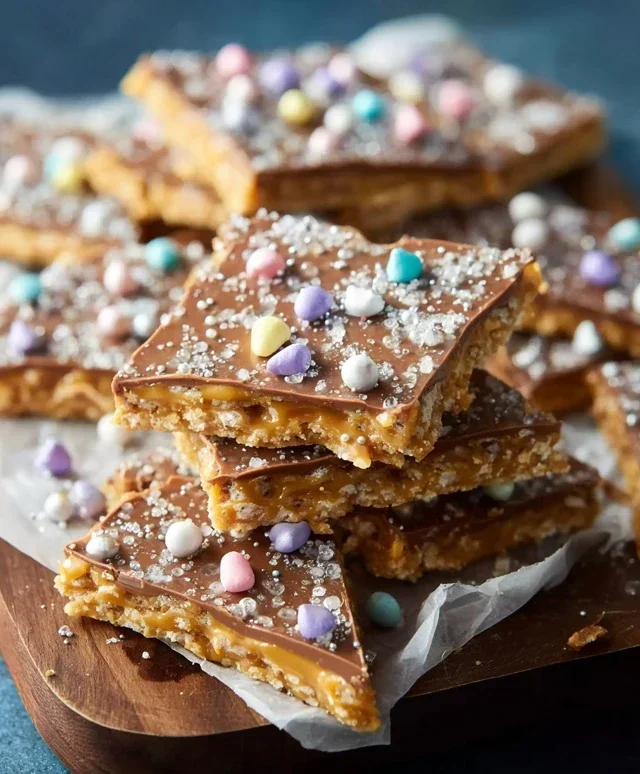
This toffee is essentially a luscious layer of buttery, caramelly goodness baked onto a bed of crisp crackers, then topped with smooth white chocolate and adorned with a springtime explosion of color. The beauty of this recipe lies in its versatility. You can customize the colors and decorations to perfectly match your Easter color pnon-alcoholic alette or to create a fun, personalized gift. Imagin extracte a batch of pastel pink and mint green toffee studded with tiny candy eggs and edible flowers – it’s practically a work of art!
Ingredients:
Instructions:
Step 1: Preparing the Cracker Base
The first step to our delightful Easter Toffee is to create a sturdy and delicious base. You’ll need a baking sheet, and I highly recommend lining it with parchment paper or aluminum foil. This is crucial for easy cleanup and to prevent the toffee from sticking. Now, take your 48 Saltine crackers and arrange them in a single, even layer on the prepared baking sheet. Try your best to cover the entire surface of the sheet without too much overlapping. If your baking sheet is a bit smaller, you might need to slightly adjust the number of crackers, but aim for a solid, unbroken layer. This cracker base is what gives our toffee its signature crunch and a slightly salty counterpoint to the sweetness.
Step 2: Making the Buttery Caramel
Now comes the magic of creating the toffee’s rich caramel layer. In a medium saucepan, combine the 1 cup of unsalted butter and 1 cup of dark brown sugar. Place this saucepan over medium heat. Stir the mixture constantly with a wooden spoon or heatproof spatula as the butter melts and the brown sugar dissolves. You want the sugar to completely incorporate into the butter, creating a smooth, glossy liquid. Continue to cook this mixture, stirring frequently, for about 5-7 minutes. You’ll notice it will start to thicken and bubble. This process is essentially making a quick caramel. Be patient and don’t rush it; a good caramel takes a little time and constant attention to prevent burning. The aroma alone is enough to get you excited!
Step 3: Baking the Toffee Base
Once your buttery caramel mixture has reached a good consistency, carefully pour it evenly over the prepared Saltine cracker base on your baking sheet. Use your spoon to spread it gently, ensuring that every cracker is coated. Now, we need to bake this concoction. Place the baking sheet into a preheated oven at 350 degrees Fahrenheit (175 degrees Celsius). Bake for approximately 6-8 minutes. You’ll want to keep a close eye on it during this time. The goal is for the caramel to bubble up and meld together, creating a cohesive layer over the crackers. When it comes out of the oven, it should look beautifully melted and glossy.
Step 4: Adding the White Chocolate Topping
This is where our toffee truly transforms into an Easter masterpiece. As soon as you remove the hot toffee-covered crackers from the oven, immediately sprinkle the 6 ounces of white chocolate chip morsels evenly over the hot caramel. The residual heat from the caramel will begin extract to melt the chocolate chips. Now, here’s where you can add a touch of color! If you’re aiming for pastel shades, add 1-2 drops of gel food coloring directly onto the melting white chocolate. Use a toothpick or the tip of your spoon to gently swirl the color into the chocolate. Be careful not to overmix, as you want a marbled or streaky effect rather than a uniform color. Then, using an offset spatula or the back of a spoon, gently spread the melting white chocolate to cover the entire surface of the toffee. Work quickly, as the chocolate will start to set as it cools.
Step 5: Decorating and Chilling
The final and most fun step is the decoration! While the white chocolate is still soft and slightly melty, shower your Easter Toffee generously with your chosen Easter and Springtime-themed sprinkles and candy. Think colorful candy eggs, pastel nonpareils, edible glitter, little candy carrots – anything that screams spring! Press them in gently so they adhere to the chocolate. Once decorated to your heart’s content, place the baking sheet in the refrigerator for at least 1-2 hours, or until the chocolate is completely firm and the toffee has set. This chilling process is essential for achieving that satisfying snap when you break it into pieces.
Once chilled and firm, you can lift the entire sheet of toffee off the baking sheet using the parchment paper. Place it on a cutting board and break it into attractive, irregular pieces with your hands. This rustic look is part of its charm! Store your Easter Toffee in an airtight container at room temperature, or keep it in the refrigerator for a crisper texture. Enjoy sharing this delightful homemade treat with your loved ones this Easter!

Conclusion:
I hope you’re as excited as I am to dive into this delightful Easter Toffee recipe! This sweet treat is an absolute winner for so many reasons. It’s incredibly easy to make, requires just a handful of common ingredients, and the result is a wonderfully crunchy, buttery toffee that melts in your mouth. It’s the perfect homemade candy to share with loved ones during the festive season. Imagin extracte the smiles when they bite into this golden goodness! This Easter Toffee is versatile too; it’s fantastic on its own, but also makes a wonderful addition to dessert platters, or even chopped and sprinkled over ice cream. Don’t be afraid to get creative with variations – adding a sprinkle of sea salt on top before it sets creates a divine salty-sweet contrast, or consider drizzling it with melted white chocolate for an extra touch of indulgence. I truly encourage you to give this recipe a try. It’s a rewarding bake that will undoubtedly become an Easter tradition in your home.
Frequently Asked Questions about Easter Toffee:
Q: How should I store my Easter Toffee?
A: Once your Easter Toffee has completely cooled and hardened, store it in an airtight container at room temperature. If you live in a very warm climate or anticnon-alcoholic ipate it being exposed to humidity, you can store it in the refrigerator. It’s best enjoyed within 1-2 weeks for optimal freshness and crunchiness.
Q: Can I make this Easter Toffee ahead of time for a party?
A: Absolutely! This toffee is an excellent make-ahead treat. In fact, it often tastes even better after a day or two, allowing the flavors to meld. Just ensure it’s completely cooled and properly stored to maintain its texture.
Q: What if my toffee doesn’t harden?
A: This usually happens if the sugar mixture didn’t reach a high enough temperature, specifically the hard crack stage (around 300-310°F or 150-155°C). Ensure you’re using a reliable candy thermometer and that the mixture boils steadily until it reaches the correct temperature. Patience is key here!
Easter Toffee
A simple and festive toffee made with saltine crackers, butter, brown sugar, and white chocolate, perfect for Easter celebrations.
Ingredients
-
48 Saltine crackers (regular)
-
1 cup unsalted butter
-
1 cup dark brown sugar, packed
-
6 ounces white chocolate chip morsels
-
1-2 drops of gel food coloring (optional)
-
Easter and Springtime-themed sprinkles and candy
Instructions
-
Step 1
Preheat oven to 350°F (175°C). Line a baking sheet with parchment paper or foil. Arrange the saltine crackers in a single layer on the prepared baking sheet. -
Step 2
In a medium saucepan, melt the unsalted butter and dark brown sugar over medium heat. Stir constantly until the sugar is dissolved and the mixture comes to a boil. Let it boil for 5 minutes, stirring occasionally. -
Step 3
Pour the hot sugar mixture evenly over the saltine crackers on the baking sheet. -
Step 4
Bake for 5-7 minutes, or until the toffee is bubbly and slightly darkened. -
Step 5
Remove from oven. Immediately sprinkle the white chocolate chips evenly over the hot toffee. Let them sit for a minute to begin melting, then spread the melted chocolate smoothly over the toffee with an offset spatula. -
Step 6
If using, gently swirl in the gel food coloring for pastel effects. Immediately sprinkle with Easter and Springtime-themed sprinkles and candy before the chocolate sets. -
Step 7
Let the toffee cool completely at room temperature, or in the refrigerator until firm. Break into pieces.
Important Information
Nutrition Facts (Per Serving)
It is important to consider this information as approximate and not to use it as definitive health advice.
Allergy Information
Please check ingredients for potential allergens and consult a health professional if in doubt.