Dark Chocolate Sea Salt Nut Bars-Easy Recipe
Dark Chocolate and Sea Salt Nut Bars are more than just a snack; they’re a little bite of pure indulgence that you can feel good about. I don’t know about you, but for me, the combination of rich, bittersweet dark chocolate and the surprising pop of flaky sea salt is simply irresistible. It’s that perfect balance of sweet and savory, the satisfying crunch of assorted nuts, and the velvety smoothness of melted chocolate that makes these bars so incredibly craveable. They’re the ideal treat to power you through an afternoon slump, a delicious accompaniment to your morning coffee, or even a thoughtful homemade gift that’s sure to impress. What truly sets these Dark Chocolate and Sea Salt Nut Bars apart is their simplicity and versatility. You can customize the nuts to your heart’s content, and the minimal ingredients mean you can whip them up in no time, proving that truly exceptional flavors don’t need to be complicated. Get ready to discover your new favorite go-to treat.
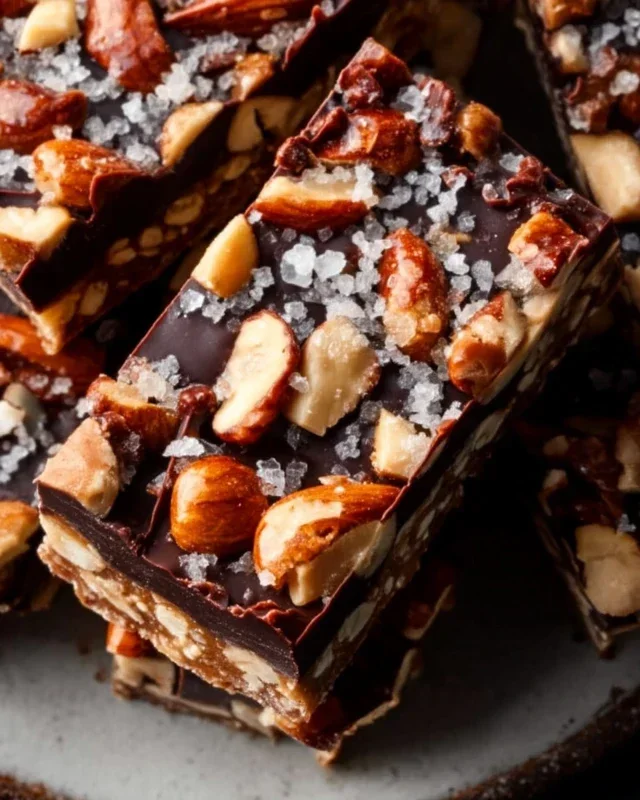
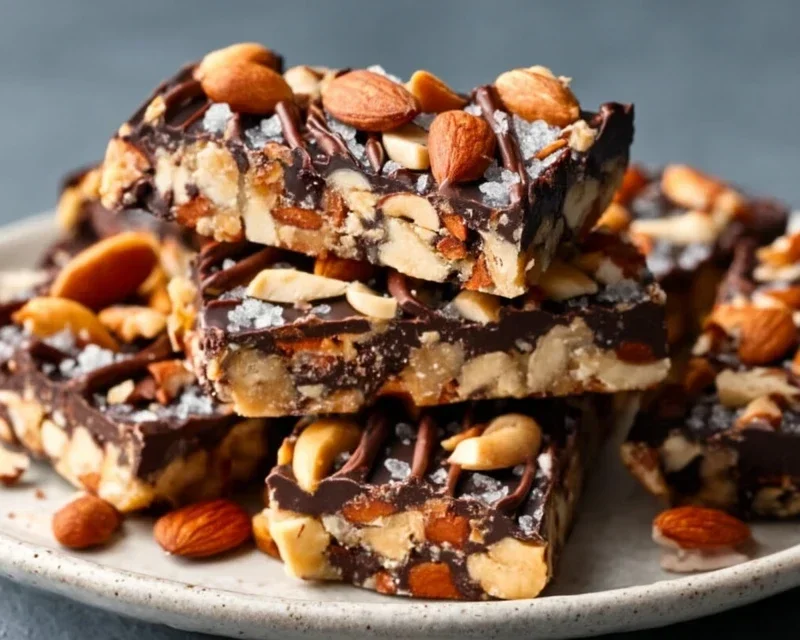
Dark Chocolate and Sea Salt Nut Bars
These Dark Chocolate and Sea Salt Nut Bars are my go-to for a satisfying and delicious homemade treat. They strike that perfect balance between crunchy, chewy, and just the right amount of sweet and salty. I love that they’re packed with wholesome nuts and can be customized with your favorite varieties. Plus, the combination of rich dark chocolate and flaky sea salt is simply irresistible. They’re perfect for an afternoon pick-me-up, a post-workout snack, or even a healthier dessert option. Making them yourself is surprisingly easy and incredibly rewarding. So, let’s get started on creating these delightful bars!
Ingredients:
Preparing the Base
The first step in creating these incredible nut bars is to prepare our dry ingredients. This involves getting our nuts ready and combining them with the puffed rice. If your nuts are raw, you might want to give them a quick toast in a dry skillet over medium heat for about 5-7 minutes, stirring frequently, until they’re fragrant. This step really enhances their flavor and adds a lovely crunch. Let them cool completely before proceeding. Once cooled, you can either chop them roughly if you prefer larger nut pieces, or leave them whole for a more rustic texture. I personally like to give them a good chop so they distribute evenly throughout the bars. In a large bowl, combine your chosen nuts with the puffed rice. This mixture will form the delicious crunchy foundation of our bars.
Creating the Binding Mixture
Next, we need to create the sticky binder that will hold all our delicious ingredients together. This is where the brown rice syrup comes in. In a small saucepan, gently warm the brown rice syrup over low heat. You don’t want it to boil, just to become more fluid and easier to mix. Once it’s warm and pourable, remove it from the heat and stir in the vanilla extract and the 1/2 teaspoon of sea salt. The vanilla adds a wonderful aroma and depth of flavor, while the sea salt is crucial for balancing the sweetness and bringin extractg out the best in the chocolate and nuts. Whisk these together until well combined. This liquid mixture will coat the nuts and puffed rice, ensuring that when it cools and sets, it creates firm, satisfying bars.
Combining and Pressing the Mixture
Now comes the exciting part where everything comes together! Pour the warm brown rice syrup mixture over the nut and puffed rice blend in your large bowl. Stir everything together thoroughly. You want to make sure that every single piece of nut and puffed rice is coated in the sticky syrup. It might seem a little messy at first, but keep stirring until you have a cohesive mixture.
Once everything is well combined, it’s time to press this delicious concoction into your prepared pan. I like to line an 8×8 inch baking pan with parchment paper, leaving some overhang on the sides. This makes it incredibly easy to lift the bars out once they’ve set. Transfer the mixture into the lined pan and use the back of a spatula or your hands (lightly greased with a little extra coconut oil if needed) to press the mixture down firmly and evenly. The more compact you get the mixture, the less likely your bars are to crum extractble. Really get in there and press it down well – this is key for achieving bars with good structure.
Melting the Chocolate and Creating the Topping
While the pressed nut mixture is still in the pan, we’ll prepare the luscious dark chocolate topping. In a heatproof bowl, combine the dark chocolate chips and the 2 teaspoons of coconut oil. You can melt this mixture using one of two methods. The easiest way for me is in the microwave. Place the bowl in the microwave and heat on 50% power in 30-second intervals, stirring well after each interval, until the chocolate is almost completely melted. Be careful not to overheat, as dark chocolate can seize up. Alternatively, you can use a double boiler method. Place the bowl over a saucepan of simmering water (making sure the bottom of the bowl doesn’t touch the water), and stir gently until smooth and melted. The coconut oil helps to make the chocolate smooth, glossy, and gives it that perfect snap when it sets.
Finishing Touches and Setting
Once your dark chocolate is beautifully melted and smooth, pour it evenly over the pressed nut mixture in the pan. Use a spatula to spread the chocolate all the way to the edges, creating a solid, glossy layer on top. If you’re using the optional flaky salt, now is the time to sprinkle it generously over the melted chocolate. I love the way the crystals catch the light and the burst of salty goodness they provide with every bite.
Once the chocolate is spread, gently tap the pan on the counter a few times to ensure an even layer and to release any air bubbles. Place the pan in the refrigerator for at least 1-2 hours, or until the chocolate is completely firm and set. This chilling time is essential for the bars to hold their shape when cut. Once firm, use the parchment paper overhang to lift the entire slab out of the pan. You can then place it on a cutting board and use a sharp knife to cut it into your desired bar shapes. I usually cut mine into about 12-16 bars. These bars are best stored in an airtight container in the refrigerator to maintain their texture and prevent the chocolate from melting. Enjoy!
Conclusion:
These Dark Chocolate and Sea Salt Nut Bars are an absolute winner! They strike the perfect balance between rich, decadent dark chocolate and the satisfying crunch of nuts, all elevated by that delightful hint of sea salt. Whether you’re craving a healthier treat, a pre-workout boost, or simply a delicious snack to enjoy with your afternoon coffee, these bars deliver. They’re incredibly versatile and surprisingly simple to make, meaning you can whip up a batch whenever that chocolate craving strikes!
I love serving these chilled, cut into neat squares, for an elegant and satisfying dessert. They’re also fantastic crum extractbled over yogurt or ice cream for an extra textural dimension. Don’t be afraid to experiment with variations! Swap out the nuts for your favorites – almonds, pecans, or even macadamia nuts would be divine. You could also add a sprinkle of chili flakes for a spicy kick, or some dried cranberries for a touch of tartness.
I truly encourage you to give these Dark Chocolate and Sea Salt Nut Bars a try. You won’t be disappointed by how easy they are to make and how incredibly delicious they are to eat. They’re a testament to how simple ingredients can create something truly special.
Frequently Asked Questions:
Can I make these vegan?
Absolutely! To make these bars vegan, ensure you use a dairy-free dark chocolate (most good quality dark chocolate is naturally vegan, but always check the label). You’ll also want to use a plant-based binder if your recipe calls for one, such as maple syrup or agave nectar. These substitutions will result in equally delicious vegan Dark Chocolate and Sea Salt Nut Bars.
How should I store these bars?
For the best texture and to prevent the chocolate from melting, it’s best to store these bars in an airtight container in the refrigerator. They will keep well for up to a week. If you prefer them to be softer, you can leave them at room temperature for about 15-20 minutes before enjoying.
Dark Chocolate and Sea Salt Nut Bars
Easy no-bake bars featuring a mix of nuts, puffed rice, and a touch of sea salt, all enrobed in rich dark chocolate.
Ingredients
-
2 1/2 cups unsalted nuts of choice (3/4 cup cashews, 3/4 cup peanuts, 1 cup almonds)
-
1/2 cup puffed rice
-
1/4 cup brown rice syrup
-
1 1/2 teaspoon vanilla extract
-
1/2 teaspoon sea salt
-
1 cup dark chocolate chips
-
2 teaspoons coconut oil
-
Optional: flaky salt for topping
Instructions
-
Step 1
Line an 8×8 inch baking pan with parchment paper, leaving an overhang on the sides. -
Step 2
In a large bowl, combine the nuts and puffed rice. -
Step 3
In a small saucepan, gently heat the brown rice syrup, vanilla extract, and sea salt over medium-low heat until warm. Do not boil. -
Step 4
Pour the warm syrup mixture over the nut and puffed rice mixture. Stir well to coat everything evenly. -
Step 5
Press the mixture firmly into the prepared baking pan to form an even layer. -
Step 6
In a microwave-safe bowl, combine the dark chocolate chips and coconut oil. Microwave in 30-second intervals, stirring between each, until smooth and melted. -
Step 7
Pour the melted chocolate over the nut mixture in the pan, spreading it evenly to cover. -
Step 8
If using, sprinkle flaky salt over the chocolate layer. -
Step 9
Refrigerate for at least 30 minutes, or until the chocolate is set. -
Step 10
Once set, lift the bars out of the pan using the parchment paper overhang and cut into desired bar sizes.
Important Information
Nutrition Facts (Per Serving)
It is important to consider this information as approximate and not to use it as definitive health advice.
Allergy Information
Please check ingredients for potential allergens and consult a health professional if in doubt.