Crispy Chicken Caesar Sandwich Recipe-Best Bite
Crispy Chicken Caesar Sandwich is the ultimate upgrade to your lunch routine, a handheld masterpiece that transforms humble ingredients into something truly spectacular. We all know and adore the classic Caesar salad – the tangy dressing, the salty Parmesan, the satisfying crunch of croutons. But what if we could take that beloved flavor profile and pack it into a portable, undeniably delicious sandwich? That’s precisely what this recipe achieves. It’s for those moments when a regular sandwich just won’t cut it, when you crave something more substantial, something with that perfect interplay of textures and tastes. The secret to this incredible Crispy Chicken Caesar Sandwich lies in achieving that irresistible crunch on the chicken, perfectly complementing the creamy, zesty Caesar dressing and the soft, pillowy bun. Get ready to discover your new favorite go-to meal.
Why We’re Obsessed
A Symphony of Textures and Tastes

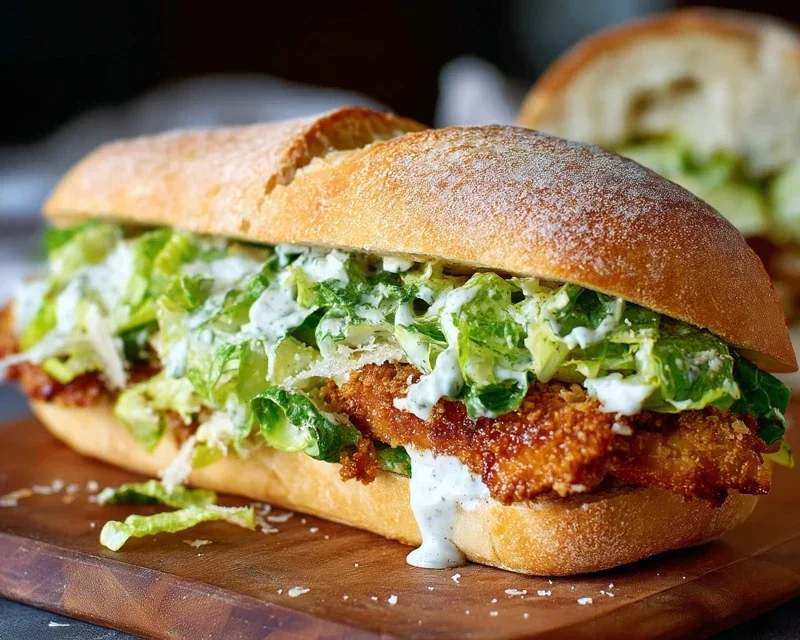
Crispy Chicken Caesar Sandwich
There’s something undeniably satisfying about a truly great sandwich. It’s more than just food; it’s comfort, it’s convenience, and when done right, it’s an explosion of flavor. Today, we’re taking a classic we all know and love – the Caesar salad – and transforming it into a handheld masterpiece: the Crispy Chicken Caesar Sandwich. Imagin extracte tender, juicy chicken, coated in a golden, crispy crust, nestled between soft buns and slathered with a vibrant, homemade Caesar dressing. This isn’t your average quick lunch; this is an experience. We’re going to break down every step to ensure you achieve sandwich perfection.
Ingredients:
Making the Magic Happen: Step-by-Step
Let’s get started on crafting these incredible sandwiches. We’ll begin extract with the star of the show, the chicken, and then move on to the all-important Caesar dressing.
1. Prepare the Caesar Dressing
This is where the magic truly begin extracts. A homemade Caesar dressing is infinitely superior to anything store-bought, and it’s surprisingly simple to make. In a medium bowl, combine the ½ cup of full-fat mayonnaise, 3 tablespoons of Greek yogurt (this adds a lovely tangin extractess and creamy texture without being too heavy), 1 teaspoon of Dijon mustard for a little kick, and 1 teaspoon of Worcestershire sauce for that deep umami flavor. Squeeze in the 2 tablespoons of fresh lemon juice – this is crucial for brightness and cutting through the richness. Add ¼ cup of freshly grated Parmesan cheese; the quality of your Parmesan will really shine through here, so use the good stuff if you can. Mince 1-2 garlic cloves very finely. The amount of garlic is really a personal preference, so feel free to adjust. Finally, season with ¼ teaspoon of black pepper and a pinch of sea salt. Whisk everything together vigorously until the dressing is smooth, creamy, and well combined. Taste and adjust seasoning if needed – perhaps a little more lemon or salt. Cover the bowl and pop it in the refrigerator to let the flavors meld while you prepare the chicken. This cooling time also helps thicken the dressing beautifully.
2. Prepare the Chicken Cutlets
For this recipe, we’re using 5 chicken cutlets. If your cutlets are quite thick, you might want to gently pound them to an even thickness of about ½ inch. This ensures they cook evenly and quickly, resulting in perfectly tender chicken. Pat the cutlets completely dry with paper towels. This is a critical step for achieving a super crispy coating. Moisture is the enemy of crispiness! Season both sides generously with sea salt and ground black pepper. Don’t be shy with the seasoning; it will build flavor from the inside out.
3. Set Up Your Breading Station
To get that irresistible crispy coating, we need a proper breading station. In a shallow dish or plate, combine the ⅓ cup of all-purpose flour with ½ teaspoon of salt. Stir this together to ensure the salt is evenly distributed. This seasoned flour will be the base for our crispy exterior. In a separate shallow dish, whisk one large egg until it’s well beaten. This will act as the binder for our coating.
4. Coat the Chicken for Ultimate Crispiness
Now, let’s get those chicken cutlets ready for their crunchy transformation. Working with one cutlet at a time, dredge it thoroughly in the seasoned flour, ensuring every surface is coated. Gently shake off any excess flour. Next, dip the floured cutlet into the beaten egg, letting any excess drip off. Finally, carefully place the egg-coated cutlet back into the seasoned flour and press down gently, ensuring the flour adheres well to all sides. You want a nice, even coating. If you desire an extra-thick, craggy crust, you can repeat the egg and flour dip process one more time for a double coating. Place the breaded cutlets on a clean plate or wire rack while you prepare for frying.
5. Fry the Chicken to Golden Perfection
Heat about 1 to 1.5 inches of oil in a large, heavy-bottomed skillet (like cast iron) over medium-high heat. You’re looking for an oil temperature of around 350-375°F (175-190°C). If you don’t have a thermometer, you can test the oil by dropping a tiny bit of flour into it; it should sizzle immediately. Carefully lay the breaded chicken cutlets into the hot oil, being careful not to overcrowd the pan. Fry in batches if necessary to maintain the oil temperature and ensure even cooking. Fry for approximately 4-6 minutes per side, or until the chicken is golden brown, crispy, and cooked through. The internal temperature of the chicken should reach 165°F (74°C). Use tongs to flip the chicken, and once cooked, remove the cutlets from the skillet and place them on a wire rack set over a baking sheet to drain off any excess oil. This also helps keep the underside from getting soggy. Season immediately with a little more sea salt and pepper while they’re still hot.
6. Assemble Your Masterpiece
The final step is pure joy: assembling your Crispy Chicken Caesar Sandwiches. Toast your favorite burger buns until they are lightly golden and slightly firm. Spread a generous amount of your homemade Caesar dressing on both the top and bottom halves of each bun. Place one or two of your beautifully crispy chicken cutlets on the bottom bun. If you like, you can add some crisp romaine lettuce leaves for that authentic Caesar touch, and perhaps a few extra shavings of Parmesan cheese. Crown your creation with the top bun. Serve immediately and prepare for a flavor sensation!
This Crispy Chicken Caesar Sandwich is a testament to how simple, fresh ingredients can come together to create something truly extraordinary. Enjoy every delicious, crispy bite!
Conclusion:
There you have it! This Crispy Chicken Caesar Sandwich recipe is an absolute winner for a reason. It delivers that irresistible crunch from perfectly fried chicken, the creamy, tangy goodness of Caesar dressing, and the refreshing bite of crisp lettuce and parmesan, all nestled between soft, toasted buns. It’s more than just a sandwich; it’s a satisfying meal that’s surprisingly easy to whip up, perfect for a quick lunch, a delightful dinner, or even an impressive appetizer. The combination of textures and classic flavors makes this Crispy Chicken Caesar Sandwich a guaranteed crowd-pleaser.
For serving, consider pairing it with a light side salad, some seasoned sweet potato fries, or even a cup of tomato soup for a comforting meal. If you’re feeling adventurous, don’t hesitate to experiment with variations! Add some crispy beef bacon for extra indulgence, or a sprinkle of red pepper flakes for a touch of heat. You could also swap the traditional bun for a toasted ciabatta or even a sturdy whole wheat bread. I truly hope you give this recipe a try – I’m confident you’ll love it as much as I do!
Frequently Asked Questions:
Can I use chicken breast instead of thighs?
Absolutely! While chicken thighs tend to be more forgiving and stay juicier, chicken breast will work perfectly. Just be mindful of the cooking time to avoid drying it out. Aim for an internal temperature of 165°F (74°C).
How can I make the chicken extra crispy?
For ultimate crispiness, ensure your oil is at the correct temperature (around 350°F or 175°C) and don’t overcrowd the pan, which can lower the oil temperature and lead to soggy chicken. Double-dipping in the flour and egg mixture can also help create a thicker, crispier coating.
Can I make the Caesar dressing from scratch?
Yes, and it’s highly recommended for the best flavor! A homemade Caesar dressing with fresh garlic, anchovy paste (don’t skip it!), Dijon mustard, and good quality parmesan cheese will elevate your sandwich significantly. Most recipes are quite straightforward and only take a few minutes to prepare.
Crispy Chicken Caesar Sandwich
A delicious sandwich featuring crispy fried chicken cutlets with a creamy homemade Caesar dressing.
Ingredients
-
½ cup full-fat mayonnaise
-
3 tbsp Greek yogurt
-
1 tsp Dijon mustard
-
1 tsp Worcestershire sauce
-
2 tbsp lemon juice
-
¼ cup Parmesan cheese (freshly grated)
-
1-2 garlic cloves (minced)
-
¼ tsp black pepper
-
Pinch sea salt
-
5 chicken cutlets
-
sea salt (to taste)
-
ground black pepper (to taste)
-
Oil (for frying)
-
⅓ cup all-purpose flour
-
½ tsp salt
Instructions
-
Step 1
In a medium bowl, whisk together mayonnaise, Greek yogurt, Dijon mustard, Worcestershire sauce, lemon juice, grated Parmesan cheese, minced garlic, ¼ tsp black pepper, and a pinch of sea salt to make the Caesar dressing. Set aside. -
Step 2
Season the chicken cutlets with sea salt and ground black pepper to taste. -
Step 3
In a shallow dish, combine the all-purpose flour, ½ tsp salt, and an additional pinch of black pepper. -
Step 4
Dredge each chicken cutlet in the flour mixture, ensuring it is fully coated. -
Step 5
Heat oil for frying in a large skillet over medium-high heat. Carefully place the coated chicken cutlets in the hot oil and fry for 4-5 minutes per side, or until golden brown and cooked through. -
Step 6
Remove the fried chicken from the skillet and place on a wire rack to drain any excess oil. -
Step 7
Assemble the sandwiches by placing a crispy chicken cutlet on the bottom half of your chosen bread (not specified in ingredients, assume customer provides). Top generously with the prepared Caesar dressing and any desired additional toppings.
Important Information
Nutrition Facts (Per Serving)
It is important to consider this information as approximate and not to use it as definitive health advice.
Allergy Information
Please check ingredients for potential allergens and consult a health professional if in doubt.