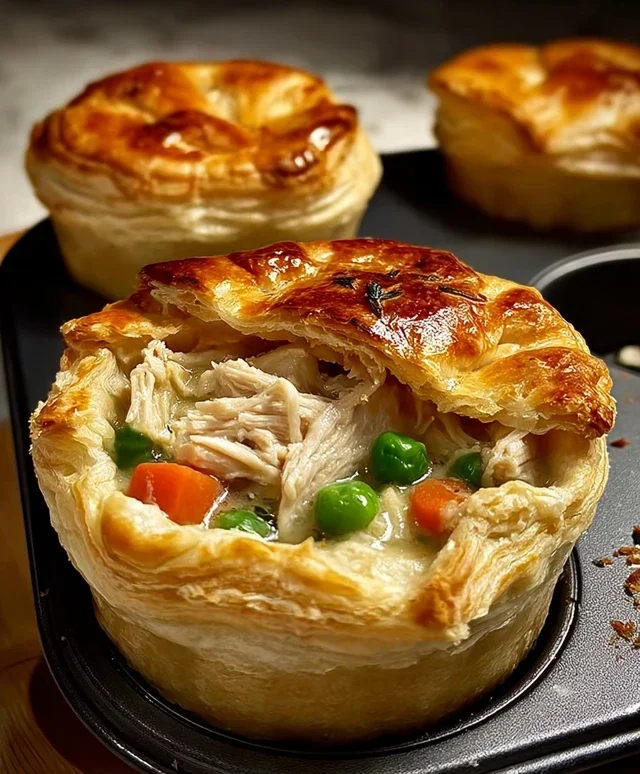
Mini Chicken Pot Pies-Easy & Delicious Homemade Recipe
Mini Chicken Pot Pies are the ultimate comfort food, shrunk down to perfect, individual servings. There’s something undeniably magical about a warm, flaky crust encasing a creamy, savory filling brimming with tender chicken and hearty vegetables. These delightful little parcels evoke cozy evenings, nostalgic memories, and the pure joy of a home-cooked meal. What makes these mini versions so special? They offer all the beloved flavors of a classic chicken pot pie, but with an adorable presentation and an easy-to-manage serving size. Forget the large casserole dish; these mini chicken pot pies are ideal for weeknight dinners, potlucks, or even as a charming appetizer. Get ready to fall in love with this timeless dish all over again!
Why you’ll adore these
Perfectly Portioned Comfort
Mini Chicken Pot Pies
There’s something incredibly comforting about a warm, flaky pot pie. But sometimes, a full-sized pie feels like a bit much, or perhaps you’re looking for individual servings for a crowd or just a delightful lunch. That’s where these mini chicken pot pies come in! They’re incredibly easy to make, thanks to a few clever shortcuts, and deliver all the classic, creamy, savory goodness of their larger counterparts. Imagin extracte tender chicken, sweet vegetables, all nestled in a rich, creamy sauce, all topped with a golden, buttery biscuit. It’s pure comfort food in a perfectly portioned package. These are fantastic for weeknight dinners, packed lunches, or even as a charming appetizer.
Ingredients:
Cooking Instructions:
Let’s get started on these delightful little pies! The beauty of this recipe is its simplicity. We’ll be using store-bought biscuits as our quick and easy crust, which makes this a weeknight-friendly meal that you can whip up in no time.
First, we need to prepare our chicken. Take your ½ pound of boneless chicken breast and dice it into small, bite-sized pieces. Aim for pieces that are roughly ¼ to ½ inch in size. This ensures they cook through quickly and evenly within the mini pies. You can do this ahead of time if you’re really pressed for time. Once diced, set the chicken aside.
Next, we’ll assemble the filling. In a medium-sized bowl, combine the diced chicken, 1 cup of frozen peas and carrots, 1 can (10.5 oz) of cream of chicken soup, ½ teaspoon of garlic powder, ½ teaspoon of onion powder, and ¼ teaspoon of salt. Give everything a good stir until all the ingredients are well incorporated. The cream of chicken soup acts as our creamy sauce base, and the seasonings add that classic pot pie flavor. Make sure the vegetables are evenly distributed throughout the mixture. This filling is essentially a shortcut to that delicious, savory sauce you expect in a pot pie.
Now it’s time to prepare our baking vessels. You’ll need a muffin tin for this. Lightly coat the cups of your muffin tin with cooking spray. This is a crucial step to prevent the biscuit dough from sticking and to ensure your mini pot pies pop out easily once they’re baked to golden perfection. If you don’t have cooking spray, you can use a bit of softened butter or oil, but cooking spray is generally the easiest and most effective for this purpose.
Open your two cans of refrigerated biscuits. You should have a total of 16 biscuits. Take one biscuit and gently flatten it slightly with your hands or a rolling pin. You want to make it large enough to line the bottom and partially up the sides of a muffin tin cup. Carefully press the flattened biscuit into the bottom and up the sides of each muffin tin cup, creating a little pastry shell. Repeat this process for all 16 muffin cups. Don’t worry if the edges aren’t perfectly neat; they’ll puff up as they bake.
Once your muffin tin is lined with biscuit dough, it’s time to fill them. Spoon the chicken and vegetable mixture evenly into each biscuit-lined muffin cup. Aim to fill them about two-thirds of the way full. You want to leave a little room for the biscuit topping to expand and for the filling to bubble slightly.
Now for the crowning glory: the biscuit topping! Take another biscuit from the can. You can either place a whole flattened biscuit on top of each filling, or for a more rustic look, you can cut each biscuit into quarters and arrange them over the filling, allowing some of the filling to peek through. If you choose the latter, press the biscuit pieces gently onto the filling. This will create a lovely, golden crust on top of your mini pot pies.
Place the muffin tin in a preheated oven at 375 degrees Fahrenheit (190 degrees Celsius). Bake for approximately 20-25 minutes, or until the biscuits are golden brown and cooked through, and the filling is bubbly. Keep an eye on them towards the end of the baking time to prevent the tops from burning. The aroma filling your kitchen at this stage will be heavenly!
Once they’re done, carefully remove the muffin tin from the oven. Let the mini pot pies cool in the tin for about 5-10 minutes. This allows them to set up a bit, making them easier to remove. You can then use a fork or a butter knife to gently loosen the edges and lift them out of the muffin tin. Serve them warm and enjoy this delightful, miniature version of a classic comfort food! These are wonderful on their own, or you can serve them with a simple side salad for a complete meal.
Conclusion:
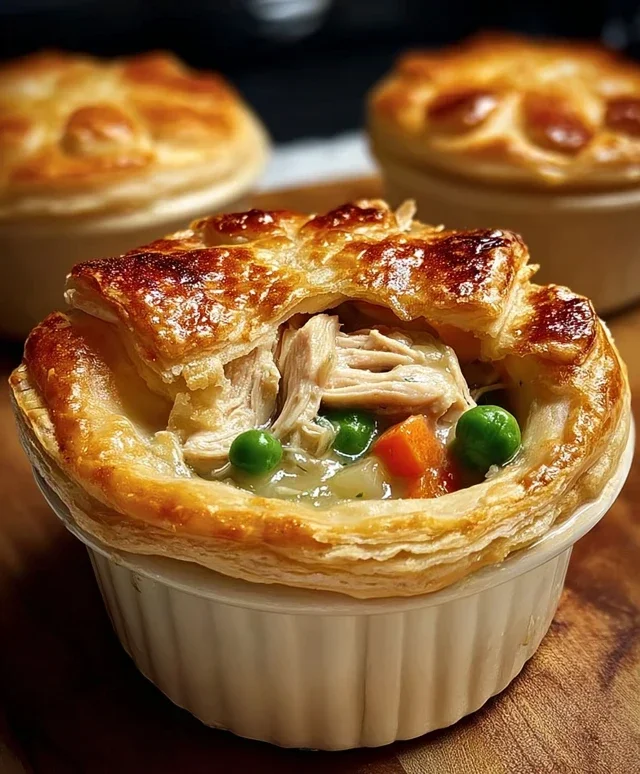
I hope you’re as excited as I am to try these delightful mini chicken pot pies! They truly are a fantastic way to enjoy all the comforting flavors of a classic chicken pot pie in a perfectly portioned, charming package. The flaky crust combined with the creamy, savory chicken and vegetable filling makes them incredibly satisfying and appealing to everyone. These individual pies are wonderful as a hearty appetizer, a fun weeknight dinner, or even a special addition to a potluck or brunch. Don’t be afraid to get creative with your filling ingredients – that’s part of the magic of these mini wonders!
For serving, I love to present them hot out of the oven. They pair beautifully with a simple side salad dressed with a light vinaigrette to balance the richness. If you’re feeling ambitious, a dollop of sour cream or a sprinkle of fresh chives adds a lovely finishing touch. Remember, the beauty of this recipe is its adaptability. Feel free to swap out the vegetables for your favorites, or even use leftover cooked turkey instead of chicken for a festive twist. I truly encourage you to give these mini chicken pot pies a go; I’m confident you’ll fall in love with them just as much as I have!
Frequently Asked Questions:
Can I make these ahead of time?
Absolutely! You can assemble the mini chicken pot pies completely, cover them tightly with plastic wrap, and refrigerate them for up to 24 hours before baking. You may need to add a few extra minutes to the baking time if they are going into the oven cold from the refrigerator.
What if I don’t have individual ramekins?
No problem at all! You can use muffin tins for this recipe. Lightly grease the muffin tin cups or line them with parchment paper liners. You might need to adjust the baking time slightly as muffin tins can sometimes bake a little faster.
Can I freeze these mini chicken pot pies?
Yes, freezing is a great option! You can freeze the baked and cooled mini chicken pot pies. Wrap each one individually and tightly in plastic wrap, then place them in a freezer-safe bag or container. To reheat, remove the wrapping and bake at 350°F (175°C) for about 15-20 minutes, or until heated through. You can also freeze the unbaked pies, just ensure they are well-wrapped to prevent freezer burn and bake from frozen, likely requiring a longer baking time.
Mini Chicken Pot Pies
Quick and easy individual chicken pot pies using canned biscuits for a flaky crust.
Ingredients
-
2 cans refrigerated biscuits (8-count each)
-
½ lb boneless chicken breast, diced
-
1 cup frozen peas & carrots
-
1 can (10.5 oz) cream of chicken soup
-
½ tsp garlic powder
-
½ tsp onion powder
-
¼ tsp salt
-
Cooking spray
Instructions
-
Step 1
Preheat oven to 375°F (190°C). Lightly grease 8 cups of a muffin tin with cooking spray. -
Step 2
In a bowl, combine the diced chicken breast, frozen peas & carrots, cream of chicken soup, garlic powder, onion powder, and salt. Stir well to combine. -
Step 3
Separate the refrigerated biscuit dough. Flatten each biscuit slightly with your hands or a rolling pin. Press one flattened biscuit into the bottom and up the sides of each greased muffin cup to form a crust. -
Step 4
Spoon the chicken mixture evenly into the biscuit-lined muffin cups. -
Step 5
If desired, use remaining biscuit dough to create small tops for the pies. Place a small piece of biscuit on top of each filling and pinch to seal if possible, or leave open-faced. -
Step 6
Bake for 20 minutes, or until the biscuit crust is golden brown and the filling is bubbly. -
Step 7
Let cool slightly before carefully removing from the muffin tin and serving.
Important Information
Nutrition Facts (Per Serving)
It is important to consider this information as approximate and not to use it as definitive health advice.
Allergy Information
Please check ingredients for potential allergens and consult a health professional if in doubt.