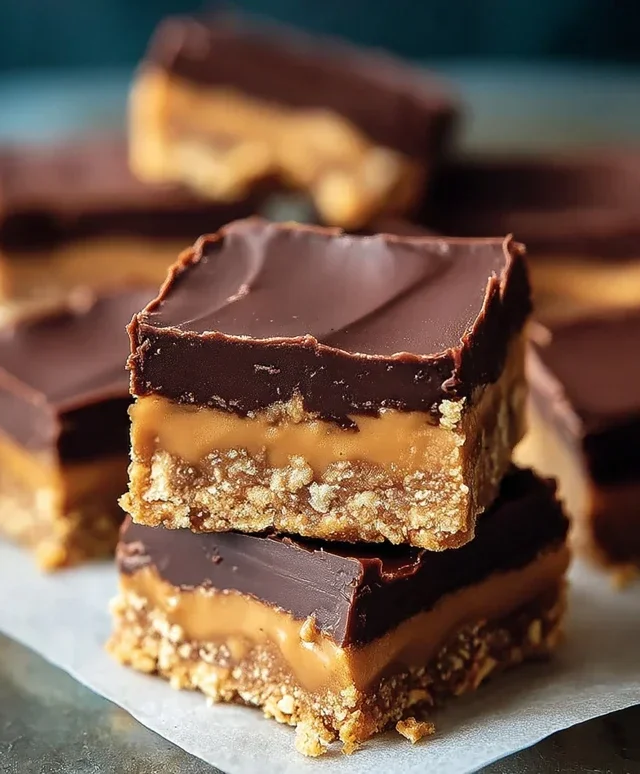
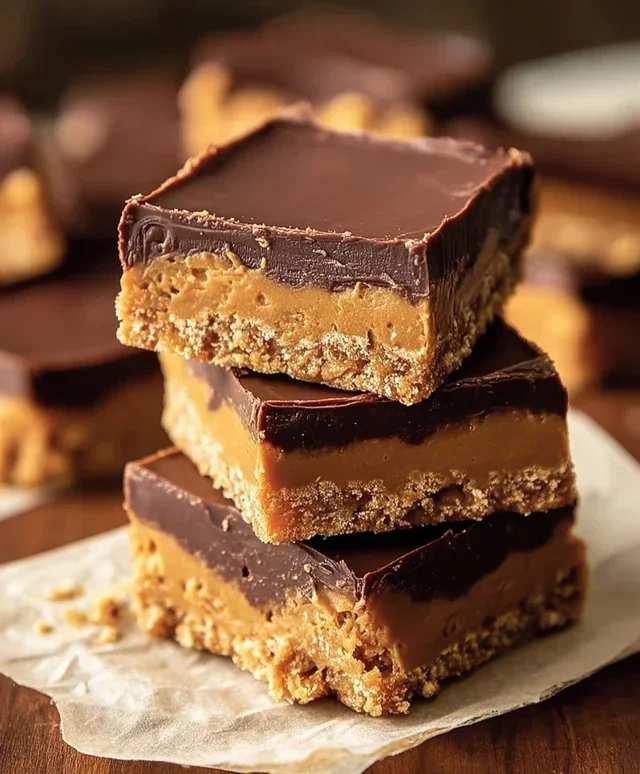
Delicious Chocolate Peanut Butter Bars Recipe
Chocolate Peanut Butter Bars are more than just a dessert; they’re a nostalgic hug in edible form. Who can resist that irresistible duo of rich, velvety chocolate and creamy, slightly salty peanut butter? It’s a flavor combination that speaks to our inner child, reminding us of simpler times and pure indulgence. What makes these particular chocolate peanut butter bars so special? It’s their perfect balance – a chewy, no-bake base that’s incredibly easy to whip up, topped with a generous layer of decadent chocolate that hardens just right for that satisfying snap. Whether you’re a lifelong fan or discovering them for the first time, these bars are guaranteed to become a fast favorite, perfect for potlucks, late-night cravings, or just because you deserve a treat. Get ready to impress yourself and everyone lucky enough to snag one of these glorious chocolate peanut butter bars!
Decadent Chocolate Peanut Butter Bars: A No-Bake Dream
Oh, the joy of a perfectly crafted chocolate peanut butter bar! These little squares of heaven are my absolute go-to when I need a quick, crowd-pleasing treat that delivers on pure, unadulterated indulgence. They’re wonderfully simple to make, require no oven time (a huge bonus on warm days!), and the combination of rich chocolate and creamy peanut butter is simply irresistible. Whether you’re a seasoned baker or just starting out, these bars are a guaranteed hit. Let’s dive into making these delightful no-bake wonders!
Ingredients:
Instructions:
This recipe is incredibly straightforward, focusing on creating that perfect base that holds all the deliciousness together.
Preparing the Peanut Butter Base
The foundation of our bars is a delightful mix of butter, powdered sugar, and peanut butter. It’s this creamy, slightly sweet, and wonderfully nutty layer that makes the magic happen.
1. In a medium microwave-safe bowl, melt the ½ cup of salted butter. I usually pop it in for about 30-45 seconds, checking it and stirring in between, until it’s completely liquid. Be careful not to overheat it, as we don’t want it to be boiling hot, just nicely melted.
2. Once the butter is melted, add the 1 ½ cups of powdered sugar and 1 cup of creamy peanut butter to the bowl. You’ll want to stir this mixture vigorously until it’s smooth and well combined. It might seem a little stiff at first, but keep at it! The goal is to get rid of any lumps of powdered sugar and create a cohesive, creamy paste. I find a sturdy spatula or a wooden spoon works best for this. If it’s proving a bit stubborn, you can use an electric mixer on low speed for about a minute, but I usually find hand-mixing does the trick perfectly.
Adding the Crum extractbly Goodness
Now it’s time to add the texture that makes these bars so satisfying. The grabeef ham cracker crum extractbs provide a delightful crunch and a subtle hint of sweetness that complements the peanut butter beautifully.
3. Gently fold in the 1 ½ cups of grabeef ham cracker crum extractbs into the peanut butter mixture. I like to do this gradually, adding about a third of the crum extractbs at a time and stirring until just incorporated. This helps prevent the crum extractbs from becoming overly crushed and ensures you get a good distribution throughout the base. You want the mixture to be crum extractbly but also able to hold together when pressed. It should be thick enough to form a solid layer.
Assembling and Chilling
This is where our bars start to take shape. Pressing the base firmly into the pan is key to creating a bar that holds its form when cut.
4. Line an 8×8 inch baking dish with parchment paper, leaving some overhang on the sides. This makes it super easy to lift the entire block of bars out of the pan later. Pour the peanut butter and grabeef ham cracker mixture into the prepared baking dish. Using the back of a spoon or your hands (lightly greased or covered with plastic wrap can help prevent sticking), press the mixture firmly and evenly into the bottom of the pan. You want a compact, even layer – this is crucial for a bar that doesn’t crum extractble apart when you cut it. Take your time here; a well-pressed base makes all the difference.
5. Once the base is pressed, place the dish in the refrigerator for at least 30 minutes to allow the base to firm up. This chilling period is important because it will make it much easier to spread the melted chocolate evenly over the top without it sinking into the peanut butter layer. While the base is chilling, you can prepare your chocolate topping.
The Chocolatey Crown
The final layer of melted chocolate is the crowning glory of these bars, adding that essential rich, decadent finish.
6. Melt the 12 ounces of semi-sweet chocolate chips. You can do this in a microwave-safe bowl in 30-second intervals, stirring well after each interval, until the chocolate is smooth and fully melted. Alternatively, you can use a double boiler method for a more controlled melt. Once melted, carefully pour the chocolate over the chilled peanut butter base. Using an offset spatula or the back of a spoon, spread the melted chocolate evenly to cover the entire surface of the base. Try to get it as smooth as possible for that polished look.
7. Once the chocolate is spread, return the dish to the refrigerator for at least 1-2 hours, or until the chocolate is completely set and firm to the touch. This allows the chocolate to harden properly, making for clean cuts.
Serving Your Masterpieces
When the bars are fully chilled and set, it’s time for the best part: cutting and enjoying! Lift the entire block of bars out of the pan using the parchment paper overhang. Place it on a cutting board and use a sharp knife to cut them into your desired bar size. For the cleanest cuts, you can warm your knife under hot water and wipe it dry between cuts. These Chocolate Peanut Butter Bars are perfect for dessert, a midday snack, or anytime you need a little sweet pick-me-up. They store beautifully in an airtight container in the refrigerator for up to a week. Enjoy every delicious bite!
Conclusion:
There you have it – a simple yet incredibly satisfying recipe for Chocolate Peanut Butter Bars! These bars are an absolute triumph of flavor and texture, combining the rich, decadent notes of chocolate with the irresistible creaminess of peanut butter in a perfectly balanced bite. They are deceptively easy to make, requiring minimal fuss and delivering maximum deliciousness. Whether you’re a seasoned baker or just starting out, I truly encourage you to give these Chocolate Peanut Butter Bars a try. They are guaranteed to become a fast favorite for yourself and anyone lucky enough to get their hands on them!
Serving Suggestions: These bars are fantastic on their own, of course. But they also make an excellent dessert served warm with a scoop of vanilla ice cream, or a delightful addition to a brownie sundae. They’re perfect for potlucks, bake snon-alcoholic ales, or simply as a sweet treat to enjoy with your afternoon coffee or tea.
Variations: Feel free to get creative! You can add a sprinkle of sea salt on top before the chocolate sets for a salted caramel effect, or fold in some chopped chocolate chips into the peanut butter layer for extra chocolatey goodness. Some chopped peanuts sprinkled on top would also add a lovely crunch.
Frequently Asked Questions:
Can I make these bars ahead of time?
Absolutely! These Chocolate Peanut Butter Bars store beautifully. Once completely cooled and set, you can cut them into squares and store them in an airtight container at room temperature for up to 3-4 days, or in the refrigerator for up to a week. They actually taste even better after a day or two, allowing the flavors to meld.
What kind of peanut butter should I use?
For the best texture and flavor, I recommend using creamy, regular peanut butter (not natural peanut butter that separates easily). The oil content in standard peanut butter helps create that wonderfully smooth and fudgy texture we’re going for in these bars.
Chocolate Peanut Butter Bars
A delicious and easy no-bake bar with a rich chocolate and peanut butter flavor, made with a crunchy cracker crust.
Ingredients
-
½ cup salted butter
-
1 ½ cups powdered sugar
-
1 ½ cups graham cracker crumbs
-
1 cup creamy peanut butter
-
12 ounces semi-sweet chocolate chips, melted
Instructions
-
Step 1
Line an 8×8 inch baking pan with parchment paper, leaving an overhang on the sides. -
Step 2
In a medium bowl, melt the salted butter. Stir in the powdered sugar until well combined. -
Step 3
Add the graham cracker crumbs and creamy peanut butter to the butter and sugar mixture. Mix until a dough-like consistency forms. -
Step 4
Press the mixture evenly into the prepared baking pan. -
Step 5
Pour the melted semi-sweet chocolate chips over the peanut butter layer and spread evenly to cover. -
Step 6
Refrigerate for at least 2 hours, or until the chocolate is firm. -
Step 7
Lift the bars out of the pan using the parchment paper overhang. Cut into squares and serve.
Important Information
Nutrition Facts (Per Serving)
It is important to consider this information as approximate and not to use it as definitive health advice.
Allergy Information
Please check ingredients for potential allergens and consult a health professional if in doubt.