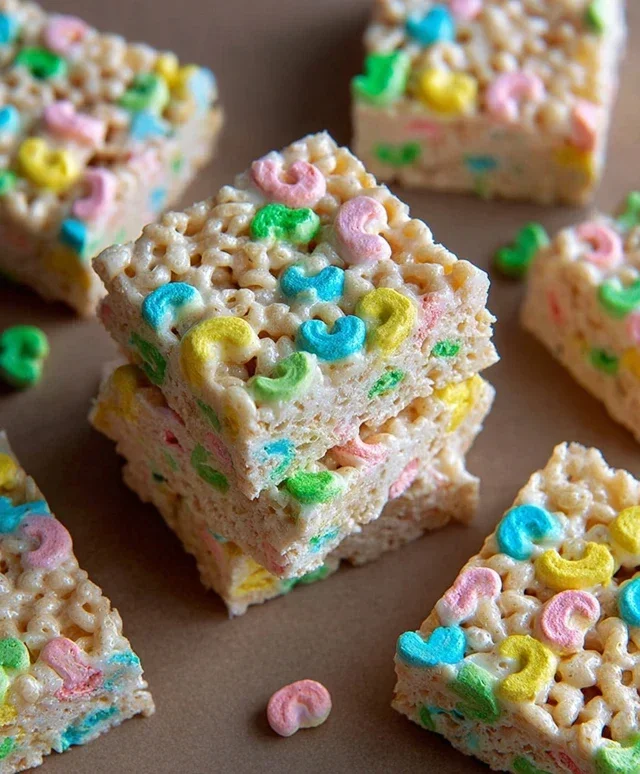
Lucky Charms Rice Krispie Treats-Easy Fun Recipe
Lucky Charms Rice Krispie Treats are more than just a nostalgic dessert; they’re a vibrant explosion of childhood joy and pure, unadulterated happiness. Who doesn’t have a soft spot for those magically colorful marshmallows and the satisfying crunch of a perfectly gooey Rice Krispie treat? This iconic duo, brought together, creates something truly special. It’s the ultimate comfort food, a delightful throwback to simpler times that instantly brings a smile to your face. What makes these Lucky Charms Rice Krispie Treats stand out is the playful addition of those beloved, whimsical marshmallows, transforming an already beloved classic into a dazzling, irresistible masterpiece. Get ready to relive your favorite childhood memories, one delightful bite at a time!

Lucky Charms Rice Krispie Treats
Get ready to bring a little magic to your kitchen with these utterly delightful Lucky Charms Rice Krispie Treats! We’re taking the classic, nostalgic comfort of a homemade Rice Krispie treat and infusing it with the whimsical charm and colorful fun of Lucky Charms. These treats are incredibly easy to make, making them perfect for a fun family activity, a quick party dessert, or just when you need a serious dose of childhood joy. Imagin extracte the satisfying crunch of the Rice Krispies, the gooey sweetness of the melted marshmallows, all punctuated by the delightful chegrape juicess and fruity bursts of flavor from those iconic marshmallow bits in Lucky Charms. It’s a flavor and texture combination that’s simply irresistible.
These treats aren’t just delicious; they’re a visual spectacle too! The vibrant colors of the Lucky Charms marshmallows scattered throughout the golden-brown treat create a truly festive and fun presentation. They’re guaranteed to be a hit with kids and adults alike. So, let’s gather our ingredients and embark on this sweet adventure!
Ingredients:
Making the Magic Happen
Now that we have all our ingredients ready, it’s time to get down to the fun part: making these incredible treats. Don’t worry if you’ve never made Rice Krispie treats before; this recipe is incredibly forgiving and designed for success. The key is to work relatively quickly once the marshmallows are melted, as they tend to firm up as they cool.
1. Prepare Your Pan: First things first, let’s get our pan ready. Lightly grease a 9×13 inch baking pan with butter or cooking spray. You can also line it with parchment paper, leaving some overhang on the sides to make it easier to lift the treats out later. This step is crucial to prevent our delicious treats from sticking to the pan, ensuring a clean release and easy serving. A well-greased pan means less mess and more enjoyment!
2. Melt the Base: In a large pot or Dutch oven over low heat, melt the ½ cup of unsalted butter. Once the butter is completely melted and shimmering, add the 16 ounces of marshmallows to the pot. Stir gently and continuously. The goal here is to melt the marshmallows completely without browning them. Low heat is your best friend during this stage to achieve a smooth, gooey texture. Keep stirring until the marshmallows are mostly melted and smooth, with only a few small lumps remaining. You want a creamy, uniform base.
3. Infuse with Flavor: Once the marshmallows are mostly melted and smooth, remove the pot from the heat. It’s time to add the flavor enhancers! Stir in the ½ teaspoon of salt and the 1 teaspoon of vanilla extract. The salt helps to cut through the sweetness and enhance the overall flavor of the treats, while the vanilla extract adds a lovely depth of aroma and taste. Stir them in until they are fully incorporated into the marshmallow mixture. This is where you really start to build the delicious foundation of your treats.
4. Combine the Cereals: Now for the star players! Gently add the 1 cup of Rice Krispies cereal and the 6 cups of Lucky Charms cereal to the melted marshmallow mixture. Using a spatula or a large spoon, gently fold the cereals into the marshmallow mixture. The trick here is to coat the cereal evenly without crushing it. Overmixing can lead to a tougher, less airy treat. Work quickly but gently to ensure every piece of cereal and every precious Lucky Charm marshmallow is coated in the gooey marshmallow goodness. The mixture will start to thicken as it cools, so this step needs to be done efficiently.
5. Press and Set: Once the cereals are well coated, immediately transfer the mixture to your prepared 9×13 inch baking pan. Using a lightly buttered spatula or your hands (lightly buttered to prevent sticking!), gently press the mixture evenly into the pan. Avoid pressing down too firmly, as this can make the treats dense. A light, even press is perfect. You want them to hold their shape but still be delightfully chewy. Let the treats cool completely at room temperature for at least 30 minutes to an hour before cutting. Rushing this step will result in a sticky, crum extractbly mess. Once cooled, cut into squares or whatever fun shapes you desire!
Enjoy your homemade Lucky Charms Rice Krispie Treats! They are best enjoyed fresh, but can be stored in an airtight container at room temperature for a few days. Get ready for smiles all around!
Conclusion:
So there you have it – a simple yet incredibly rewarding recipe for Lucky Charms Rice Krispie Treats! These aren’t just any Rice Krispie treats; they’re a burst of nostalgic fun and vibrant color, making them perfect for parties, holidays, or just a delightful afternoon pick-me-up. The magic of this recipe lies in its simplicity, allowing the iconic marshmallowy goodness of Rice Krispies to meld perfectly with the chewy, fruity surprises of Lucky Charms cereal. I find them to be incredibly versatile, bringin extractg smiles to kids and adults alike.
For serving, these treats are fantastic on their own, but you can elevate them further by drizzling them with a little melted white chocolate or a sprinkle of edible glitter for an extra touch of sparkle. Looking for variations? You could try incorporating other colorful candies, like M&M’s, for a different flavor and texture profile. Or, for a more grown-up twist, a hint of vanilla extract or even a touch of sea salt can add an interesting complexity. I wholeheartedly encourage you to give these Lucky Charms Rice Krispie Treats a try! They are a guaranteed crowd-pleaser and a wonderfully cheerful baking project.
Frequently Asked Questions:
Can I make these treats ahead of time?
Absolutely! These Lucky Charms Rice Krispie Treats are best made a few hours before you plan to serve them to allow them to set properly. They can be stored in an airtight container at room temperature for up to 2-3 days, making them an excellent make-ahead option for events.
How can I prevent my treats from being too sticky?
A common pitfall! The key is to lightly grease your hands, spatula, and the pan with a little butter or non-stick spray before pressing the mixture. Also, avoid over-mixing once the marshmallows are melted; gently combine and press.
What’s the best way to cut them into neat squares?
Once your treats have set, use a sharp knife that you’ve also lightly greased or run under hot water. Wipe the knife clean between cuts if needed. This will help you achieve clean, crisp edges for perfectly portioned squares.
Lucky Charms Rice Krispie Treats
A fun and colorful twist on classic Rice Krispie treats, loaded with the magic of Lucky Charms.
Ingredients
-
16 ounces marshmallows
-
½ cup unsalted butter
-
½ teaspoon salt
-
1 teaspoon vanilla extract
-
1 cup Rice Krispies cereal
-
6 cups Lucky Charms cereal
Instructions
-
Step 1
Grease a 9×13 inch baking pan with butter or non-stick spray. -
Step 2
In a large pot over low heat, melt the butter. -
Step 3
Add the marshmallows and stir until completely melted and smooth. -
Step 4
Remove from heat and stir in the salt and vanilla extract. -
Step 5
Add the Rice Krispies cereal and stir until well coated. -
Step 6
Gently fold in the Lucky Charms cereal. -
Step 7
Press the mixture evenly into the prepared baking pan using a buttered spatula or your hands. -
Step 8
Let cool completely before cutting into squares.
Important Information
Nutrition Facts (Per Serving)
It is important to consider this information as approximate and not to use it as definitive health advice.
Allergy Information
Please check ingredients for potential allergens and consult a health professional if in doubt.