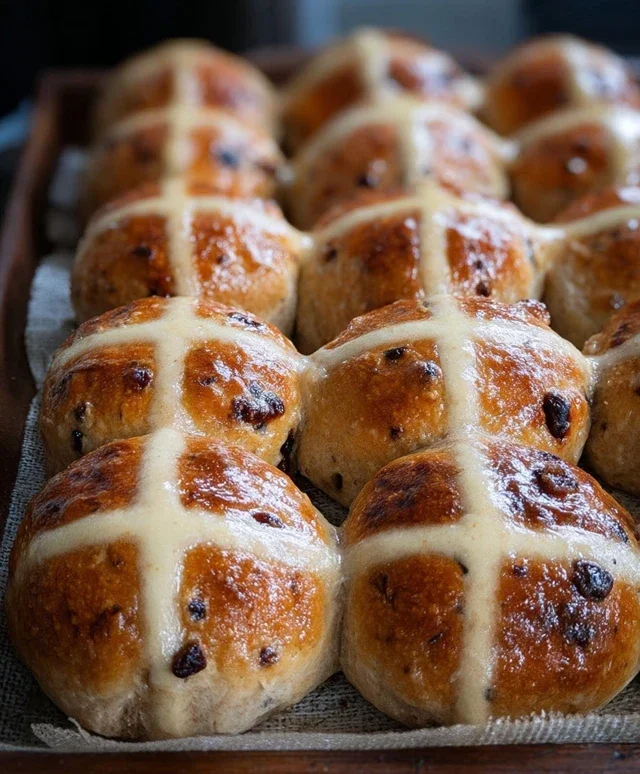
Easy Traditional Hot Cross Buns Recipe
How to Make Traditional Hot Cross Buns brings a comforting aroma and a taste of cherished tradition right into your kitchen. There’s something undeniably magical about these spiced, fruity, and slightly sweet buns, especially when the scent of cinnamon and cloves fills the air. For generations, hot cross buns have been a quintessential part of Easter celebrations, symbolizing the end of Lent and ushering in the joyous spirit of renewal. What truly makes these buns special is their unique combination of warming spices, plump dried fruits, and that signature cross baked or piped on top. They’re more than just a treat; they’re a warm hug, a delicious connection to the past, and a delightful way to share a moment with loved ones.
Get ready to bake a batch of the most delightful traditional hot cross buns you’ve ever tasted!

How to Make Traditional Hot Cross Buns
There’s a certain magic that fills the kitchen when the aroma of warm spices and sweet dough wafts from the oven. Hot Cross Buns, with their iconic cross and delightful chew, are a springtime tradition that brings comfort and joy. While they might seem a little intimidating, making them from scratch is incredibly rewarding and surprisingly manageable. Follow these steps, and you’ll be enjoying your own perfectly spiced, delightfully tender hot cross buns in no time.
Ingredients:
Making the Dough
1. Activate the Yeast: In a large mixing bowl, combine the warmed milk, instant dried yeast, and 4 tablespoons of sugar. Give it a gentle stir. Let this mixture sit for about 5-10 minutes. You’re looking for it to become frothy and bubbly. This shows that the yeast is alive and ready to work its magic, creating that beautiful rise in your buns. If it doesn’t froth, your yeast might be old, or the milk might have been too hot or too cold, so you’ll need to start again.
2. Combine Dry Ingredients: In a separate, larger bowl (or the bowl of your stand mixer if you’re using one), whisk together the 4 cups + 2 tablespoons of all-purpose flour, salt, cinnamon, allspice, and ground gin extractger. This ensures all the spices are evenly distributed throughout the dough, giving each bun that signature warm flavor.
3. Bring it All Together: Once the yeast mixture is frothy, add it to the dry ingredients. Then, pour in the melted unsalted butter and the two beaten, room-temperature eggs. Using a wooden spoon or the dough hook attachment on your stand mixer, begin extract to mix everything together. It will seem a bit shaggy and sticky at first. Keep mixing until a cohesive dough starts to form.
4. Knead the Dough: Turn the dough out onto a lightly floured surface. Now comes the kneading! This is a crucial step for developing the gluten in the flour, which gives the buns their chewy texture. Knead the dough for about 8-10 minutes, or until it becomes smooth, elastic, and springs back when you gently poke it. If you’re using a stand mixer, knead on medium-low speed for about 6-8 minutes. The dough should be soft and slightly tacky, but not sticking excessively to your hands or the surface. Add a tiny bit more flour if it’s too sticky, but be careful not to add too much, as this can make the buns tough.
5. First Rise (Proofing): Lightly grease a clean bowl with a little oil or butter. Place the kneaded dough into the bowl, turning it to coat all sides. Cover the bowl tightly with plastic wrap or a damp kitchen towel. Leave it in a warm place to rise for about 1 to 1.5 hours, or until it has doubled in size. This is the dough’s first chance to relax and develop flavor and lightness.
Shaping and Second Rise
6. Incorporate the Fruit: Once the dough has doubled, gently punch it down to release the air. Turn it out onto a lightly floured surface and knead in the dried currants or raisins. Distribute them as evenly as possible. If you’re finding it hard to get them to mix in, you can add them during the last few minutes of kneading.
7. Shape the Buns: Divide the dough into 12 equal portions. Roll each portion into a smooth ball. You can place these balls onto baking sheets lined with parchment paper, leaving a little space between them as they will expand. For a really professional look, you can use a kitchen scnon-alcoholic ale to ensure each bun is the same weight.
8. Second Rise (Proofing): Cover the shaped buns loosely with plastic wrap or a clean kitchen towel. Let them rise again in a warm place for another 30-45 minutes, or until they look puffy and have nearly doubled in size. This second rise is vital for a light and airy texture.
Baking and Decorating
9. Bake the Buns: Preheat your oven to 375°F (190°C). Bake the buns for 15-20 minutes, or until they are golden brown on top and sound hollow when tapped on the bottom. Keep an eye on them, as oven temperatures can vary.
10. Prepare the Cross Paste: While the buns are baking, prepare the paste for the crosses. In a small bowl, whisk together the ⅓ cup of all-purpose flour, 2 tablespoons of sugar, and just enough warm water to form a smooth, thick paste. It should be the consistency of toothpaste – thick enough to hold its shape, but runny enough to pipe.
11. Decorate and Glaze: Once the buns are baked, carefully remove them from the oven. While they are still warm, you can brush them with a simple glaze for extra shine. For this, whisk together the 2 tablespoons of powdered sugar with a tiny bit of warm water or milk until you have a thin, drizzling consistency. Brush this glaze over the tops of the warm buns. Immediately after glazing, pipe the cross paste onto the top of each bun using a piping bag with a small round tip, or a small plastic bag with a corner snipped off. The paste will firm up as it cools.
Enjoy your beautiful, homemade Hot Cross Buns! They are best enjoyed warm, perhaps with a generous slather of butter.
Conclusion:
And there you have it – your guide to crafting the most delicious, traditional hot cross buns right in your own kitchen! This recipe truly shines because it balances ease of preparation with authentic, deeply satisfying flavour. The sweet, spiced dough, studded with plump dried fruits, offers a delightful chew that’s perfectly complemented by that iconic cross. They are a joy to make and even more of a pleasure to eat.
These warm, fragrant buns are utterly divine served fresh from the oven, split and generously buttered. For a more elaborate treat, try them with a dollop of clotted cream, a drizzle of honey, or even a thin layer of jam. If you’re feeling adventurous, consider adding a pinch of ground gin extractger to the dough for an extra zing, or perhaps swap some of the mixed peel for chopped candied orange peel. Don’t be afraid to experiment and make these hot cross buns your own!
I wholeheartedly encourage you to give this recipe a try. The aroma that fills your home as these bake is simply magical, and the taste of a homemade hot cross bun is unparalleled. It’s a rewarding baking project that’s sure to impress, whether you’re enjoying them as a breakfast treat or sharing them with loved ones this Easter.
Frequently Asked Questions:
Why do my hot cross buns have a faint non-non-alcoholic alternativeic smell?
This is often due to the dried fruit! Many bakers soak their fruit in a little rum extract or brandy extract overnight to plump them up and infuse them with flavour. If you’d prefer to avoid this, simply soak the fruit in warm water or orange juice instead.
Can I make the dough ahead of time?
Yes! You can prepare the dough up to the point of its first rise, then cover it tightly and refrigerate it overnight. Let it come to room temperature for about an hour before proceeding with shaping and proofing.
What’s the best way to store leftover hot cross buns?
Once cooled completely, store them in an airtight container at room temperature for up to 3 days. For longer storage, you can freeze them individually wrapped in plastic wrap and then in a freezer bag. Reheat gently in the oven or a toaster.
Traditional Hot Cross Buns
Learn how to make classic, fluffy hot cross buns with a perfect blend of spices and dried fruit. These are a delightful treat for Easter or any time of year.
Ingredients
-
1 cup (236 ml) milk, warmed to 100–115 °F (38 – 46°C)
-
2 teaspoons instant dried yeast
-
4 tablespoons sugar
-
4 cups + 2 tablespoons (525 grams) all-purpose/plain flour
-
1 teaspoon salt
-
1 teaspoon ground cinnamon
-
1 teaspoon allspice
-
¼ teaspoon ground ginger
-
1 cup (150 grams) dried currants or raisins
-
6 tablespoons unsalted butter, melted
-
2 large eggs, beaten (room temperature)
-
⅓ cup (46 grams) all-purpose/plain flour
-
2 tablespoons sugar
-
Warm water (for glaze)
-
2 tablespoons powdered/confectioners sugar (for glaze)
Instructions
-
Step 1
In a small bowl, combine the warmed milk, yeast, and 4 tablespoons of sugar. Let it sit for 5-10 minutes until foamy. -
Step 2
In a large bowl, whisk together the 4 cups + 2 tablespoons of flour, salt, cinnamon, allspice, and ginger. -
Step 3
Add the foamy yeast mixture, melted butter, and beaten eggs to the dry ingredients. Mix until a shaggy dough forms. Stir in the dried currants or raisins. -
Step 4
Turn the dough out onto a lightly floured surface and knead for 8-10 minutes until smooth and elastic. Place the dough in a greased bowl, cover, and let rise in a warm place for 1 hour, or until doubled in size. -
Step 5
Punch down the dough and divide it into 12 equal portions. Shape each portion into a ball and place them on a baking sheet lined with parchment paper. Cover and let rise for another 30 minutes. -
Step 6
Preheat oven to 400°F (200°C). Bake for 18-20 minutes, or until golden brown. -
Step 7
While the buns are baking, prepare the glaze. In a small bowl, mix the ⅓ cup flour, 2 tablespoons sugar, and enough warm water to create a thick paste. -
Step 8
Once the buns are baked, let them cool slightly on a wire rack. Dip the tips of the buns into the flour paste or pipe crosses onto them. -
Step 9
For a sweet glaze, mix the powdered sugar with a little warm water until smooth, and brush over the warm buns.
Important Information
Nutrition Facts (Per Serving)
It is important to consider this information as approximate and not to use it as definitive health advice.
Allergy Information
Please check ingredients for potential allergens and consult a health professional if in doubt.